
AMD Sapphire Nitro+ RX 580 8GB Limited Edition Mining Rig Tutorial – 190 Mh/s
- Like
- Digg
- Del
- Tumblr
- VKontakte
- Buffer
- Love This
- Odnoklassniki
- Meneame
- Blogger
- Amazon
- Yahoo Mail
- Gmail
- AOL
- Newsvine
- HackerNews
- Evernote
- MySpace
- Mail.ru
- Viadeo
- Line
- Comments
- Yummly
- SMS
- Viber
- Telegram
- Subscribe
- Skype
- Facebook Messenger
- Kakao
- LiveJournal
- Yammer
- Edgar
- Fintel
- Mix
- Instapaper
- Copy Link

Here is another mining rig, this time i am using the new Sapphire Nitro+ RX 580 8GB Limited Edition GPUs. I must say that this is one of the best mining rig i ever build, it worked with no crashes or any other issues from the beginning, it is like a plug and play machine, power up and forget about it 🙂
As you can see for this mining rig i use dual PSU, not because of high power consumption or anything related to that, since with this crypto mining rush is very hard to find other components too not only GPUs.. so i was looking to get EVGA 1300w PSU or any 1300w 80+ Gold certified PSU and i ended up with 2x EVGA 750w 🙂 which works great!
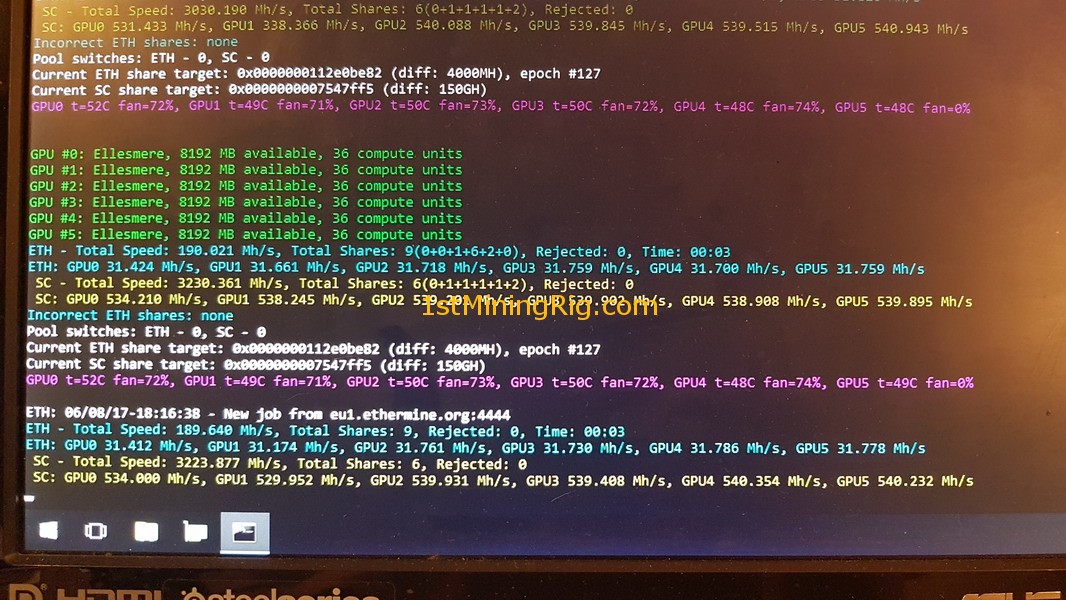
Hashrate results: Ethereum 190 Mh/s + Siacoin 3,230 Mh/s
Let’s get started!
Hardware used
- GPU: Sapphire Radeon NITRO+ RX 580 8GB LIMITED EDITION 11265-00-40G
- Motherboard: ASRock H81 PRO BTC R2.0 LGA 1150
- CPU: Intel Celeron G1840 Processor
- RAM: Kingston HyperX Fury 4GB 1333MHz DDR3
- SSD: SanDisk SSD PLUS 120GB
- PSU: 2x EVGA SuperNOVA 750 G2, 80+ GOLD 750W, Fully Modular or EVGA SuperNOVA 750 G3
- Dual PSU Adapter: Add2PSU Multiple Power Supply Adapter
- USB Risers: Ver 006c PCI-E 1X To 16X Riser Card 164P With 6 Pin To SATA Power Supply USB 3.0
- Power Button: 2 Pin SW PC Power Cable on/off Push Button ATX Computer Switch Wire 45cm
- Energy Meter: TP-Link HS110 Smart Plug w/ Energy Monitoring
- Frame: https://1stminingrig.com/product/aluminum-mining-rig-open-air-frame/
If this is your first time assembling a PC, check this tutorial: Tutorial: Ethereum Mining Rig Part 3 (building the rig)
A) Motherboard – connect the following parts
- CPU and Cooler
- Memory RAM
- SSD
- Power Button

B) PSU – connect cables and dual psu adapter
- PSU 1: 3x VGA Cables, 3x SATA Cables, 1x Motherboard 24 Pin Cable, 1x CPU Cable, 1x Molex Cable
- PSU 1: Connect 1x Motherboard 24 Pin and 1x CPU Cables to motherboard
- PSU2: 3x VGA Cables, 3x SATA Cables, 1x Motherboard 24 Pin Cable
- Dual PSU Adapter: Connect Molex cable to ADD2PSU adapter from PSU 1 and then attach the Motherboard 24 Pin Cable to ADD2PSU from PSU 2


C) GPU and USB Risers
- 1x GPU
- 1x USB Risers
- First connect 1x USB Riser cables (USB 3.0, 6 PIN to SATA) , then connect it with SATA cable from PSU 1, plug USB 3.0 in to 16x PCIe slot
- Attach the GPU to USB riser and then connect it with 8 Pin (only) VGA cable


- Follow this guide: Best Windows Setup, Configuration, Tweaks For Mining
- Install AMD Drivers (combined): How to Run 6 or More RX 570 / RX 580 GPUs on Windows 10
- Follow this tutorial: Best BIOS ROM for Sapphire Nitro+ RX 580 8GB Limited Edition Hynix Memory 31.5+ Mh/s
- repeat this step with all GPUs one by one only
- Now that the optimized BIOS has been flashed on all 6 GPUs, shut down the rig
- Plug in all GPUs and USB Risers
- check point 5


- Connect both PSUs power cables to wall plug
- PSU 2: Turn it on by switching the button from 0 to 1
- PSU 1: Turn it on by switching the button from 0 to 1
- Press power button to start the PC, both PSUs will start almost at the same time
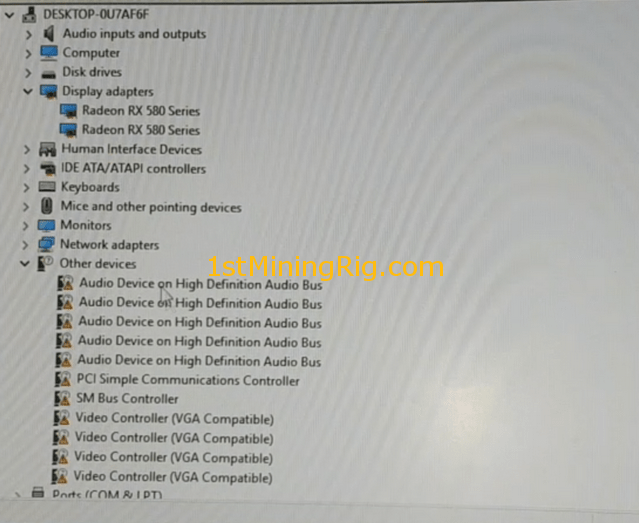
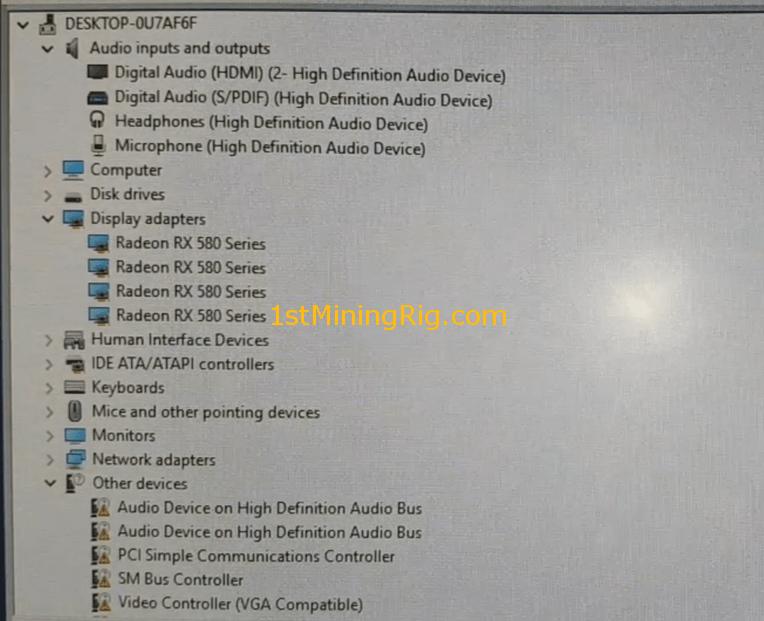
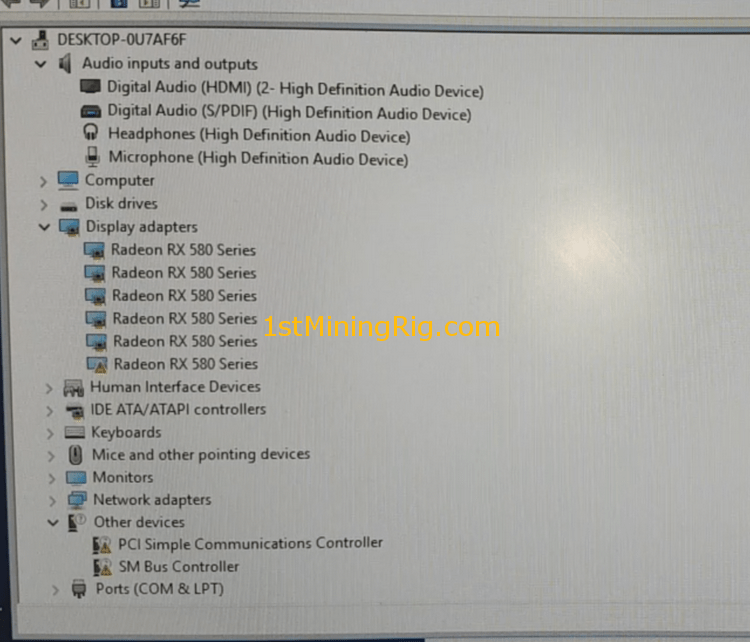
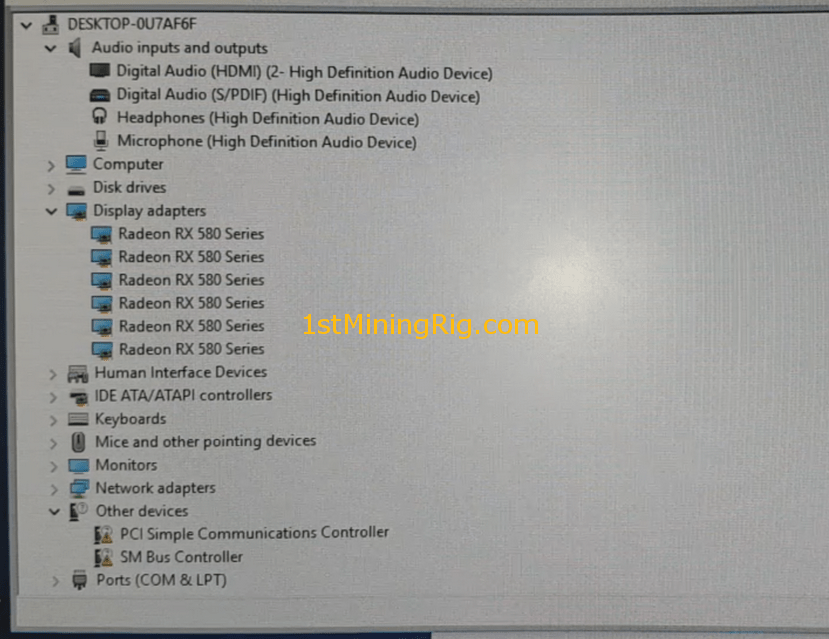
- When windows is booted wait for few minutes to discover all 6 GPUs, you can check in device manager when all GPUs are installed
- Download Claymore: https://mega.nz/#F!O4YA2JgD!n2b4iSHQDruEsYUvTQP5_w
- Extract archive contents on desktop
- If you want to mine Ethereum only, create a new text document like ETH.txt and paste the following code: EthDcrMiner64.exe -epool eu1.ethermine.org:4444 -ewal <Your_Ethereum_Address>.<RigName> -epsw x -dcri 1 , then rename ETH.txt to ETH.bat
- For dual mining Ethereum + Siacoin create a new text document and name it ETH+SIA.txt and add the following code: EthDcrMiner64.exe -epool eu1-etc.ethermine.org:4444 -ewal <Your_Ethereum_Address>.<RigName> -epsw x -dpool stratum+tcp://sia-eu1.nanopool.org:7777 -dwal <Your_Siacoin_Address>.<RigName> -dcoin sia -dcri 14,19 or 30
- for more details on how setup the miner or how to mine ZCash and Monero check this guide: https://1stminingrig.com/best-bios-rom-sapphire-nitro-rx-580-8gb-limited-edition-hynix-memory-31-5-mhs/
The results!
- Ethereum hashrate 190 Mh/s
- Siacoin hashrate 3,200 Mh/s
- GPU clock 1200 (claymore line: -cclock 1200)
- GPU memory clock 2250 (claymore line: -cclock 1200)
- Undervolt claymore line -cvddc 850 -mvddc 850
- Full line: EthDcrMiner64.exe -epool eu1-etc.ethermine.org:4444 -ewal <Your_Ethereum_Address>.<RigName> -epsw x -dpool stratum+tcp://sia-eu1.nanopool.org:7777 -dwal <Your_Siacoin_Address>.<RigName> -dcoin sia -dcri 30 -cclock 1200 -mclock 2250 -cvddc 850 -mvddc 850
- Power draw 1020w (PSU 1 519w & PSU 2 504w)


have fun! 🙂
[cp_modal display="inline" id="cp_id_e9e92"][/cp_modal]


Awesome speeds!
connect it with 8 Pin (only) VGA cable..why 8pin only? is it ok?
yep.. check images..
whats the use of 6 pin?
good when overclocking you clock
Please check my image. I always connect PERIF1 https://uploads.disquscdn.com/images/ac2472cddbd3b2c3ef43c41e99e5f887ddd62ec8cee73b18e34d396bb7504edc.jpg Cable to 2 lots on image. is it necessary?
no when using powered risers.
Thanks. I will remove it. It was connected without problem 🙂
What is the difference between the regular RX 580 cards and the limited adition? I have 6 REGULAR AMD SAPPHIRE NITRO+ RX 580 8GB MINING RIG , this guide will fit them as well? or I should change something?
https://uploads.disquscdn.com/images/5fb95b56f5750a99390a9dc72e3b9ad8c9dd6882b1d50a6e9d9b7e533a11d287.jpg
send them to me !! :))
not really a big difference, both are very good
What do you guys think it worth the most to mine today with the 6 RX 580 cards mining rig?
https://goo.gl/aZ8V5b
Great write ups and a great resource for novice and expert. I was wondering if you could clarify something in your write up?
GPU clock 1200 (claymore line: -cclock 12o0)
GPU memory clock 2250 (claymore line: -cclock 1200)
Undervolt claymore line -cvddc 850 -mvddc 850
-cclock 12o0 -cclock 1200 -cvddc 850 -mvddc 850
I am using triXX but would like the adjustments to be made in Claymore. I am using the settings 1150 /2150 and -100mV on my Nitro+ 580’S 4GB and getting 30.5.
Why do you use an “o” instead of a zero (0) ? why are there 2 cclock settings? and do voltage settings always match?
Any help is most appreciated.
Hi, yes sorry about that.. i just edited the miss typed text.. not really sure how i missed that 🙁
hey
is there an issue in your post by the claymore lines:
GPU clock 1200 (claymore line: -cclock 1200)
GPU memory clock 2250 (claymore line: -cclock 1200)
should this at memory clock not be mclock ?
greetz Alex
ps i ordered today the special edition too but its completely blue with blue led fans 😉
hope it works together with my 2 x rx 470 nitro+
and on mclock fill in 2250 not 1200 or ?
when I’m wrong sorry for that
Yes, sorry :/ didn’t noticed it.. i just changed it now.. thanks!
Hello
Unfortunately i have this GPU available to buy .
It is alright to be used in this configuration you have done?
1)HIS Radeon RX 580 IceQ X² OC, 8GB GDDR5, DVI, HDMI, 3x DisplayPort
2)Gigabyte Aorus Radeon RX 580 XTR 8G, 8GB GDDR5, DVI, HDMI, 3x DisplayPort
I would appreciate your help to decide .
Hmm between this two ill go with the Aorus one..
Hello. Do you know where I can buy a lot of this graphic cards?? I can’t find anywhere.
Not really 🙁 but have you tried to check locally if someone is selling the new p106 mining ? Those can be sold by 100 pcs only.. https://1stminingrig.com/msi-nvidia-p106-100-mining-performance-review/
So this is the best setup right now for ETH/ETC? If so then im starting to build it
What version of windows did you use? Tia
@ciprianpt:disqus Are you also writing here, or are they just copying(stealing) ? LINK REMOVED …. some of their articles seem very very similar to yours?
Yep, they just steal my work :/ will check that and will try to report them.. thanks! 🙁 they use spinning software for synonyms..
I’m not sure if they can remove comments from Disqus, but we could start making references there to the original articles here … I would be happy to do that once in a while 🙂
They can moderate the comments and delete or ban by ip.. but we can try that 🙂
Hi, I have another question:
– I have this HX1200i CORSAIR power supply, will it be good for this RX580 6 cards gear?
Umm will be at its limit, you will have to make a good undervolt, ill sugest a 1300w psu or two of 750w
hey there,
ive bought 4 of the sapphire rx 580 limited edition but another edition the gpu’s are completely blue with blue led fans
on completely standard i only get 19 mh per card is that normal and can i do this tut for this graphic cards too ?
greetz alex
I guess you have the special edition not the limited edition 😀
Ok 😉
Can i do this tutorial for my GPU s too ?
Don’t think so.. you better edit their original bios..
I used the bios provided in the tutorial to flash a nitro+ rx580 special edition hynix memory and it went from 19mh/s to 27.5mh/s. But I am not having any luck with the clocking when i use claymore -cclock 1200 -mclock 2250 -cvddc 850 -mvddc 850 the system crashes I tried clocking with msi afterburner 1130/2250 -96mV and it is stable but gives me just 1 mh/s more. Any suggestions?
*Update: Just got very stable 29.8/9mh/s with -cclock 1200 -mclock 2210 -cvddc 850 -mvddc 850 but again would appreciate suggestions :). Will try to edit the original bios on one of my other cards and will get back with results and if it made any difference.
*Update2: I moded the silent bios by copying both 1:1750 to 1:2000 and 2:1750 to 2:2000 and it was a disaster I got just 20mh/s with the same clocks in claymore as above.
Hi, maybe there is one card that cant handle the undervolt.. try to change -cvddc 850 -mvddc 850 to -cvddc 875 -mvddc 875 or -cvddc 850 -mvddc 875… also add -wd 0 to see which card is crashing and mining with 0.00 Mh/s
I was actually testing on one card at a time and this behavior was common to all of them. I will try what you suggested. Also one out of the 6 cards gets the driver to crash and then freezes and I am testing the rig with the other 5 and it runs stable at 29.8mh/s could this possibly be solved by decreasing the undervolt?
I have the same cards. What is your best setting?
cclock 1200 mclock 2210 voltages at 875 all set in claymore. Are you currently getting 30.3, I was getting 30.5 with increased DCRI in claymore but at the current epoch I am only getting 175 MH/s, waiting for the new AMD drives that should be fixing this.
What is your power consumption in GPU-Z and wall???
It is 76w in GPU-Z and about 120w per card from wall for total of 870w and it actually is cclock 1210 mclock 2210. my hashrate dropped dropped to 172.3 at epoch 139 I still haven’t applied the new drivers but I will do it tomorrow to see how to power usage increases.
I installed the new amd beta driver and i got to 185MH/s from 172MH/s eth only mining. My setting are 1130 core clock, 2210 memory clock, 850 voltages for both memory and core, 880 watts power consumption. I used the AMD wattman for tweaking.
I tried 1200/2250 875/875 with the five cards on and it crashed again.
You are the man brother it runs stable at 1210/2210 875/875 with all the six cards at 30,1mh/s. Do you think I can play a bit more and increase the clocks and maybe the voltage a little bit for more hash rate. I am using 1200w seasonic PSU for which I’ve read people are running stable at 1400w draw, GPUZ shows about 80w draw per card. Or maybe keep all the cards at 850/850 and only the problematic one at 875/875. However you saved the day!!!
Hey.. yeah you can play with the settings.. have you tested the gpus one by one ?
Yeah, I spent hours testing and the final results i could get were:
1300/2210 no undevolt 30.7-8mh/s
1230/2210 875/875 30.5mh/s 80w in GPUz – currently mining seems stable.
I couldn’t squeeze more out of those cards. Anything above 2210 memory clock doesn’t seem to improve the hashrate after that value increasing the core clock increases it.
*Update one of the cards just crashed certainly the one that doesn’t handle the undervolt very well. I will try to set this one only to 885/885. For GPU 4 the value format would be -cvvdc 875,875,875,885,875,875 right?
Hi again, guys!
Maybe some of you had already noticed that hashrate is slowly decreases as epoch increases.
You can read info about it here:
http://www.legitreviews.com/ethereum-hashrate-performance-drop-might-coming-amd-nvidia-gpus-tested_195702
Share your experience. Maybe some of you already found solution (before AMD)?
Regards.
HI There,
I am creating a rig with GPU Nvidia 1080 Ti there will be overall 6 graphics cards right now and i will mine Ethereum. Please help me out. Am I on righ track? Thanks
Yep, 1080 Ti are very good 🙂
Thanks Mate <3
Hi @ci@ciprianpt:disqus
bought this new Sapphire Nitro+ RX 580 8GB from newegg last week w/ Hynix memory. unexpectedly, i only got 22Mhs stock whereas i am expecting 24-25stock on this GPU..
Brand Details: Sapphire Radeon NITRO+ RX 580 8GB GDDR5 PCI-E Dual HDMI / DVI-D / Dual DP w/ backplate (UEFI)
Model: 100411NT+8GL
tried to OC it using 1150 CC / 2150 mem but i could only reach 26Mhs stable rate. whenever i push the mem clock to 2200, the GPU crashes using Claymore 9.6
i copied strap 1:1750-> 1:2000 and 2:1750-> 2:2000 & 2250
some say the GPU might get brick if i push this GPU further. any idea or suggestion so i can maximize this GPU’s performance…
Hi, try copying the 2: only… that stands for Hynix mem.. let me know!
Hello guys, maybe i was lucky enough but i found settings for Gigabyte RX 580 Gaming 8G / GV-RX580GAMING-8GD
what i did:
replace 1750/2000/2250 with this timings (value is from this Ciprians BIOS from this post).
777000000000000022AA1C00B56A6D46C0551017BE8E060C006AE6000C081420EA8900AB030000001B162C31C0313F17
then flash bios, apply clock patch. reboot.
i used original utility from gigabyte, its name is gigabyte aeorus…
so i started claymore with default values and started modify the aeorus tool. i was able to have stable core 1150/ mem 2150(2200 gave me artifacts so i cho https://uploads.disquscdn.com/images/80019c4c179e5c78c3f5c9ea9152b4ac1d8dd873f1a90885618bae4367dd14a3.jpg sed just for sure safer 2150 instad of 2175) and mining at speed of 29,6Mhs. tested aprox 1hour and no problem
so enjoy,hope it helps, becvause i was struggling with gigabyte a LOT!
btw thank you Ciprian for timings:) U saved lot of folks out there:)
P.S. any recommendation for dual mining ethereum + LBRY?
Good job there 🙂 i prefer siacoin or decred…
I followed the same steps in the OC post. I also applied the changes Ti suggested to undervolt. My issue is that one card works just fine and hashes around 31Mh/s. Once I plug in 2 cards the system is really unreliable. One card hashes at 4Mh/s and the other around 29-30. Any idea on why it would do that. Both cards hash stable at 30-31+ by themselves in each of the 1×16 slots but when both plugged in I get crashes and one hashes at 4. I have been trying to get my rig up for a few days now and would greatly appreciate some help. I would be more than happy to toss some ETH your way if you can assist. I’m using RX580 8GB Nitro+ Hynix cards on Asus z270-P board. My GTX 1070 rig was a walk in the park compared to this guy 🙂
dont know if it helps you, but here is what i did:
1. instal windows only with one card in pcie then update windows to the latest version.
2. save bios, modify bios as above (copy paste that timings into 1750,2000,2250)
3. use ddu, remove driver,change card, repeat step 2 with card 2,3,4,xxx.
4. use ddu, turn off pc, turn on all cards, instal driver
5. open amd radeon driver tool in tool bar, go to gaming tab, top right click “add” and browse. search for your exe file in claymore folder click open. it will create new settings tab in radeon software. then click on second tab something like wattman. for each card change core frequency to dynamic and voltage control to manual.
use what you want but i enden stable on stage 6/7 with 1200mhz/1000mV and for frequency 2250mhz. click apply. this will automaticaly load this profile when you open claymore. so you dont need to put any settings for cards into calymore *bat file. anyway i had stabilty issue when i used settings into claymore bat file. yo dont need any other tool.
i am curently having core/mem/voltage 1200/2250/1000mV, stable with 30/30,5Mhs (2cards only so far), gpu-Z shows 105W for each card, stable for two days.
btw each card is different and they dont have same hasrate, difference is 0,5Mhs on same settings. first is worst and it gave “only” 29,9-30,1 and secornd is giving 30,3 all the time.
so hope it helps
Which driver version are you using? I read 17.4.3 is the best.
dont know if 17.4.3 is the best, i am using the latest one 17.7.1 downloaded from official amd.com site
Thx for the info. I tried following and I get around 30Mh/s for each but it reboots ever few minutes or graphics crash. Another weird thing is that GPU1 doesn’t show any temp or fan readings in claymore. I’m going to keep at this. I’ll post back what I find.
i recommend you start with 1150/2150 and test for stability. then increas mem with 25Mhz steps and test again till you find stable frequency. btw use HWINFO for mem errors. if you get any, drop frequency.
on 1125(50)/2150/925mV you should be ok with 29Mhs and 90W. try& and let me know
Hey guys I think it was the under-volting that was getting me crashes. I re-flashed the bios on my two cards back to stock and then only changed the mem strap as suggested above. I would still get crashes If I set clocks to core1200/mem2250. I tried just leaving them at the standard values and still was crashing. I then tried core1150/mem2150 and was stable but I could not get the temp readings to show in Claymore for the 2nd GPU. I just think there are some crazy driver issues with windows 10 right now. I downloaded SimpleMininOS. So far I’m running 30 minutes without crash, hashing just over 29Mh/s and 586Mh/s SC. I have the SMOS OC set at core1150/mem2150 Power Stage 7. I am okay running this now but once I hook up all 8 GPUs this thing is going to suck power. Why I was under-volting the cards were pulling about 100W. Now they pull about 180W. Currently 2 GPUs in my rig from the wall is pulling 500W. I’m a novice when it comes to under volting GPUs. How can I get the power usage down? If I wanted to undervolt but just not as extreme as @disqus_8LuuwzNkwH:disqus shows above what would that look like? Thanks again for all the help!
http://i.imgur.com/ekp5M5M.png
you can undervolt as much as you want in temrs what gpu allows you and stay stable. you can try going down from 1000mV to 800 with 25mV steps. test for half hour if stable and no hashrate drops often, you should be fine.then you can start increasing mem/core but as i said use hwinfo and watch for mem errors if there are any. also be aware that dual mining increase power consumption, so it could be related.
https://uploads.disquscdn.com/images/f9fad7a83f022964f08dda2f57a3bac00d1ad131c003f401c76aafe742ed0331.png https://uploads.disquscdn.com/images/9c4fd9f58707ce6edc3a2b1efe7506b022535e92e8068c9f26a307fa7e51eac5.png
You can see the differences here. The strange thing is that I made the undervolt changes but when I run a backup of the modded bios they are not reflected. Are these undervoltings recommended. Or should I leave stock like my bios shows and undervolt using Trixx or some other software type mod?
these strings represent “stage” in radeon software- wattman stage 1-7, you can play with it if you like, howver as i said above, i did all changes directly in readeon software, no tools/software are not needed. see how mine looked like, i dont have the latest version yet:)
now im using 1200/2250/1000mV – 105W in gpu-z and i recommend you to use 950-1000mV for all stages 3-7.
https://uploads.disquscdn.com/images/74abff2068ec3ee50d594ca27354dbef7688a03a6406f2b91f485f5d93e6e246.jpg
I would use that software but I can’t get more than 1 GPU to run in Windows. The second I add GPU #2 they system is glitchy or GPU2 Mines at like 4Mh/s. I have 2 running somewhat stable for over a day right now using SMOS (no undervolting). I just have a question. Is it normal in Claymore to get this occasionally. I would say I get it about once every few hours. I have tried dropping the clock on GPU0 by 75Mhz but still get it occationally. https://uploads.disquscdn.com/images/03cc05473d3981d7f6694165edf78aad7a9ce5c2c835649e8c513dd7a653b21b.png
Have you tried using hwinfo and watching for mem errors?? If you get mem errors it may cause rejected shares and of course drops in hashrate.
And each gpu is differend in term of quality…count with it, one can give more and be stable, second give less. So you can st core/mem diferently for each gpu or set less for all gpu’s. Unfortunately im still waiting for more cards to deliver,curently have two only so i cant advise you how to make it run all 6 in W10,however Ciprian has good article somewhere around, check for it.
I can’t even get 2 running in Windows at the moment so can’t really use any software. Currently running simple mining os. When I run just one card in Windows I have zero OC issues at the suggested numbers above. But Once I plug in 2 everything changes.
Is it normal in this mode HWinfo to show memory error ?
or I must have zero errors ?
Have you edited the bios like that ?
Hi there, would someone be noob friendly and tell me how to modify bios or miner setup to get the best hashpower? Im really noob and beginner and I cant find a post to explain step by step on what to do, please help me guys
I want to use dwarfpool not the one which is used in this post
here: https://1stminingrig.com/sapphire-nitro-rx-470-8gb-oc-bios-flash-mod-tutorial-hynix-samsung/
Thanks you Ciprian
Look, I want to get my first mining rig with 6x asus strix 570s 8gb (because DAG is getting heavy for 4gb)
I have to put about 3000$ for that because Im in Iran and no access to ebay or Amazon(and only asus strix is in stock here). And I should borrow thr money from my dad and give it back in 6-7 months.
I need to know is it possible? Can I get my money back in that time.
What coins can I mine with it to reach my 3000$?
Because they say eth might go pos and no mining possible after that, are there any alternatives?
I really like starting to mine but Im totally begginer in it
Would you please tell me how to use claymore miner with dwarfpool? Because I heard etherpool is solo and my rig wont be good to get solo shares.
Help me please.
Hi! Total noob at this. Why do you not use all the power supply pins on the GPUs? I see some open ones in your pictures…
If you are asking for the two molex ones on the PRO BTC H81 they should be plugged in if you are using unpowered risers. He is using powered raiser which draw power from the PSU and not from the MOBO. However I also use powered raisers but I choose to have them plugged in.
Wow, anyone following the cryptocurrency bloodbath these days?
I guess profitability is looking really sad these days
Can you tell me the frame dimensions using 2 psu ?
60x40x40 🙂
How many GPU’s did you use to get 190mh/s?
6 🙂
If I have 6 of the following GPU’s will I achieve 190mh/s?
Radeon RX 470 MINING Edition 8192MB GDDR5 PCI-Express Graphics Card
2048 Stream Processors, 1236MHz Boost Clock, 7000Mbs Memory Clocks, 8GB GDDR5.
Dear @Ciprian V. I bought 6x Sapphire RX570 OC 8GB Hynix for my mining rig, I tried many ways to mod bios of this cards but no results, with or without mods no more than 21mh/s in ETH. Can you giveme a little help?
https://mega.nz/#F!0E1igYya!s7afm9NBqz60hrE5hYo8wQ
Also can the setup above be used to mine litecoin?
That PSU is not available atm in my country. Can it be replaced by other 750w 80+ psu like CORSAIR RMX SERIES 750W MODULAR 80Plus GOLD? Will the Dual PSU Adapter work with that PSU?
Yep it will work..
Hi, I follow this guide with (Sapphire Radeon NITRO+ RX 570 4GB) and I have a mistake, if I leave in bios (use gpu board) I have problems with (atiflash: error reading from rom) and GPU-Z don’t detect GPUClock and Memory Clock, same as this
https://www.techpowerup.com/forums/threads/gpu-z-1-18-0-cpu-core-clock-0-memory-clock-0-cpu-temp.232171/
If I set in bios (pci gpu) and connect HDMI cable to Sapphire GPU, then atiflash and GPU-Z works fine, but when I try to set (OC) with SapphireTrixx my screen goes black..
Any suggestion? some bios changes? wrong drivers?
Thanks!
UPDATE: With (use gpu board) if I connect remotely with my laptop, then I can use GPU-z and AtiFlash… I Investigate a little more, any help will be welcomed!!
I’m wondering why you only used the 8 pin power connector on your vid cards and why you didn’t put the 8 + 6 on them.
not needed.. extra power consumption for nothing…
Hi Ciprian,
Will you add a tutorial for rx580 special edition 8g? ( 11265-21-20G )
It has higher stock values which can help us to get more hash.
Hey, those cards were not sold across Europe.. can’t get one to test.. only if you ship that to me, once tested ill can send it back 🙂
Hey, shipping fee can make a bomb effect on me 🙂 so what about sending you the original rom for editing? 🙂
I’ll suport shipping costs 🙂 email me the rom..
I have rx580 special edition 8g ( 11265-21-20G ) my max is 30.3 MH/s in 4xGPU have in wall 640W GPU-Z 100W any have better?
Hi, I have the same card RX 580 Special Edition 8G (11265 – 21 -41G) but getting only 18Mh/s. Any suggestions?
Hi,
first you must mod bios!
thx . modded the bios. installed the AMD beta driver and getting 174 on eth and 3000 on sia using 6 claymore 9.8. 125W per GPU
11265-21-20G What type of memory?
Hynix memory 😉
can you please share your bois? which bois are you using? because i can not get it more than 29.5Mh 🙁
What gpu card do you have?
I have exactly same gpu as you: rx580 special edition 8g with Hynix memory 🙂
I changed the parameters in the bios, because Wattman after the restart PC or claymores changed the voltage up. Give me your mail I will send you the bios!
https://uploads.disquscdn.com/images/4edfb923fc6e900706b2a46ce68d65d13499dcaae1626f8a612a5f770fab94a8.jpg
thanks ever so much man.. much appreciated 🙂
its: [email protected]
by the way.. I am new to this but have technical background.. do you recommend any tutorial or info where I can learn about how to mod bois of the different GPUs?
if you get the bios, please forward it to me as well to [email protected]
thanks
hi , could you please , send me the bios file mod for special edition rx580 8gb, [email protected]. thank you for your help
Dear Mr. Oznar, I’m very impressed by your great results, and I would like to kindly ask you if you could please share your bios file mod for special edition rx580 Hynix 8gb; my e-mail is [email protected]. Thank you so much!
4 x GPU – 30.7 Mh/s – 570W total at wall 😉 https://uploads.disquscdn.com/images/4ba70fcdd9b430ab8d5ae323e2472242ea901add608a8cad6e051a3836091329.jpg
Hi can you also send me that bios for rx580 special edition?
[email protected]
Ty
https://1stminingrig.com/best-bios-rom-for-sapphire-rx-580-8gb-special-edition-hynix-memory-31-mhs/
Hi Ciprian, good article ! Now mining edition gpu have been announced , do you think we should wait and buy them day 1 or still continue with “gaming” gpu ?
I’ll gonwith the mining edition ones
Hi Ciprian, very good article. My rig is based on your’s and it’s working quite fine. I’m a bit confused only. You wrote “Attach the GPU to USB riser and then connect it with 8 Pin (only) VGA cable” for mentioned above GPU card. I have connected my GPU (Sapphire Nitro+ RX580 8GB Hynix) with 8pin plug and 6 pin plug too. Does it mean I can unplug 6pin cable and power GPU with 8pin only? Does it mean I can use free 6pin plug comes from PSU to power riser with 6pin socket?
Yes, you can unplug the 6 pin cable.. 🙂
My rig has 6x AMD R9 290X GPU’s and I’m getting 196 MH/s (32.7 MH/s per card). I have my cclock =1170 and mclock= 1100. Try those numbers out on your rig and see what hashrate you get.
Hello,
getting 33.3 + 1030dcr on my non x 290
try 1181cc & 1430mc
what is your watt intake per gpu ?
https://uploads.disquscdn.com/images/626364064ab76f15304ca33e48566ec1e5e4e01e5e1eb2bc44e2a7885a060975.png
hi, what clocks ?
Hello Ciprian, I already bought 12x Sapphire Nitro+ RX 580 8gb, I am going to setup my first rig with 6x GPU. So now I need to buy other components. What you think about following parts:
Mobo: ASUS PRIME Z270-A
CPU: Intel Pentium Processor G4400 3.3 GHz
PSU: 1200w
RAM memory: 8gb
Or do you have any suggestion?
Thanks
Hey @goranergic:disqus m rx 500 consume a little more power than rx 400s, ill suggest 1300w PSU or two of 750w. As for the motherboard, that should be good, why not h81 pro btc ? 4gb rams are enough 🙂
Hi tnx for answer. Power supplier now is 1500w 🙂
About motherboard I really dont know why I didn’t take h81. I found a lot of suggestions for both motherboards. But anyway I have 12 cards so for second rig I will do with h81.
This is off topic: Does anyone know about S9 Antminer how to setup? Some video or something?
Thanks 🙂
Hi i am looking to buy a sapphire radeon rx 580 nitro+ limited edition 8192mb Please if you give me more information from where to buy them Thanks [email protected]
Hey guys,
I can only find AMD SAPPHIRE NITRO+ RX 580 8GB (not Limited Edition). Could you please tell me if the Limited Edition makes any difference? Should I wait or buy the “simple” ones?
Thanks!
Hi Ciprian,
Do you have any idea for Gigabyte Aorus RX580 8GB Hynix mem? I am not able to get past 29.0 to 29.3 Mh/s per card. Kindly help!
What timings have you used?
Hi. Will this guide be ok to follow for the ASUS RX 580 4GB OC cards?
No it wont work :/ maybe if you send me the bios i can work on it..
I’d be happy to do that! Where can I send you the bios?
here https://1stminingrig.com/contact/
Nothing received yet!
It wouldn’t send the message but it definitely doesn’t allow attachments? How do I send the bios?
can you try here: https://1stminingrig.com/hire-me/ ?
I have contacted you via your contact page
Hi Ciprian,
Does this work for Sapphire Nitro RX 570 8GB running on Windows 8.1?
Windows can be any version but gpu has to be the same mode, so it wont 🙂
Do you have a tutorial specific for Sapphire Nitro+ RX 570 8gb 🙂
https://1stminingrig.com/best-bios-rom-for-sapphire-nitro-rx-470-8gb-oc-samsung-memory-29-30-mhs/
Hi have hynix memory though
Hi Ciprian
What sort of weekly return are you getting on this rig?
Hey Ciprian,
Thanks for feedback and replies. Could you please reply a few if you dont mind.
1/ Please share the BIOS.
2/ You are not using Limited Editions RX580?
3/ How did you specify ‘Undervolt claymore line -cvddc 850 -mvddc 850’ since my TRIXX wont work.
4/ I have 4 cards at ~31MHz or above (1350MHz n 2250MHz) and power requirement around 890w. Something is very wrong somewhere. (I was planning to plug in 6 cards (since you quoted 1100watts, so I bought Corsair 1200i), Now with 4 clocking at 890, I dare not to plug another 1.
Help required.
Thanks
Hi,
1/ Bios is already shared 🙂
2/ what do you mean ?
3/ You can undervolt directly from .bat file with claymore miner
4/ For 500s ill recommend 1300w or 2x 750w PSU
hi, currently each card do 25MH/s. I don’t understand what’s wrong.
Hi
Greetings ! Thank you for the guideline . I am planning to build a mining rig using sapphire rx580 and try to follow your step here. I have a question on the gpu to psu connector, in your setup from the gpu to the psu you only connect the 8 pin connector , while this card has 8+6 pin. In what i am aware of if the card has both 8 and 6 pin you need to plug both and connect to psu. Can you share the reason why in this setup you only connect the 8 pin but not the 6 pin ?
Much appreciated.
Hey @disqus_4AyYHCzM1E:disqus , since gpu core is not helping that much with hashrate the extra power is not needed at all, usually those are underclocked a lot like from 1400 to 1130 or 1150 and then undervolted. You can connect the 6 pin if you have enough cables but it wont be needed at all..
Hi
I use sapphire rx 580 nitro+ but i got micron memory . Since the bios mod is for hynix, is there any way I can get the bios for micron ?
Thanks !
Never had one with micron memory.. strange :/ can you send me the rom ?
Where should i send you the rom ? Fyi mine is the rx580 nitro+ oc 8 gb, not the limited edition
here https://1stminingrig.com/hire-me/ , also send a link with your exact gpu. thanks!
Good Morning.
It leaves me a doubt. The
MHs of the “RX 580”, dividing the individual value of each one gives
more or less 31.66MHs, that potential in MHs, is overclocking the GPU or
its factory power?
Thank you.
Overclocked yes 🙂
What changes the version of the Video Card with memory of 4GB for 8GB?
Different bios!
But with the 4GB card will give me 31.66MHs, equal to 8Gb?
Yes if modified properly
Right. Do you already have this modified BIOS? Have you already tested with another 4GB model and functioned correctly?
the model that pretrndo to catch is this Nitro, but of 4GB.
Edit:
Complementing Ciprian, is this one that I intend to buy:
https://producto.mercadolivre.com.br/MLB-916186054-placa-de-video-radeon-4gb-rx-580-256bit-ddr5-sapphire-nitro-_JM
Edit 2:
Could this model here be able to mine at 31 MHs?
Link: https://producto.mercadolivre.com.br/MLB-912224947-placa-de-video-radeon-rx-580-pulse-sapphire-4gb-_JM
Good evening, Ciprian, first of all, I apologize for asking you these questions. LOL
But I’m wanting to build a structure thinking about the future (expansion).
For example, I’m looking to buy this Motherboard here:
https://producto.mercadolivre.com.br/MLB-901648154-placa-mae-para-mineraco-biostar-tb250-btc-pro-12-pci-e-_JM
It has 12 PCI slots, okay.
I’ll follow your tutorial here. But my question is in the question of the other 6 GPUs that I will be buying in the future. In that case I’ll have to pick up 2 more PSUs to power these 6 GPUs, right?
Will I have to use another “Add2Psu” font adapter?
How would you look in that situation with a 12-slot motherboard?
I’m making a budget this way, adding this motherboard, because I’ll be saving 400 Brazilian reais here in my country.
If you can help me with this, I would thank you too much.
Because if it is the case, instead of buying the motherboard (AsRock) that you indicate here in your tutorial, I would buy this from the link above.
Thank you in advance.
Hi, the link provided is not working for me. Once i build a rig with 13 GPU and 4x PSU as test and i used 3x ADD2PSU adapters to power all 4 PSU at the same time 🙂 so yeah.. you can use the adapter for more psus.
Ciprian, good morning, me again. 🙂
What do you think of this mobo:
Another thing, if I follow your tutorial, Windows 10, would it support 18 GPUs?
In
the other message you said that already tested with 13 GPU, my fear is
to take this Motherboard, and Windows 10 does not accept.
Thank you.
Windows cannot support more than 18 gpus of the same brand, so the max you can have is 8x AMD and 8x NVIDIA.
But I don’t recommend rigs with more than 8 gpus.
Ciprian, do you have a reason why you do not recommend it with more than 8GPUs?
I have a colleague who has one from ASUS of 19 PCI.
Got it, Ciprian, but let’s go, for me to start. Ideally, should I ride with the H81 PRO BTC then?
Another thing, see what you think, was thinking about putting this PSU to connect the 6 GPUs, take a look:
http://www.ebay.com/itm/Dell-3H7TN-1100W-Power-Supply-Unit-PSU-LITEON-PS-2112-2LD-Dell-PowerEdge-C6100-/382056277941?epid=2196394575&hash=item58f45427b5:g:a54AAOSwYVBZrqyN
And in this server source, put this adapter:
http://www.ebay.com/itm/10-6Pin-Power-Supply-Breakout-Adapter-Board-for-DPS-800-DPS-1200FB-PS-2751-5Q/282628996668?_trkparms=aid%3D222007%26algo%3DSIM.MBE%26ao%3D1%26asc%3D20160908110712%26meid%3Dad63b6caa54c4387968faba3e237b2ad%26pid%3D100677%26rk%3D10%26rkt%3D12%26sd%3D391885735803&_trksid=p2385738.c100677.m4598
And connect a real 500W source, for everything else, just like this:
https://produto.mercadolivre.com.br/MLB-769776402-fonte-gamer-atx-evga-500w-reais-100-w1-0500-kr-80-plus-white-_JM
What do you think?
Is it any problem for me to use this Motherboard by following its tutorial?
https://produto.mercadolivre.com.br/MLB-907256894-placa-mae-para-mineraco-biostar-tb250-btc-6-pci-e-pro-btc-_JM
Thank you.
Ciprian, good morning, my friend, I’m really sorry for bothering you. But I saw that to make the card render with the BIOS changed, it has to be for memory HYNIX, this 4GB GDDR5 model I want to buy, can you tell me if it would work?
Model I’m going to buy: 11265-07-20G
Site where I will buy: https://produto.mercadolivre.com.br/MLB-916186054-placa-de-video-radeon-4gb-rx-580-256bit-ddr5-sapphire-nitro-_JM
Thank you.
Another doubt, this model of 4GB of Video Card, which I informed in the previous post, will be able to do dual mining?
Thank you.
This would be the BIOS changed to the model I want to buy, take a look there Ciprian:
https://anorak.tech/t/sapphire-rx580-nitro-4gb-hynix/4637
Thank you.
Ciprian, about this part of your tutorial:
“For dual mining Ethereum + Siacoin create a new text document and name it ETH+SIA.txt and add the following code: EthDcrMiner64.exe -epool eu1-etc.ethermine.org:4444 -ewal . -epsw x -dpool stratum+tcp://sia-eu1.nanopool.org:7777 -dwal . -dcoin sia -dcri 14,19 or 30”
In my situation, I will want to put dual mining to ETC + ETH, is it possible, even with a 4GB GPU, which is what I put in my comments below?
Thank you.
Good afternoon. Can I make two-coin dual mining: ETC + SC?
Yeps..
Hello friend,
I have Rx 580 connected, But I’m only getting 800 H/s what might be the reason.
I’m in the process of building (another) 8-gpu rig and I want to get Sapphire Nitro+ cards this time. In your opinion, is the $75cad premium of 8gb cards are worth it over the 4gb cards? Also, I don’t see you reviewing 4gb Nitro+ cards. what’s their dual-mining eth dcr hashrate is like?
Thanks!
4gb and 8gb have almost the same hashrate 🙂
Thank you!
I’m wondering if you can post your Hynix timing strap here? Or do you only use 1625 or 1750 straps?
I could do the mod myself plus the adjusting of the clocks, but all will be useless (and I won’t hit 30) without custom straps.
Hi again.
After verifying from you that 4gb and 8gb shouldn’t have difference in terms of hash rates, I went ahead and bought 8x Nitro+ 580s 4gb that have Elpida memory.
After bios modding them, i set all cards to 1200 core, 875 both mvddc and cvddc but have different memory clocks per card. Some have 2025 some up to 2100 – I tested them individually to know their limits.
Now, onto the interesting part. When I’m running Claymore v10 miner, sometimes after a couple hr, sometimes 10 hrs or more, i’m getting an openCL error on just ONE card. It is random and not always that same card, but it is happening. I’m on Day 5 and cannot put my finger on it.
Basic troubleshooting of course I already did like changing risers, usb cable, 6-pin connector, x1 connector and even swapping cards, but issue persists.
I have also DDU’d and reinstalled the amd blockchain drivers but same banana. Page file is 16GB to 20GB. Ram is ddr4 4gb.
I’m on my wits end and the last thing I wanted to do is to reinstall Win10. Any help would be appreciated.
P.S. Every time a card would hang, I adjust the mem clock a step down (2100 to 2075) but it’s still happening on other cards.
i have the same card i have modded the bios but only getting 27 mhs on eth mining, how come you get 31 mhs
have you used the official mining drivers?
i have download some one modded bios from anorak site. and able to achive 30mhs. myself mod bios version cant achive that
Hi man you are rocking and rolling, will be sending you some funds. I don’t have enough crypto yet, but I will send you a paypal. Listen do you think that the hashing will improve if switch from nanopool to ether.org? Can share the measurements for the frame. I also get only 28.100 or so mhs as the other guys mate, any other ideas?
Hey, the difference should not be that big.. 🙂 about the hashrate.. have you set any dcri ?
Hm,
i can get sapphire rx 580 nitro + 8g (11265-01-20G). It doesnt say if it is limited edition … do you think this will work on this card?
I have the 100411NT+8GL version and it worked! You should have no problems
Ciprian, is it possible for me to mine Storj on this VGA Rig at the same time? If you want to put 2 HDs of 4TB.
A friend told me that I have to put a fast processor, in case I mounted my RIG with the Celeron G3900, he gave a suggestion of a 7700K i7 and 16GB of RAM, or put a GPU in place of the i7, but wanted to leave the GPUs , for ETH + DCR.
Yes you can, i am also doing it, since the CPU is dual core only then you can add only two HDDs/nodes 🙂
Right. So with that Celeron I told you I own, I can only run two 4TB HDDs, correct?
If I put an “i7 7700K”, I was wanting to use all SATAs and all USBs on the BIOSTAR TB250-BTC Motherboard Ver. 6.x. Ciprian will run normally, what do you think?
About the BURST coin, what do you think of it? Between mining BURST and STORJ, which one do you think is best?
If you add i7 then you can run 8 HDDS but make sure you have enough sata ports on motherboard, BIOSTAR TB250-BTC Motherboard Ver. 6.x has 6 slots so basically one is already taken by the current ssd installed, you can add up 5 hdds max on this motherboard 🙂
I never tested burst.
Ciprian, why does it have to be 1 HD per Core in PoC mining? Do you have any explanation?
If you put the 8 HDs on the Celeron, will not it work? What can happen?
Thank you.
One CPU thread means one Node so basically you can share one space instance for each cpu thread. This is how Storj works. If you have a quad core cpu then you can create 4 nodes 🙂
If I want to use the 6 SATAs on the motherboard I mentioned above, and all 11 USBs, would a GPU do that? If so, this adjustment is made as, you know tell me Ciprian? Thank you.
You will have to buy an i7 processor, but you can create up to 8 Nodes only. So you have 5 free SATA slots on motherboard for internat HDD and for the other 3 nodes you will have to get 3 external hdds
Got it. About processor speed, does it have to be the 7700K or is it a 6600K that has support on my motherboard already enough?
Now on the question of RAM, a friend told me that I have to have 16GB of RAM, the 4GB I bought to mount the mining for this guide will not serve, as I want to put mining via HD, do I really have to buy 8GB modules anyway?
Thank you.
Doesn’t matter if is 7k or 6k as long as it has 8 threads and its supported by the mobo 🙂 I’m sure you can run with 4GB with no problem. Ill recommend first to test with 4GB and if the system is slow, buy more 4GB rams 🙂
Ciprian, another doubt.
How do I calculate how much I can earn?
I know BURST has a Mining Calculator on their website.
But Storj does not, is there any account I can do?
I want to put this HD in my RIG:
1 HD 2TB
4 HD 1TB
1 HD 500GB
The basic income formula is $ 0.015 USD per GB you rent with an additional $ 0.05 USD per GB downloaded. This means that by renting 100 GB, you will get $ 1.50 USD per month, being the case the data owner does not access the data.
This means that in order to get a monthly income of at least $ 90 USD you’d have to rent 6 TB of HDD space.
Good morning Ciprian.
Can you tell me why I’m getting negative ping on Storj Share?
Here’s the picture of how it’s getting below:
https://uploads.disquscdn.com/images/dd9b301f0406ec0b368be1d2055a946079482a50bff69bc4d26953e6f53e25e1.jpg
I researched some forums and as I use AMD processor, they talked about updating the processor driver. Do you know if you have another way to fix this negative Ping error?
hi, are you always getting this ? happen to me sometimes.. not cery often.. but i guess is not such a big deal.. illread more about it..
Then Ciprian, gives and then comes back positive. Now at this point I sent that message, the first HD is at -18 and the second HD is -3. My fear is to be making this mistake and not be earning the rewards.
you are fine.. no worries 🙂
Thanks for the guide Ciprian! I just built this following step by step. However, I’m only getting what appears to be stock speeds out of my cards (23-24 MH/S). After flashing the BIOS on each card, is there anything else I have to do in order to properly ooverclock/undervolt them? I thought that was handled by the lines in start.bat: -cclock 1200 , -cvddc 850, -mvddc 850 … Am I missing something?
Have you missed -mclock 2250 ?
I am experiencing same issue,except I only installed one GPU at the moment. When I type the -cclock 1200 , -cvddc 850, -mvddc 850etc, my Computer crashes and cant keep up.
how much we earn from thing rig in a week ???
Umm.. i hard to say.. depends of the price, dificulty.. is hard to answer such questions but as for now around $65
Hi Ciprian, if I were to follow this guide but instead use four of five Sapphire Radeon NITRO+ RX 580 4GB (11265-07-20G) gpus (since they’re cheaper), aside from flashing a different bios, is there anything I’d have to do differently (e.g., command line options)?
And lastly, will the 4 GB editions stop being profitable significantly sooner than the 8GB editions? Thanks!
Hi, command linse cna be the same, but you may encounter crashes, try with mem clock 2100 first.
Hi Ciprian, I decided to build 8 gpu rig:
GPU: 8x SAPPHIRE NITRO+ RX 580 8GB Special edition ;
Motherboard: ASUS PRIME Z270-A ;
CPU: BX80662G3900SR2HV ;
RAM: DDR4 Kingston HyperX Fury Black 4GB 2133MHz ;
PSU: 2x EVGA SuperNOVA 850 G2 850W ;
SSD: SANDISK SSD PLUS 120GB SATAIII ;
2x M2 to PCI-E ;
Dual PSU Link Cable ;
8x ver006c risers.
What do you think, will it work stable? Is it enough 2x850w? And about risers is ver006c PCI-E a good choise or choose other?
Hi @disqus_jftex57zkd:disqus , yes it should work stable, also 850w should be enough.. make sure cards starts undervolted every time and use -gser 5 or -gser 10, usb risers are also good
sveikas, ar susirinkai riga? galvoju kazka panasaus daryti irgi, idomu butu suzinoti kaip pasiseke tau? dekui
Hi, I have roughly the same setup and I’m having issues with undervolting, Claymore parameters aren’t applying onto cards (RX 580 NITRO PLUS 8GB) and in MSI AFTERBURNER, I can’t change the voltage even though I enabled it in the settings…any ideas on how I can fix that?
Command line has the following : -tstop 70 -tt 55 -fanmin 60 -fanmax 100 -cclock 1200 -mclock 2250 -cvddc 850 -mvddc 850
If you are running with on board video card then go to device manager and disable it, restart msi afterburner 🙂
I had the same problem. Just go to AMD Radeon Settings, and disable crossfire. Reboot PC and everything will be ok next time you fire up claymore.
I can’t find the crossfire settings in AMD Radeon Settings, mind telling me where is the option?
Open Radeon Settings/Gaming/Global Settings/global Graphics and then disable AMD Cross Fire
I don’t have this option
Le 30 nov. 2017 06:23, “Disqus” a écrit :
anyone else has a problem with the H81 pro BTC recognising the 6th GPU on the x16 PCIE? Riser is fine , swapped them card is detected. did a CMOS reset same only 5 GPU;s recognised . Any ideas please? all 1X are recognised
I completed modding the BIOS on my first Sapphire 580 8GB and ran claymore and I am only running 24 MH/s. Am I doing something wrong, do I need to overclcok the computer? Sorry for the newbness but I need to get the one GPU working before moving on to the others.Thanks!
Also, with the 580 8gb tutorial,is Polaris Bios mod step needed? it is not listed in the software requirements, but is listed in Step 5 of your the 4 series tutorial
Hi, yes you will have to overclock the card via MSI afterburner core clock 1150, mem clock 2200.
Or you can add the following line in .bat file or config file: -cclock 1150 -mclock 2200
I am overclocking using MSI and Trixx using both your recommendations and KHS is fluctuating between 23 and 24, do I need all my GPU installed to see some 30’s?
Have you also tried to overclock from .bat file ?
Thanks for the reply Ciprian, can be very frustrating especially knowing everyone is getting 31! I am overclocking in Miner using the .bat file and receiving the same results, I’m curious if I should be flashing the BIOS with a different BIOS and not the one you have listed in the tutorial, did a an Official AMD release come out?
The one i linked is just fine, everyone is using it. I guess you are doing something wrong, and i cannot tel what unless i check your rig :/
I fina https://uploads.disquscdn.com/images/2f3a35bd1ebb80f019ec9d84bf614dec1d7b63dbbd6ecca56b1301f3ac85ca5c.jpg https://uploads.disquscdn.com/images/3c4210b2cbaef0f77cbf624226e844309ef5d621d4cee2bfc952ea835fdefbc1.jpg lly fixed it, I’m going to post what I did to fix it the next few days, had a few tweaks to the bios upon startup and also used AMD official beta drivers you listed in your Ethereum DAG fix, I don’t think you had that forum linked here
Awesome 🙂
It could be the memory, ie, Ciprian’s memory can be samsumg and yours hynix. There is no way to know this before buying.
Hey man, how did you go about 256 Kb rom size? Do you just open it in Polaris Bios, edit and flash after that? Were there any problems? My Polaris warns me that the rom file size should be 512 Kb.
Do you have 256kb rom ? if yes, upload it to mega.nz and send me the link 😉
Also, you should check Radeon driver settings – Gaming – Global Settings – GPU workload. It should be Compute, not Graphics. Works only for non-blockchain driver (mine is 17.11.1, blockchain drivers seem to work worse for some reason and don’t have Compute option)
Hi Ciprian. Rx580 have 8+6 slots right? Is it ok not to insert the extra six pin of the gpu? May I know what is the use for it?
There is no need to use it.. wont help you with anything since core clock is downclocked and undervolted
Hi Ciprian my nitro+ is samsung. Is there any way you have a rom for samsung memory?
nope 🙁
Try with amd mining drivers it will helps u
Hi forever. Did that already, I am currently testing roms and looking for a stable one. Do you have the same 580s?
Hi,
I follow the tutorial (bought same items) and i would like to say THANK YOU it works great !! (186Mhs not 190^^ Micron memory)
Have some difficulty to find a stable Micron B.I.O.S.
I use ATI Mining BETA drivers.
For the previous comment : (Ethereum price 465$)
Period ETH USD BTC
Minute Ξ0.00002 $0.01 ฿0.0000
Hour Ξ0.00119 $0.55 ฿0.0001
Day Ξ0.02861 $13.31 ฿0.0015
Week Ξ0.20030 $93.14 ฿0.0103
Month Ξ0.85842 $399.19 ฿0.0443
if i have 3 gpus,will 650w psu be enough ?
Yes, but make sure you undervolt them first 🙂
Hi Ciprian, can you help me please:
I am using the start.bat to send the undervolting parameters (and others) to the card. So when my (planned) rig is starting the cards are NOT UNDERVOLTED YET, right? If I start all 6x 580 cards together this way I assume that my psu will say good by.
So what do I have to do to store the “undervolt parameters” into the cards?
Greetings
Andreas
One card non undervolted can go up to 180w, even if goes to 200w you are still okish..
Hi Ciprian, new builder here, would you say this is a cheaper and equally powerful alternative to the GeForce GTX 1070, which from other articles seems like its top optimisation runs at about 31/32 Mh/s?
Yeps, on Ethereum (ethash) hasing speed is almost the same..
Thank you, will this work with Sapphire Radeon RX 580 NITRO+ Special Edition 8 GB GDDR5 11265-21-20G or will the command line be different?
Command line can be the same, but not the bios
does the EVGA 750 BQ would work for this setup?
Yep, should work!
Hello Ciprian,
thank you very much for your fantastic tutorial.
Can you help me out? I’ve got the same blue cards but can’t seem to save a proper ROM file to edit it. AtiWinflash (versions 2.74, 2.76 and 2.66) only allows me to save a 256 kb .rom file which PolarisBiosEditor refuses to work with (as it requires 512 Kb files). What did you use to save and edit BIOS of your cards?
And how to I swith BIOS to silent mode on these blue cards? There is no red button…
Hi @ljod:disqus , that’s fine, your bios version is 256kb only. But this are the Limited Edition cards and not Special Edition, for SE check this link: https://1stminingrig.com/best-bios-rom-for-sapphire-rx-580-8gb-special-edition-hynix-memory-31-mhs/
Hi Ciprian, do you think EVGA SuperNOVA 1200 P2 80+ PLATINUM is OK to run 6 of these (rx 580)? If not, I can do 750W x2 however I am not sure how to boot the 2nd PSU. What are your thoughts?
Make sure the P2 have enough PCIe cables to power up the gpus 🙂
Ai idee dc un rig ( de 3 placi video ) de la 90 mhs a scazut treptat la 60 mhs … si asta mi s-a intamplat la toate ? Zilnic sau odata la 2 zile scade puterea. Astept un raspuns . Ms frumos
Salut probabil nu suporta OC-ul, incearca sa il dai mai jos!
Hi Ciprian
I have 3 XFX RX 580 Black edition with Hynix memory. Will the BIOS flash work for these cards as well?
Nope, this is for sapphire only..
hi,
Do you now what’s the difference between Sapphire Nitro+ RX 580 8GB Limited Edition and Gigabyte Radeon RX 580 8Go (GV-RX580GAMING-8GD)??
Hi looking at making one of these rigs what are all the cables that i will need ? power supplies come with no cables. and what is the dual psu adapter for? thx.
Salut, as dori sa intreb daca un GIGABYTE AORUS Radeon RX 580 8GB ar putea scoate aceleasi performante ca SAPPHIRE NITRO+ RX 580 8GB ?
Salut, sincer sa fiu nu am fost curios sa o testez, poate nu o sa ajunga la aceleasi rezultate dar pe aproape. 🙂
Isn’t it dangerous to use the SATA cable to power up the riser cards? I’ve read somewhere that they can be prone to melting. Is this true?
Love your article ciprian! With 1050 power draw where did you plug it in your house? I’m about to make one myself
Hi what is the dual supply adapter for?
To sync both PSUs to start at the same time when the rig is powered.
the Intel Celeron G1840 is not available what can I buy?
I found this available: http://amzn.to/2DqDicj
Can you get away with a 1200w PSU?
yes but make sure you undervolt the cards, also add -gser 5 -lidag 1
i have same ring 183 hash but when i try to het sia it reduce to 153 do you have any idea why ? (ps : using simple mining )
Try setting -dcri 17
Hello Ciprian,
I’m mining with a Saphire Nitro RX580 Special Edition 8GB and I reach max 15.7 Mh/s. I installed the last AMD drive and I mining with SimpleMining, please let me know if it’s normal or I must to try mining directly with Claymore?
Thank you,
Have you modded the bios ?
I´m very surprised for your fast answer. I thought that RX580 reach 24 Mh/s without BIOS modifications. I´m going to modify it tonight and I’ll let you know.
Thank you
Ok, let me know the results 🙂
Hello Ciprian,
Excuse me, but I have hadn’t time to try. Resume, I reinstall windows and I passed from 15 to 20 Mh/s and Today I modified the Bios and I reached 30.25 Mhs/s.
Thank you so much, if you come to Montreal, let me know and I invite you a couple of beer in a good local brewery 🙂
Noted 🙂 thanks!
Is it possible to upgrade this build to a 12 cards setup? I mean would the motherboard be able to handle that?
EDIT: Also do you know if a similar set up but using Sapphire Pulse instead of Nitro LE would provide similar Mhs?
Hi @disqus_f3uF2mlQOz:disqus , you can use this one https://1stminingrig.com/asrock-h110-pro-btc-motherboard-review/ , Pulse cards are also great 🙂 similar Mh/s
Hello there,
Cay You help me please?
I have problem with stable. One for day or two restart my pc. I don´t know why.
I use 3 SAPPHIRE NITRO+ Radeon RX 580 Special Edition.
(motherboard: asus prime z270a, bios was change for mining)
I have 29,5 MH/s for one card.
I mine ETH and DCR – dulamining.
Claymore is set for:
-cclock 1200 -mclock 2090 -cvddc 850 -mvddc 850
Bios for GPU is from this page.
What I have to change to make it stable?
Hi, try changing -mvddc to 890 or 900
Hi Ciprian,
Thank you very much for your advice.
This seems to have solved the problem.
I’m already dont asleep in the stress :D.
I sent you some eths as a little thank you.
Any time @disqus_XqfBWfuc8R:disqus cum mare placere si spor la minat 🙂
Thanks!
Do i need to disconnect the GPU’s , when i first boot up the device and install the windows for first time ? Or i can keep them connected do the driver update and GPU Mod ?
You can start with one gpu connected.
Thanks ! and at what step shall i reconnect all other GPU’s ?
Once the driver is installed, shut down the rig, connect all gpus and power on, then wait for windows to discover all the cards.
Can i run Hynix bios over GDDR5 Macron memory type ?
Every time I try mining with SIA I get like 24 on ETH :/ Even with dcri 19.. 🙁 If I mine DCR I get normal 30 ETH.. Any idea why ?
Umm.. have you also tried lower dcri ?
dcri -9 to -14 for Sia / Pascal Lite
Hello, thanks for the good tutorial. How many GPU’s can be attached to this motherboard?
Hi, 6 GPUs!
hi
I was wondering if you could please help me:)
I have Sapphire RX580 gpu’s i am getting 330.000 hashes per second but i see everyone talking in mega hashes and not sure what that is? and im trying to understand if my hash rate is good , i have not overclocked or undervolted my cards , so for 5 gpu i am getting about 1670.450 H/s per second
thanks 🙂
Hello @lucyseo:disqus , what coin are you mining right now ?
is it enough to use 2x 550W gold certified , for 6 GPU RX 580 total ?
Nope..
When Overclock it is normal to have memory errors in HWinfo ?
I have used XFX RX580 8GB Black Edition OC+
-tt 60 -fanmin 60 -cclock 1150 -mclock 2200 -cvddc 850 -mvddc 850
115W Consumation
Do you think this setup has enough power for an 8-card setup? I’m probably gonna use another rig because this has room for 6-7.
Hi Ciprian! This is the best mining blog ever. thanks for your shares. Im planing to make a rig with 2x 850W evga Gold and some Sapphire RX580 8GB Nitro. Using the Asus Prime z270A (this mobo can handle 9gpus) do you think is enough the 2x PSU for 9gpus? Or should I go for 8 only?
Thanks!
Hi, thank you 🙂 When i do 8x GPU mining rig i use 850w PSU but if you are going to have the 9th card added then i would recommend 1x 1000w and 1x 850w, with the 1000w psu you can power up the mobo,cpu, ssd, 5x gpus and 5x risers. With the 850w power up 4x gpus + 4x risers. In this case you will be safe if you choose dual mining as well 🙂
Hello, i have 6x rx 580 8gb sapphire, what do you mean by undervolting ? ( dual psu 650w corsair
I mean to undertvolt core clock and memory clock
That was great article step by step
i am also going to write one on my blog
https://bitcoinguider.in/
Is it fine to use this set up on my Asus RX 570 4g if i don’t have RX 580? Thank you!
Hey I have been trying to setup my rig for a few days now and was wondering what is the best amd driver currently?
What alternative PSU’s can I use? I will start with only 3 cards and upgrade later.
I’m using MSI Aero ITX 4 GB x 8 GPU ,,,,, Biostar TB250 BTC Pro / but i can only boot up window 10 with 4 GPU ….. / and i connect all 8 GPU window can’t boot up stuck in auto repair ………… after that uninstall AMD Driver with DDU in safe mode .. reinstall Driver …. i see 4 GPU in display adapter and other 4 GPU in under other devices with Video Controller (VGA Compatible) / and i was try to update driver by local driver folder. but when installing …… window got error …… (system thread exception not handled atikmdag.sys windows 10 ) / how can i run all gpu in stable ( my gpu are using mod bios ) please help me.
Hi, do u have any idea what would be the hasrate of one ntiro+8gb GPU coming right out of the box with no bios modification not oc of any type.
Thanks
22 – 24 Mh/s
And with the right bios or oc (btw, which one is better, bios modifications or using softwares like msi afterburner?)
I wanna build a mining rig,( ignoring for a second the fact that the cards expensive at this moment and extremly difficult to find).
What would your suggestion be? At this moment considering the difficulty of eth, which cards arebest for mining eth?
Nitro+570/580 8gb ?
I found some Msi rx580 8gb armor oc but not sure what is the difference between it and nitro+8gb, for mining purposes, what is the best option?
Thanks
Salut
am si eu o mica problema
Am o placa rx580 8gb memorie micron si imi tot crapa
Am instalat win 10 drivere de pe situl amd daca se modeaza biosul imi da ethdcrminer64.exe has stopped working windows 10
pe biosul cu care a venit se opereste claymore dupa cateva linii de share dar cu share 0 si imi da eroare de open cl.
Are cineva vro idee?
Vezi sa nu fie prea mult overclock.. incearca sa il reduci putin..
Nu are deloc overclock…am tot schimbat drivere am gasit unu, tot apare opencl dar doar cand vreau sa intru in radeon setings
Pe partea de mining nu mai pica dar merge cu 21Mhs fara a face nimic la placa. Daca umblu la bios nu mai recunoaste placa corect o ia in claymore rx480 sau 580 cu 3gb in loc de 8 si da ethdecreed.exe has stop working…ma dispera
Cred ca mai bine scapi de ea :))
La asta ma gandeam si eu.
Ca vad ca nu gasesc nici o solutie
Problema e ca nu se mai gasesc placi video
Salut! Am urmat sau am incercat sa urmez unul din tutorialele tale pt mining ethereum. Cu placa de baza Tb250+, Cpu celeron g3900, 4gb Kingston fury, PSU Corsair RM1000X si 4 placi video Asus Strix RX570 4oc. Sunt incepator si nu am facut inca vre-o setare, nu am facut upgrade la bios (uefi) dar am un hashrate maxim de 69Mh/s pe ETH si 62Mh/s pe Ethereum classic. OS windows 10 pro.
Poti sa imi dai si mie un sfat? Vad ca la tine rx570 scotea un 22Mh/s cu setarile stock…si altii o duc pana la 29mh/s…ai vre-un sfat pt mine? repet, sunt incepator e primul meu rig.
Ms mult!!
Salut, ca sa ajungi la o viteza mai mare aproape de 30 Mh/s trebuie modificat biosul placilor.. ce top de memorie au ?
salut din nou, deci am instalat crimson-relive-blockchain si am ajuns la 21-22mh/s cu fiecare placa, un total de 87-88mh/s. Placile sunt asus radeon strix rx570 de 4gb fiecare.
Cam asta este viteza lor in default 🙂
ca sa modific bios’ul placilor..poti sa imi spui asa in mare pasii? ca sa pot sa aprofundez pe urma din alte surse ca sa si inteleg ce fac. asa in mare, si daca ai timp sigur. ms mult oricum esti THE MAN!
aici: https://1stminingrig.com/how-to-fix-re-flash-bios-of-bricked-gpu-on-rx-470-480-series/ si https://1stminingrig.com/best-bios-rom-sapphire-nitro-rx-580-8gb-oc-hynix-memory-30-mhs/
Hey, i only have the normal sapphire 580 nitro+ 8GB.
Which GPU Bios MOD/Flash should i install?
greets
https://1stminingrig.com/best-bios-rom-sapphire-nitro-rx-580-8gb-oc-hynix-memory-30-mhs/
Hey,
first thx for the link.
I’m sorry but i have another problem. I use an hard drive with windows (already installed) to test everything. If I plug the GPU with the risercard into the PCIexpress there is only black screen. Without the GPU i can use the Onboard Graphic. I’m a rookie with these risercards/pciexpress. Should i use the HDMI onboard or VGA onboard ? Don’t know what to do.
Motherboard is the ASrock H81 BTC PRO
Have you made any modification on motherboard’s bios ? You should go to chipsed settings and on primary video card choose onboard 🙂 You see the black screen because it is automatically changing to use the display from PCIe slot, so if you plug the cable in to GPU will have image.
Ok i managed that a while ago but i had to buy another ssd card and did the installation up to Point 5 at your Link to flash the normal sapphire 580 rx 8gb. I didn’t have the Hynx Memory… it is the Micron Memory Type 🙁 Is there a flash for ?
thank you very much for your support ciprian
Your Limited Edition is Micron memory? Or you are confusing with Special Edition ?
Will this bios mod work with sapphire rx580 nitro+ 8gb ?
nope, check this https://1stminingrig.com/best-bios-rom-sapphire-nitro-rx-580-8gb-oc-hynix-memory-30-mhs/
Hi, I bought Sapphire Radeon RX 580 8GD5 Nitro+ and stock hash rate is only 17,6 MHash/s. Where is a problem?
You should modd the bios..
I tried it, but the result is not good, hash rate grew to 20,6 (Samsung mem) respectively 19,4 MHash (Hinyx mem.)
I got 32 mh/s with smasung one 😀
What I can do to have it too? Can you help, please?
email me!
Thank you, now I am satisfied with hashrate around 30 on ethereum. I had to switch GPU workload from Gaming to Compute and then I flashed the bios of GPU – the best rom for me is sapphire-rx580-nitro-miner03-gpu3-moded. And finally I try OC GPU by Claymore.
is it can supply 12pcs Sapphire Pulse RX570 8gb GPU on win10 64 bit by AMD Radeon Crimson-ReLive-Beta-Blockchain-Workloads-Aug23 version driver?
Sorry, I don’t undestand you … I have got Sapphire Radeon RX 580 8GD5 Nitro+ One with Samsung memory and 1 with Hinyx mem.
Salut Ciprian , i just got 3 x 8GB MSI RX580 Armor OC and planing to add 3 more for my first rig. I will follow your tutorial but I’am not sure about the OC part…are you familiar with this gpus ? Could you please give me some advice/directions on overclocking/bios mode (if any different) Thanks a lot
Salut, nu am folosit deloc placile respective.. modarea biosului o sa trebuiasca sa o faci tu.. in rest poti urmarii pasii de overclock si undervolt
Is there a difference between Sapphire 11265-00-40G and 11265-00-20G if it comes to the configuration and setup shown here?
Umm.. not really sure.. different type of memory maybe and bios size..