
Tutorial: Ethereum Mining Rig Part 4 (ethOS installation)
- Like
- Digg
- Del
- Tumblr
- VKontakte
- Buffer
- Love This
- Odnoklassniki
- Meneame
- Blogger
- Amazon
- Yahoo Mail
- Gmail
- AOL
- Newsvine
- HackerNews
- Evernote
- MySpace
- Mail.ru
- Viadeo
- Line
- Comments
- Yummly
- SMS
- Viber
- Telegram
- Subscribe
- Skype
- Facebook Messenger
- Kakao
- LiveJournal
- Yammer
- Edgar
- Fintel
- Mix
- Instapaper
- Copy Link

How to build a Ethereum mining rig diy tutorial part 4: ethOS installation and configuration!
If you are looking out to use ethOS for etherium mining, here are some quick guidelines that will help you to install and configure it, right away.
Wondering what ethOS is all about? Well, this is simply a 64-bit linux distro that is specifically meant to mine Ethereum while letting you control all your rigs from one particular location. ethOS also lets you drill down to some specific GPUs as and when it is required. Read more here: http://ethosdistro.com/
Features
- This distro boots and mines without having you to install any new drivers, configure xWindows or even compile some specific software.
- Provides remote configuration where you can set some core locks, instruct the rig for remote reboots, get pool info, control fans, check mem clocks and toggle around other settings flawlessly.
- Being extremely lightweight it works with the weakest range of CPU that has been ever made in the last 5 generations. The distro can also work on only 1 GB of ram.
- The automatic GPU protection ensures that the GPUs will immediately turn off as they reach a temperature threshold.
- Equipped with the automatically configuration of local stratum proxy. These stratum pools can also be changed during the configuration.
- Comes with a web panel that provides detailed event reports and rig statistics.
- Supports the GPUs of AMD, including any GPU of 2GB+ HD and 700 series or any R9 belonging to the 200/300 series. This includes the 390, Fury, Nano and 390X R9s.
- Ensures consistent DAG file management where the SSD never runs out of space.
- Can be easily updated to the latest version of ethOS with one command.
- The IP assignment is ensured via DHCP while the hostname is defined from the mac address.
- Automatically opens to a terminal window with full focus on the boot. No mouse is required for the job.
NOTE: Or if you want to use Windows 10, which is currently the best OS for mining, check this tutorial: Best Windows Setup, Configuration, Tweaks For Mining , How to Run 6 or More RX 570 / RX 580 GPUs on Windows 10 , Claymore’s Dual Ethereum Miner v9.0 – Better Mining Performance
How to get ethOS?
ethOS is pre-loaded on a SSD of 16 GB. It is also available for digital download and can be bought at gpuShack.com.
Step 1: Writing ethOS ISO to your SDD, HDD or USB stick
- You need to get started by downloading and installing the HDD Raw Copy Tool.
- After this, extract the ETHOS 1.0.4 ISO from the archive.
- Open the raw copy tool in your HDD.
- Click the continue option after selecting ethos 1.0.4.
- Select the drive where you want to install ethos and click continue on it.
- Click the start button and wait for a couple of minutes for successful confirmation.
- Finally connect your HDD, USB STICK or SDD to continue.


Step 2: Power up the rig
Once the rig is powered you will see a lot of texts appearing (image 1,2,3,4), no need to do any action, just and wait until the Green logo shows stats like the GPU and CPU..

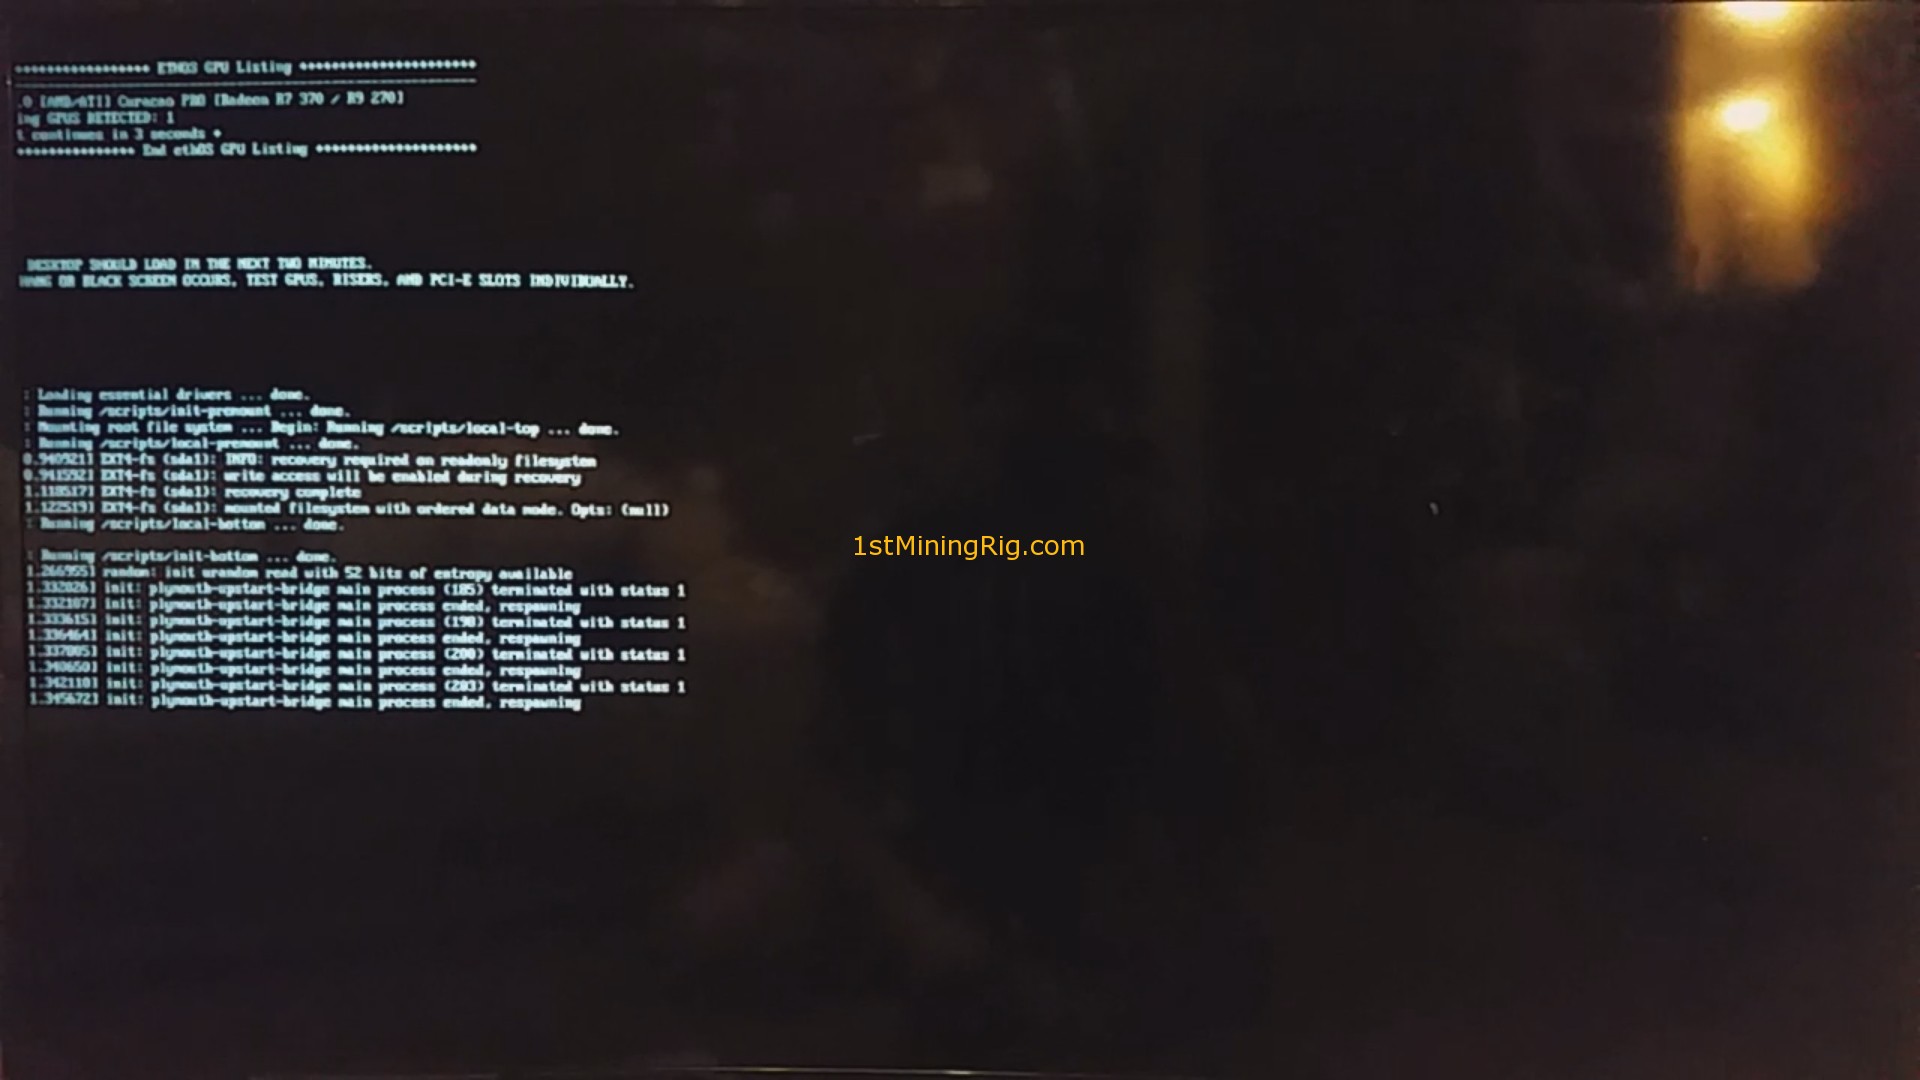


After it is booted, you will find that the Ethereum logo and the terminal doesn’t have any rig stats for a couple of seconds. If this lasts for more than 2-3 minutes even after rebooting, reboot it once again. In most of the cases, it would not last for more than 2-3 minutes. However, if that happens in case of you, there is no need to panic as you can solve the issue simply by rebooting.

If things seem to go the right way after that, check the top right corner and wait for the system to complete the booting.


As soon as everything is completed, the rig will automatically mine and the speed of the GPU fans will automatically increase, producing a little noise.

Since i have connected only one GPU the hashing power put of the box is 13.2MH/s. After this, we need to carry out the set up. But while continuing with the set up, the following things must be considered:
- The ethOS should be updated to the latest version
This can be done by typing the commandsudo ethos-update && sleep 5 && sudo rebootin the black window. Now hit the enter button and do not interrupt the process of update. - Set ethOS to the single rig mode
Run this command to make the remote file completely blankecho -n "" > /home/ethos/remote.conf - Changing ethOS password
a) In terminal typepasswdand you will see “Changing password for ethos.”
b) Type default/current password which is “live”
c) Then type your preferred password twice and that’s it, we secured the rig.
Wallet and GPU configuration
- Run the command
nano local.confand the default settings will be listed like in the image below. maxgputemp 85leave it default for now. This number means that this is the maximum temperature your GPU should reach when the system automatically stops the miner.stratumproxy enabledthis is a default command and should not modify it.- Using arrows go down to
proxywalletand change the address with yours. - On proxypool you will see it in 2 lines,
proxypool1andproxypool2, it is because the second link is as a backup and ifproxypool1has connection problems or is down for any other reason then ethOS will connect toproxywallet2. If you are located in EU changeproxywallet1to this one:eu1.ethermine.org:4444 - Save new modifications by pressing
CTRL+OthenENTER.CTRL+Xto exitlocal.conffile.

Basic Commands
- In order to get a complete list of commands type
helpmein your window.

- Check your mining progress by using the command
show miner. To stop checking this progress, pressCNTRL+C.

- Every ethOS installation rig comes with its own ID. This can either be found at the top of the rig or along the side of the terminal. You can also check this online from your phone by logging in to
xxxxxx.ethosdistro.com. The information is automatically sent and stays for one minute. But if you’re looking out to check the fresh stats, type terminalupdateand everything will be automatically re-added.

- The miner can be started and stopped by the minestart and minestop.


Overclocking
Now that you’re somewhat familiar with the terminal and the commands, give more power to your rig by configuring the overclock feature.
a) All with one
- Start by accessing the
local.conf - Only if you want you can increase
maxgputemp to 90(i personally didn’t do it) - Now add the commands
globalcore 1150andglobalmem 1500. - For the time being, leave the
globalfan to 85. - Save
local.confsettings and exit. - Type the command:
putconf && ethos-overclockand hit the enter button. Wait for a couple of seconds for the overclock to be applied.

Keep your eyes to GPU temperature, If it doesn’t reach more than 85 then you wouldn’t have to toggle anymore. Tweak the globalfan and set the temperature as low as you can.
b) Individual
- The first thing you need to do is check your local configuration ID. This can be found in the terminal, mine is
936ff0
- Now go to
local.confand let’s say that you have 3 GPUs only.
a) core settings:cor 936ff0 1175 1175 1175
b) mem settings:mem 936ff0 1600 1600 1600
d) fan settings:fan 936ffo 85 90 70 - Save
local.confand exit - Now type
putconf && ethos-overclockand hit enter. Done.

Using SSH to login to ethOS from Windows
- Download Putty from http://the.earth.li/~sgtatham/putty/latest/x86/putty.exe (Putty is an executable that can be run without installing)
- Find the IP of your rig (You can find your rig’s IP on your ethosdistro.com web panel, on your rig’s desktop, or on your router’s DHCP client table)
- Open Putty and input Rig Information and Type the rig’s IP into Host Name. Port should be 22. Click Open
- When the terminal window shows up, login with username ethos and your password or default “live”.
Now you are done with ethOS software installation and setup. You are all set! Follow these tweaks for quick and easy ethos installation for your Ethereum mining.
My rig is currently running with 5 GPUs, waiting for my USB riser to be shipped so i can install the 6th GPU!!


Here is my local.conf for now but once i install the 6th card ill set them up individually
Well.. it’s been a lot of fun building my first rig, i hope you enjoyed as much as i did. Let’s hope the mining process last a bit more longer so we can take advantage of it and to make some nice ethers.
Ill keep this blog updated with all the modifications that my rig will suffer not matter if those are ethOS settings, ethOS update, frame modification/reconstruction etc..
[cp_modal display="inline" id="cp_id_e9e92"][/cp_modal] Part 3: Building the rig


cant wait to try this i am building 1 cheap rig and one rig with saphire radeon pro duo’s
What GPUs are you going to use on the cheap rig, what specs ? How many duos and do you have good offer for them? 🙂
I just setup my own RIG with windows 10, 2 Duo Pros and push around 100/105 but its so damn weird that the damn thing keeps turning off after a few hours. It does get HOT using Radeon settings it shows me temps of 62C. Any idea what the issue(s) may be?
What clocks ?
Didn’t bother to modify anything it’s 112 right out of the box for both duos
Hi, can you help me please? How can i set up Dual mining on claymore? Because im just mining etheruium now, its working well, but i want to try to mine other coins as well.
hi, are you mining on ethos or windows ?
i am using ethos. The ether mining going well but i tried to set up as dual miner and i can’t
you cant dual mine on ethos, you willy have to switch on windows.
That’s why i can’t. Thank you so much
Hi,
I have 3 questions,
1) Do I need to buy 4 Ethos SSD for 4 New rigs?
2) Or I have to buy 1 Ethos SSD from GPU shack and I can clone it for the other Rigs?
3) Can I use UBUNTU for mining without ETHOS?
Hi @kindergart:disqus ,
1) Yes, you will need separated license for each rig. But you can order the downloadable version and buy 16gb SSD from a local supplier, if you don’t want to wait for gpushack to chip them.
2) You will receive a ISO file and will work just one time, it has an id or an user that is unique and it can be used only once.
3) Yes, you can use linux or windows, ethos is just a modified ubuntu to make the mining process much simple without spending hours on installation etc..
Thanks for the Reply. I like your website and the way you have made the tutorials.
I will order the ISO file.
I searched but cannot find any tutorial for starting a miner on Linux ubuntu. I cannot see any step by step tutorial for Linux and how to run a miner.
Can you share any links if you have?
Thank you! 🙂
For linux should be the same as on windows, follow pool instructions or miner instructions, try with claymore..
Ok. Thanks I will try and will ask in case I get stuck.
Thanks for the replies.
I appreciate your help.
I cannot find any step by step guide for Claymore dual miner for Ubuntu. Pls help.
Hi Ciprian,
I am have installed Ubuntu from Virtual box on windows 7 and have started mining on Ubuntu.
I want to know how to tweek the Gpu like overclock and fan speed adjustment on Ubuntu.
Can you help?
Hi @kindergart:disqus, sorry but i don’t know that much in ubuntu, the only thing i used was ethOS, but windows is better 🙂
Hi Ciprian,
I bought and installed ETHOS. I have 6 RX480s 8GB, MSI z97 Gaming 5 motherboard, SSD is Intel 160GB but 3gb/s speed.
I have following questions.
1) I am able to run 4GPus only and 5th and 6th GPU fails. I updated ETHOS and everything is fine. Am I doing some thing wrong?
2) My SSD is Intel 160GB but 3gb/s speed its not 6Gb/s. Does that matter?
3) I started with installing 1 GPU at a time. but 5th and 6th fail. Why??
Steps I followed:
1) Installed ISO on SSD.
2) used the same procedure that you gave above.
3) Core 1100 and Mem 1700 Hashrate (I am getting is 17Mh/s on ethereum claymore on this.)
I am so frustrated pls hel. I thought Ethos won’t give problem and I can use 6GPU.
What i am doing wrong here?
Pls HElp..
Hi @kindergart:disqus, i must say that ethOS is not that great since the RX series, is good but still needs some improvements.. i once faced what you just said.. i had a rig of 6x 480 and every day or once two days the same card was failing.. no matter if stock/underclock settings etc.. i have tried everything, the rig is now running for about 1 month on windows and is very stable, no more 4th gpu fail..
1) nothing wrong..
2) nope
3) like i said, i had enough and switched to windows.. 🙁
I was able to get it a bit more stable by increasing the memory only to 2200 and for the 4th card was set to 2100
like this:
mem 9ae6br 2200 2200 2200 2100 2200 2200
I also had:
flags –cl-global-work 16384 –farm-recheck 200
globalpowertune 4
globaldriver amdgpu
If you still have problems ill recommend to switch to windows 10!
Core 1100 and Mem 1700 are not that good try core 1150/1180 and memory 2100/2150 maybe 2200, but 2150 must be good.
Are the cards on stock, no bios modification?
Actually I was using windows 10 and there was the same problem, so switched to EthOS. 2 GPU failed every time.
I was using 1100/2200 on windows but radeon Driver was failing. Updated everything tried everything on windows. Initially it worked on windows, 163Mh/s for a month then it started failing. and since past 3 months it is failing. so switched to Ethos.
I did a small mistake , My switch on the cards was on Overclock mode, while installing Ethos. Now I have made the switch to default but GPU fail even at 1100/1700 that is terrible. Does that matter? what do u think?
If I try to reinstall ethos, will that reinstall again? since Ethos is a per use license copy. What do u think?
Then must be a problem with you cards, the chips.. no need to reinstall ethos, just switch the bios and restart, it will use the one where you changed the switch..
can we use bios mod RX470 on ethOS and overclock it? will be the same like on Win10?
Yes..
Hello Ciprian,
I have a question that might help other software amateurs too.
How do I install Windows and EthOS on the same rig?
I bought a machine to transfer the downloadet EthOS to a SSD. Can I do the same with Windows? Where do I get Windows for cheap money? I want to mod the Bios of my cards and therefore I need Windows on the rig, right?
Best Regards
Hello @jp_ks:disqus , I would recommend to use windows 10, right now is the best choice! 🙂
Okay thank you!
What’s the best software now in May 2017 for mining Ethereum?
Claymore Dual Miner? Or would you recommend triple mining?
I use claymore 🙂
Hello Ciprian,
First of all, great tutorial, I have learned a lot, thank you very much!
I am new to the mining game, so I was wondering if I could ask you some questions (Sorry if some of them seem trivial).
I want to build a rig with 6 GPUs, from what I’ve read the best choices are:
AMD RX 480 Sapphire.
Asrock H97 Anniversary Motherboard.
My questions are:
1. I see that EthOS has some issues with the RX cards, so is Windows 10 the best option?
2. What is the process of setting up the rig on Windows? (Regarding difficulty, issues, bugs, things to look out for in comparison to ethOS).
4. RX 480 is currently the best GPU for mining Ethereum?
Keep in mind, I don’t have to worry about electricity costs, because in my country electricity cost is quite negligible, so I don’t mind if I can get more Mega Hashes, with an increase in power consumption.
5. Asrock H97 is the best choice for mining?
Have you had any specific issues with it?
Thank your very much in advance
Hello Juan Andrade
The best choices was and still are till will be out of stock everywere:
Sapphire Nitro+ RX 470 4GB OC
Sapphire Nitro+ RX 470 8GB OC
Sapphire Nitro+ RX 480 8GB OC
As motherboard H97 is no longer produced but you can get the H81 Pro BTC R2.0
Right now Windows is over Linux, i recommend using Windows 10.
To setup windows is very easy, i already added a tutorial for that 🙂
Yes RX 480 is the best to mine with MSI or Sapphire!
Hope this was helpful 🙂
Hi Ciprian,
Thanks a lot for your help in this post. Very helpful!
I have a question: is Nitro+ RX 580 4Gb also as good as the same one but 8gb for a 6GPU mining rig? If yes, why don’t you mention the RX 480 4gb?
Thanks in advance.
Mike
Hi, usually everyone skip the 4gb version and get the 8gb instead because of low price difference.. but those are also good 🙂
Thank you Ciprian, I bought 4gb because of availability:).
Let me know the results! thanks!
Hello Ciprian,
for you its better mining with win 10? or Eth OS?
With a 8 GPU Nitro+ 470 8Gb
Right now i prefer Windows 10
How about for HIS 580 4Gb?
I’m using windows 10 with driver 17.4.3 but not stable.
What is the cheapest place to find windows 10? I’m assuming I need to get it on a USB drive also? (Link would be appreciated!)
Thanks,
Nate
Maybe this http://amzn.to/2qhZPBW ? 🙂
Or here -> https://www.reddit.com/r/microsoftsoftwareswap/
Can I run EthOS from a USB? I bought the combo from gpushack and the OS was provided on a USB stick. Or must I buy an SSD and transfer it?
As i know usb stick will fail at some point so basically is not recommended.. get a 16gb ssd instead
Thank you!
this is true after troubleshooting mine got corrupted and have to purchase the digital download anyway and then flash it to a SSD
At First thankyou for your ethos instructions. i ran my rig with 6 x rx480 8GB in Windows 10 after UV GPU and MEM the powerusage was around 800-820 Watt. When i start it in ethOS the powerusage is around 900-930 Watt. Is there any way to Undervolt the gpu and Memoryin Ethos? In Windows i got 28.5xx – 29.0xx MH/s in ethOS 26.6xx – 26.9xx – Same gpu clock and memory clock. Thanks for helping
Hi, have you tried globalcore 1130 ?
Hello Ciprian. First of all , I really want to thank you for sharing your vast knowledge with us noobs. Second, I just got into the mining game and I have a couple of questions:
1.- I live in country where electricity is basically free, keeping that in mind I really don’t care about the efficiency of the PSU, so I would like for you to recommend me a PSU that is a cheaper than the most efficient ones but that it is still safe, you know something that is cheap but won’t destroy my components
2.- Here is the other thing, this is the set up that I have in mind 6 of SAPPHIRE RADEON NITRO+ RX 470 8GB, ASRock H81 PRO BTC R2.0 LGA 1150. According to one of your other tutorials you can overclock each GPU up to 29.xx Mh/s, that means that the total hash rate of the rig would be around 174Mh/s, according to some calculator on the internet that would make around $900 monthly mining ETH, now that seem to good to be true, could you give me a more realistic estimate of the profit of the rig.
Again thank you so much for everything you teach us I’m forever grateful
Hi,
1. As for the PSU i still recommend the evga 1300w or 2x evga 750w not matter what. If you don’t pay for electricity then you can use a higher gpu clock for a slightly better hashrate, but consumption will go higer and also the cards will run hotter.
1. SAPPHIRE RADEON NITRO+ RX 470 8GB are very good and stable cards, yes each card can pull around 29 – 29.5 Mh/s, there may be cards that doesnt support memory clock that high like 1150/2150 and you will have to lower it to like 2130/2100 etc.. the hashrate will go down a bit, but still good.
Your calculations are precise according to current ETH price and dificulty the earnings with a rig like this are $898.61 month!
Thank you so much Ciprian I really appreciate your advice, I will follow it. One thing I forgot to ask. Does the mining consumes a lot of data, because one would think that as it only process raw data, no graphic interface no nothing, it should be really light on the data consumption are. Is that correct?
Hi Ciprian, firstly thanks for all the tutorials! I am building 2 x 6 RX 580 gpu rigs and I wanted to know if it is worth trying to solo mine? I have looked extensively on the internet but cannot seem to find a definite answer. I should get around 300 Mh/s. Thanks!
Hi, pool mine is the best option 🙂
So got a few running now my friends want me to set them up rigs. Is there any way I can make any of the miners do a “devfee” for the builder? I figure if I can make 2% of each rig i build it would be worth my time.
You could have mentioned that ethOS doesn’t work with Nvidia 1060 cards… I paid 39$ for nothing.
Hey @silviuoprean:disqus , SERIOS? why is my fault for buying something wrong ? 🙁 on their homepage you can find “Limitations of Scope: CPU Mining, ASIC Management, NVIDIA GPU Mining (ethOS is for AMD GPUs).”
I’m not saying that it’s your fault. I know I’m a noob, and maybe should be more careful when buying stuff, but I followed mostly your instructions when building my rig. From part 1 to part 4, and took advice also for buying the components. It would just be useful probably to have included that information in step 4.
NVIDIA cards now supported
Amazing, thanks Dennis!
no prob^^
Hi Ciprian,
I’m new to this. How do ProxyPool 1 & 2 work? Do I have to set up an account with one of the pools or do I just point it to one? Second, if I just point it to one, can I use the one it is defaulted to?
The second pool is as a backup if the first one fails to connect for any other reason.. so if you are USA use
proxypool1 us1.ethermine.org:4444
proxypool2 us2.ethermine.org:4444
Hi Ciprian, I tried ethOS and I obtained more hash rate respect to win 10. Instead, for power consumption ethOS can’t modify by software the vdd, so on rx 480 bios I put memory clock/voltage=2125/850 and 850mV on all GPU voltage rows. After reboot the power consumption is not decreased and verifying on Windows with gpu-z the vdd is 0.98V
Reading the bios with atiflash the voltage values are 850mV. It seems that voltage values that I put on bios are not used..
Best regards
Windows10 is better 🙂
Hello Ciprian, your tutorial it’s amazing! I have a doubt, I have 3 rx 570 and 1 R9 380 can I put in ethos all? I don’t trying yet, because I dont know if possible, thanks!
as I remember it won’t work to mix rx with r9
Could help me to install wireless driver in ethos
The ethOS distribution page states that wireless drivers cannot be used from what I understand so you have to use wired networking.
thank you
very cool guide, I’m having trouble with just getting a blank screen when plugging monitor into GPU. All BIOS settings correct and updated, EthOS updated, integrated card works and shows EthOS and even shows 6 GPU’s connected but when goes to EthOS it goes blank. Followed guide on ethdistro and plugged GPU correctly into 1st PCI 16x. still nothing this is 6) RX 460 on MSI SLI Z170a.
I cant get dual mining to work Eth+Sia eth is working but sia keeps at 0 mh/s
paste here you configuration file..
Hi, can you share best setting for Eth+Sia dual mining for EthOS?
The ethOS panel address keeps on changing. How do I make it static?
use command: custompanel
Salut Ciprian
Multumesc pentru postari. Sunt de mare ajutor.
Salut @tudor751:disqus cu mare placere 🙂
ı am how to Ethos change ssh port 22
I sell Windows 10 keys for 20 USD via Paypal, contact me with “Windows 10” in the title. [email protected]
Hi Ciprian, do you have a tutorial for Win 10 rig complete setup?
Here: https://1stminingrig.com/best-windows-setup-configuration-tweaks-for-mining/
Thank you!
Hey, 1st and foremost… THANK YOU, your site is very informative! I have built a few rigs with windows with some GTX 1060’s 3gb and managed to get 23mh per card. I am now going to try linux with some rx 580 nitros that you recommended. I have linux set up but cant figure out how to run a script on reboot so im headed to Ethos. Do you have tutorials on how to set up claymore miner on ethos? I primarily want to use claymore so I can have multiple config files. Going to have 12 gpu…. want to split them up and mine diff coins.
Hey, welcome 🙂 here is a configuration that i used.. it is pretty old now https://1stminingrig.com/tutorial-ethereum-mining-rig-part-4-ethos-installation/
if we are using a pool, and the pool manages the coins mined. Why are we entering our proxy wallet?
Because there is where you will receive your reward!
Seems that my ethos (new installation) doesnt pick up my ethernet. The miner doesnt start. Any Suggestions?
Check pool status..
SALUT, FOARTE UTIL ARTICOLUL PENTRU MINE CARE IMI CAM PRINDEAM URECHILE IN ETHOS FIIND OBISNUIT CU WINDOWS IN GENERAL
Ma bucur ca este de folos 😛
Am xfx rx580 8gb stii setarile pentru ethos? Am un rig de 10 gpu pana acu si windows 10 deja dupa 6 placi se blochează din pacate asa ca am cumparat ethos si e de lucru
Salut, si cu 6 GPU pe windows face la fel ?
cu 6 merge bine .ce pui in plus incepe sa inghete de asta am trecut la ethos dar nu reusesc sa il setez bine placile in windows imi scot 29 mhs in ethos 25 e diferenta si trebuiesc setate…ai habar?
Poate sa fie ceva legat de dcri daca folosesti claymore, totusi iti sugerez windows, este mult mai accesibil decat ethos. ai grija la clocks si undervolt, din cauza lor cred ca iti da freeze. dale mai jos la placile care crapa
da-mi un pm in privat sa vorbim de ethos
Ciprian, do you know about the intensity settings on ethOS, what they do and how to set them?
Hey @disqus_Rj3NjzKnqV:disqus , you mean the -dcri ?
I am talking about the settings in the sgminer-gm-xmr.stub.conf file that you can modify in ethos…the rawintensity, worksize and gpu-threads. Is there settings to get better hash?
Hi Ciprian,
Great tutorial thank you for that. I built the rig as per instructions have 4 rx570 8gb gpus. First time booting does not load any thing or monitor have connected only gpu to test the boot. After few mins gpu fans start spinning faster. Not sure why it is not booting. Any advice please?
Thanks
~~~~~~~~~
Hi Ciprian,
Everything is working just fine now. I am getting approx 20 hash per gpu. I changed setting to as per instructions. I am using RX 570 8 gb cards. Please let me know if there is room to optimize.
Thank you very much again for awesome tutorial.
-Abhi
Have you modded the bios ?
No, I am still figuring out how to do it on ethos. I do not have windows machine. My personal laptop is a Mac. What is your thought me running dual boot ethos and windows10 on the same SDD?
You can’t do it on ethos.. you will have to do that on windows.. :/
I am trying sudo atiflash on ethos to flash my gpus. Need rom file for Sapphire 11266-09-20G Radeon NITRO+ RX 570 8GB GDDR5 card. Would v4.rom you shared work for these cards? Please advice.
Nope, you will have to modify the original rom
how do you do that?
Thanks for all the info, I just got ethos and keep getting the error “could not connect to http://127.0.0.1:8080”
I’m trying to mine to the ethermine.org pool and are using their settings, the pool is up but I’m not mining to them. Any ideas?
That is a local ip.. have you added the port to proxypool ?
Do you mean in the local.conf file from ethos? I used the ports from the guide on ethermine (using US west) in the config file, I don’t see anywhere in the config file on where to modify local ip’s or ports. Here is a link to the default setup ( I should add that this setup works, but only on nanopool)- http://ethosdistro.com/pool.txt
Thanks a lot 🙂 Great work !!
One question. Is it possible to change the RX580 bios from Linux distribution???
When setting the overclock in ethOs. Do I need to do anything with my gpus? I keep reading flash them how?
The flashing must be done via Windows!