
Connect To Your Mining Rig From Different Location or Device
- Like
- Digg
- Del
- Tumblr
- VKontakte
- Buffer
- Love This
- Odnoklassniki
- Meneame
- Blogger
- Amazon
- Yahoo Mail
- Gmail
- AOL
- Newsvine
- HackerNews
- Evernote
- MySpace
- Mail.ru
- Viadeo
- Line
- Comments
- Yummly
- SMS
- Viber
- Telegram
- Subscribe
- Skype
- Facebook Messenger
- Kakao
- LiveJournal
- Yammer
- Edgar
- Fintel
- Mix
- Instapaper
- Copy Link

In this tutorial I’ll show you how to get access to your ethereum mining rig from a different device via SSH / Putty. This way, you’ll be able to connect with your rig from a friend’s PC, android / iOS smartphone, tablet, Windows server, etc.
The idea to create this tutorial was born when I had to leave town for a couple of days. I was really concerned about my mining rig. After all, it could get a bug and stop mining, or there could be an internet issue and I wouldn’t be there to fix it. Although some issues cannot be fixed from a third-party device, I wanted at least to be informed if something happened to my rig.
I usually check the temperature and other parameters of my mining rig through USERNAME.ETHOSDISTRO.COM, but any IP changes invalidate the access with my current ID. Hence, I really needed to have a more reliable way to connect with my rig from anywhere, any time of the day. Basically, I needed to link my phone to it.
After many hours of researches, experimentations, and trial and error I’ve finally found a way to access my rig through SSH. I’m really thankful to tntor from the #ethereumOS irc channel for his valuable insights.
 Some people recommend using Teamviewer for that purpose. Although it is a proven method that does works, personally I find it a bit messy. In order to do that, I need a virtual keyboard so I can use the Linux commands like CTRL+O to save the file, ENTER to confirm and CTRL+X to exit, and so on. I mean, in my opinion, the Teamviewer method requires too much useless key tapping, which is something I want to avoid.
On the other hand, it’s good to have Teamviewer as a back up option. If you’ve got access to a PC, you can use it to access your mining rig, check how it’s going, and so on. But you don’t always have access to a PC when you’re traveling, do you? Let’s avoid this PC inception and see how you can access your rig from your phone 🙂
Best ways to access your ethOS mining rig via SSH and control it
First of all, use your default IP to login to your router. The default IP is usually 192.186.1.1 or 192.168.0.1. After you’ve logged in with your username and password, look for the VPN Settings tab (depending on the router, it might have a slightly different name with a similar meaning)
For this tutorial I’m using an Asus Dual Band Wireless-N 600 SOHO Router (RT-N53), with the following Firmware Version 3.0.0.4.374_311. It’s a great router, by the way!
As you could notice, it has a simple interface. After introducing the username and password, we go directly to the VPN Server tab.


Once you access your VPN Server tab/page, there should be some instructions regarding VPN setup. Try to follow those if your router is different than mine. I’ll list the instructions for my router as an example (they might be similar to yours, by the way):
VPN Server – Basic Config
The VPN server allows you to access your home network anytime, anywhere.
Please follow these steps to configure your VPN Server:
(1) Enable the PPTP VPN server
(2) Set the IP pool for client IP. (Maximum 10 clients)
(3) Set up the username and password for VPN client.
(4) Open the VPN connection program on your computer or smartphone.
(5) Add a new PPTP VPN connection and the VPN server address is xx.xxx.xxx.xxx
(6) If your WAN IP address is dynamic, please click here to set the DDNS.
(7) VPN Server FAQ
(1) Enable the PPTP VPN server
The Enable PPT Server option should be visible in your router’s VPN settings page. Check yes or enabled and click Apply!

(2) Set the IP pool for client IP. (Maximum 10 clients)
This should be added automatically once the PPTP is enabled. Hence, I haven’t had to do any modifications in this field.
(3) Set up the username and password for VPN client.
After you fill the Username and Password fields, click the PLUS button to add the client to the router’s VPN database. After that, go to the VPN details tab, and choose Both for Broadcast Support. Click the Apply button once again.


(4) Open the VPN connection program on your computer or smartphone.
(5) Add a new PPTP VPN connection and the VPN server address is xx.xxx.xxx.xxx
If your provider doesn’t use a dynamic IP address then you’re all set.
In my case, though, I have a dynamic IP. I do have the option to switch to a static IP, but the dynamic one is quite useful in some situations 😛 If that’s your case too, then follow these steps:
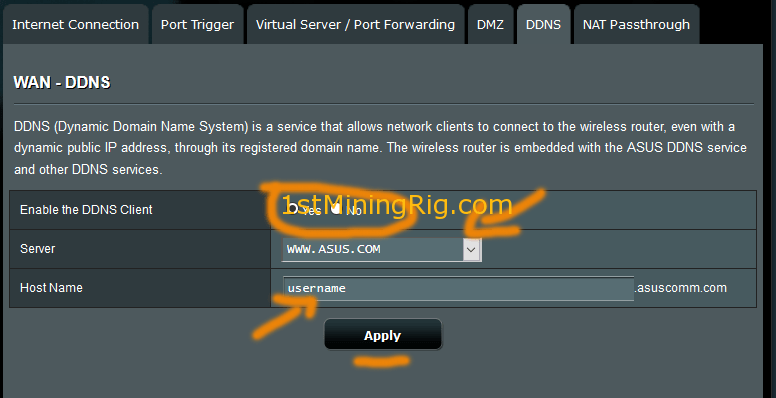
(6) If your WAN IP address is dynamic, please click here to set the DDNS.
In my router, when I click on the highlighted text please click here to set the DDNS, it redirects me to a page called WAN – DDNS. Alternatively, you can find this page in the WAN settings tab. Once there, enable the DDNS client. For instance, ASUS kindly provides a free DDNS host; hence “WWW.ASUS.COM” is the best choice for me and for any ASUS router user.
After selecting the Asus DDNS host, enter a username for your host. You’ll be using it later to connect to your VPN server. Your username will have this format: username.asuscomm.com. Don’t forget to click Apply before proceeding.
You can access the VPN Status page to see if someone’s connected to your VPN server.


Now that your VPN is all set, all we have to do now is connect to it and then access our mining rig via SSH!
Connecting to yout VPN from an Adroid device (smartphone, tablet)
Follow these 10 steps and, after some gentle tapping, you’ll have access to your home network:
- Go to the
Settingspage of your Android device - Choose
More networksorWireless & Networks - Tap the VPN option
- Tap the PLUS sign to add a new VPN Server address
- VPN Details: You’ll need to fill two fields. The first field, called
name, will define how the network will appear on your device; hence, you can type anything in there. The second field –server address– should contain theusername.asuscomm.comof your VPN. - Once done, select the VPN server you’ve just added
- Enter the username and password that you set on your router: MyUsername and MyPassword
- Tap on
Connect - Wait until you get the connection confirmation message / notification
- Once you get it, it’s all set! You can check your connection anytime by tapping the appropriate icon on the notification bar


Congratulations! You are now connected to your home network. The next step is to install the needed Android app to access your rig via SSH. Sadly, I don’t own an iOS device which would serve the same purpose. I’ve googled “VPN iOS” and I saw some screenshots of apps that look almost like the ones I’m using on Android, so maybe they would work the same way too.
Connecting to SSH from your Android device
After browsing Google Play and testing several SSH apps, I’ve decided to stick with ConnectBot or VX ConnectBot apps. You can choose any of those two. Both are user-friendly and have all the functions we need. You can read more about them here. Here’s how to use any of those two apps:
- Download, install and execute ConnectBot
- Write your rig username IP and port address, like that:
[email protected]:22Wait until it connects - Once connected, it will ask you for the password. If you haven’t changed the default ethOS password yet, then you can type
live, which is the default / factory one - Once you log in, you’ll see the ethOS home/welcome splash screen and the commands
- Type
show minerand tap enter to see the miner progress - To get back, tap the CTRL button (situated in the bottom left corner of the screen) and then select
Keyboard(a small button on the bottom right corner of the screen) and finally press C. - From here you’ll have full access to your rig configuration
- To disconnect from SSH, tap the
returnbutton, and press and hold the green dot. A window will popup where you can tapdisconnector edit your connection settings


I hope you were able to follow these 8 steps without any complications. Now you can control everything your ethOS mining rig does from your favorite Android device.
Connecting to your rig with VPN from a PC using SSH
If it’s possible to do it from a phone, then it’s definitely possible to do it from a PC. The following steps won’t do any invasive changes in your PC. By following the steps below, you can safely use the computer of your friends, family or even a public cyber cafe PC to access to your mining rig. Right now I’m using Windows 10, but I will be adding Windows 8.1, 7 and XP screenshots as well.
First, we connect your PC to the desired VPN server. Here’s how we proceed:
- Search for
Windows and Sharing Centerin your search bar and access it - Click on
Set Up a New Connection or Network - Click
Connect to a Workplace Create a new connection(skip this step if you don’t have one)- Select
Use my internet connection (VPN) - Then, add your VPN host name
username.asuscomm.comand a name for this connection (used as a reference only)


Now it’s time to connect to your VPN host. Please do the following:
- Type
VPNin the search bar. Select the optionChange Virtual and Private Networks (VPN)by clicking on it - Click on VPN
- Select the VPN connection we’ve just created and click on
Connect - After you click that, it will ask you for your VPN’s username and password. Fill the two fields and click on “Ok”/“Connect” and voilà! The connection is now established.


The next step is easy: start Putty, enter the local/lan IP of your rig in the Host Name (Or IP address) field, choose the port 22 and connect.


You can follow the same steps for Windows Server and it will work just fine.
Honestly, wish I had this guide when I went out of town back then. Now that I know these steps, checking my rigs from different locations has never been so easy! I hope that this know-how will be as useful for you as it was (and still is) for me.
[cp_modal display="inline" id="cp_id_e9e92"][/cp_modal]


I have a mining rig working on xubuntu with a putty connection etablished. Now if i want to change the payout treshold, i need to confirm my miners public IP Adress.
How can I even find out my workers private IP Adress via Putty (i am behind a Router and do not have static IP’s for the devices in my network)?