
Best BIOS ROM for Sapphire Nitro+ RX 480 8GB OC to Mine Ethereum 30+ Mh/s
- Like
- Digg
- Del
- Tumblr
- VKontakte
- Buffer
- Love This
- Odnoklassniki
- Meneame
- Blogger
- Amazon
- Yahoo Mail
- Gmail
- AOL
- Newsvine
- HackerNews
- Evernote
- MySpace
- Mail.ru
- Viadeo
- Line
- Comments
- Yummly
- SMS
- Viber
- Telegram
- Subscribe
- Skype
- Facebook Messenger
- Kakao
- LiveJournal
- Yammer
- Edgar
- Fintel
- Mix
- Instapaper
- Copy Link

Hey, people. I just found the best BIOS for Sapphire Nitro+ OC RX 480 8GB. Tested it on 8 GPUs, all of them are working great with no problem so far.
This bios is from a Sapphire Nitro+ OC RX 480 8GB with Samsung memory, some say that all 8GB cards have Samsung memory only and 4 GB cards are based on Hynix or Elpida memory.
Here is the exact GPU i am using in this tutorial ( also on SALE 🙂 )
Before to use this ROM, make sure your GPU has Samsung memory by checking it with GPU-Z

First of all i will tell you the exact tools and software i am using, maybe this will make the difference..
- Windows 10 PRO 64 http://amzn.to/2mG447M
- AMD Drivers 16.9.1 download here
- ATIflash download here
- Claymore’s Dual Ethereum AMD+NVIDIA GPU Miner v8.1 (Windows/Linux) download here
- Sapphire TriXX download here
- Windows 10 Registry tweaks for mining
- Virtual Memory increased to 16 GB
Everyone should give a big thanks to Jukebox, from Ethereum forum.
On this thread here, Jukebox posted a BIOS ROM that he was testing, “Here is my another ROM with 1150/2150 clock settings, that does 29.8 MH, Use it on your own risk. “. He also stated that “If you VERY lucky, you can try to clock up to 1225/2300 MHz and reach 31.5-32 Mh with this ROM, but test it yourself. “, but i guess that would be too much and will also increase the power consumption.
Here what you should do to achieve this awesome results
1 Download ATIflash and BIOS ROM file- Download ATIFlash 2.74 https://www.techpowerup.com/download/ati-atiflash/ (extract the contents in C:/ and create a folder “atiflash“)
- Download the ROM here: https://us.v-cdn.net/5021640/uploads/editor/0h/dh5xcsdx676t.zip (extract the ROM to “atiflash” folder)
- First of all make a backup of the original BIOS (OC version) with ATIflash
- Shutdown the rig
- Switch VBIOS to the other side (side with HDMI cable)
- Turn on the rig
- Create a backup of “silent” ROM
Now that we have a backup of both BIOSES, let’s flash the v4.rom
- Start ATIflash as administrator
- Load v4.rom
- Click “Program” and wait, the programming process will take max 1 minute
- Restart the rig once you get the confirmation that the ROM was successfully programmed
I made a special video just for this, here it is
- Download the latest version https://mega.nz/#F!O4YA2JgD!n2b4iSHQDruEsYUvTQP5_w
- Create a text document and paste the following code inside
- GPU_FORCE_64BIT_PTR 0
GPU_MAX_HEAP_SIZE 100
GPU_USE_SYNC_OBJECTS 1
GPU_MAX_ALLOC_PERCENT 100
GPU_SINGLE_ALLOC_PERCENT 100
EthDcrMiner64.exe –epool eu1.ethermine.org:4444 –ewal ETHEREUM_WALLET_KEY.RX480s –epsw x –dpool dcr.suprnova.cc:2252 –dwal SUPRNOVA_USERNAME.WORKER_NAME –dpsw WORKER_PASS –tstop 85 –dcri 34 - Save the file as .bat, like ETH+DCR.bat
- Now run the .bat file


- Download the latest version http://www.sapphiretech.com/catapage_tech.asp?cataid=291&lang=eng
- Install, start Sapphire Trixx and set the following values if not already added
- GPU Clock: 1150
- Memory Clock: 2150
- Apply changes, and after that make this modification
- mV: -100
- Apply changes
- Repeat this steps for each card
- Check Claymore for results


Registry modification & Virtual Memory
I am using a file created by a user from Ethereum forum which let’s you to disable a lot of unuseful features for a mining rig like windows update, windows defender, OneDrive etc..
Before to run the modifier, please backup your registry first
- Download Windows Registry tweak: https://mega.nz/#!8gZzjQaa!Dt4wE0WEo8nZkui_-cAAXL4mb4YlO6CJgFZTXKq9pnQ
- Run it, and will ask you one by one what to disable or not, tye “y” or “n” and hit enter

As for virtual memory, claymore’s is asking for it, and this will improove your rig performance, at least for me it did
- Go to “System” -> “Advanced system settings“
- On “Advanced” tab where its says “Performance” click on “Settings“
- Select “Advanced” tab again
- Click “Change” button
- Uncheck “Automatically manage paging file size for all drives“
- Check “Custom size“
- For “Initial size (MB)” i usually use the recommended one which in my case is “2938“, so i will add: 3000
- For “Maximum size (MB)” add: 16000
- Click “Set” button
- that’s it


If you have less than 6 GPUs on your rig then, i gues, not reall sure 100% but you will have to use a different –dcri, to find the best –dcri value for your rig increase or decrease intensity by pressing “+” or “–“, then press “S” to see current hashrate.


And finnally, the numbers, best moment of this tutorial 🙂

Profitaility


UPDATE: Wednesday, March 29, 2017
If for some reason this BIOS ROM does not work for your card as it happen with John here, like you get blue/black/green screens while starting to mine or booting to windows, low hashrate etc.. is maybe because of bad chips, you can use this ROM : https://mega.nz/#!M14GXLgS!n03dhVJZeHkTyFff48dpUqFE8hK3Rj0Ek7D8dcB7vMY , it is a bit slower but will work for sure. Check this tutorial if you need help re-flashing your GPU: How to FIX & RE-Flash BIOS of Bricked GPU on RX 470 / 480 Series
Happy mining! 🙂
[cp_modal display="inline" id="cp_id_e9e92"][/cp_modal]


Hello
thanks for your help
please
what is the best pool for ETH
I prefer ethermine.org 🙂
Hello,
i tested your rom getting 26M/s for dual mining ETC+pascal. i’s it standart?
Hi, what is your dcri value ?
default 30
try to increase or decrease with + and – then press S to see current hashrate.
all good now.. thanks..
I have an MSI Z97 Gaming 5 mother board with HD Intel graphics on Board.
In Bios I have set the default graphics to PEG mode(PCI-E) insted of IGD(Intel graphics).
To switch the windows to AMD graphics(on Startup) It needs a monitor with High resolution. Else windows boot with default Intel HD graphics.
My question is, in your tutorial I cannot see any HD monitor you used. Nor the dummy DVI pin. When I dont connect monitor my AMD settings does not open.
How do you Run your Graphics on AMD cards without monitor with Radeon settings open.
Am I doing anything wrong?
I am new to mining.
Hi @kindergart:disqus , i am only using HDMI cable to connect the monitor. Insert HDMI cable to the GPU that is placed in the main PCI-e 16x slot here: https://gyazo.com/85b22fedd4ff7dcd6026f4533b7f7579
Ok.
Only cable?
No monitor?
Thanks in advance
Will this give great hash rates for Monero too?
Hi, Yes 🙂
*goes super saiyan*
kamehameha!!
Hi, great article, as usual!
Question, though 🙂
Are you mining on Win10 now? In your last year guide you recommended ethOS. So do you find Win10 more preferable now, especially with BIOS upgrade?
I saw on ethereum forum some claims Ubuntu is more stable for custom BIOS
Interesting to here your thoughts on this.
Question if I load your rom on rx 480, after that step I don’t need to do nothing else, I am running ethos
Bu you will have to flash the rom in windows, you cannot do that in ethos. Basically after that no need to do anything else, let me know how it goes.
atiflash -p 0 v4.rom
Old SSID: E347
New SSID: E347
Old P/N: 113-2E3472U.O54
New P/N: 113-2E3470U.S52
P/N mismatched
ERROR: 0FL01
Ermm.. have you also tried flashing directly in ATIflash ? https://www.techpowerup.com/forums/threads/atiflash-error-0fl01-fix.133935/
Yes i did, Ciprian.
Tried this https://www.techpowerup.com/forums/threads/atiflash-error-0fl01-fix.133935/ ? also take a look at this thread https://forum.ethereum.org/discussion/10152/bricked-my-480-cards-with-atiflash-error-0fl01
If using ethos, I need to do modifications on windows first? then boot back up on ethos and my configs will remain once all my cards are flashed? Also I do have to flash each card right? Thank you!
you will have to burn ethos image again, but yes, will need windows to flash the bios. but my recommandation is to stay with windows 10, right now is the best os to mine with!
Thanks man really appreciate it! Gonna stick with windows. Just got my 6th card today and going to plug in my windows SSD tonight. Can you help me a bit. Do I need to just have 1 card plugged in at a time and flash each on individually? Once flashed should I switch back the BIOS switch on the GPU? or should they all be moved towards the HDMI ports when im finished?
Flash the card one by one only! make sure you backup original bios first. switch the bios towards the hdmi and flash the modded one.
Went through the steps. Soon as I started mining i got the blue blank screen. Rebooted and same thing… i swapped my SSD back to ethos for now, 5 of 6 cards look to be mining at 27mh/s but the 6th only 23mh/s…. not sure what happened. Will try the alternative rom. Thanks for the help Ciprian
This mining result was obtained using only one GPU, or at 6 rx480? And the result with BTC? Thanks for this.
The results are from a 6x RX 480 rig, what about BTC?
Thanks. It’s a question, I’ve discovered your site a little, and I’m really enjoying your explanations and reviews. But why do not I see BTC mining data? Thank you.
I already added review with ASIC that can be used to mine Bitcoin.. haven’t found them ?
hi this work with 11260-07-20G model??
i want to buy 18 so i need to be careful
Yes, it should work with no problem.. other used tested the rom with same model and had no problems.
Hi, great tutorial. Too bad for me it doens’t work. After applying the v4.rom and rebooting I get a big scrambled mess on the screen. After a next reboot just de default Windows drivers. Any tips?
Hi @disqus_vLauD4I0lB:disqus, sorry to hear that 🙁 but no worries here is another ROM that works great, it has just little less hashing power but is stable, meant for cards that does not support the v4 (for me worked) https://us.v-cdn.net/5021640/uploads/editor/rc/t9y6aeqlfn1l.zip , on the last rig i had two cards that wasn’t wroking at all with v4 but then i tried this one and now the rig is up and running like a charm 🙂 try it and let me know.
I will update this article soon and also will make an article regarding the last rig.
Good luck!
Meh… after appling the bios and a reboot, Windows does not recon the card as a Radeon card and loads the default drivers.
Got 17.x drivers, does that really matter? Will try the 16.9.1 later today.
Yes, do not use latest drivers, use 16.9.1
Yes! Older drivers works! Did not expect this.
😉
Some ‘thank you’ is on it’s way to you. 😉
Keep up the good work.
Thank you @disqus_vLauD4I0lB:disqus 🙂
Hi Ciprian V.
I loved this guide and the rom as well but same thing happened tom me like John here. Claymore crashes after a couple of minutes. First, i thought it’s bad risers but even if i use one card directly in the mobo, it still crashes.
2 out of 5 sapphires nitro+ work fine. The problem is on the 3.
Going to try this new rom today and post the results.
Win 10
Amd 16.9.2 drivers
have you also tried the second bios aswell ?
Ciprian,
I will buy you a case of beer if you can help me with my dpools file. I am trying to dual mine ether and decred with claymore. I made an account at coinmine.pl but I admit I am stumped. I am dual mining, as I type this, but my text file must have some syntax error because I have no stats. Ether and Nanopool were sooo much easier for me. Thanks in advance!
Hey @HiFiveGhost:disqus, can you send me your current configuration ?
Ciprian,
Is there a way I can email you my config? I’d rather not show it here.
Hi @HiFiveGhost:disqus, you can send it here https://1stminingrig.com/contact/
Why you don’t use ethermine and suprnova?
EthDcrMiner64.exe –epool eu1.ethermine.org:4444 –ewal ETHEREUM_WALLET_KEY.RX480s –epsw x –dpool dcr.suprnova.cc:2252 –dwal SUPRNOVA_USERNAME.WORKER_NAME –dpsw WORKER_PASS –tstop 85 –dcri 34
Everytime I hit “program”, I get an error messaging stating “Cannot erase ROM”. Anyone else having similar issue? I’ve tried through windows and DOS with similar issues. The only thing I noticed that is different from the video is under Flash type, mine says M25P20/c. Not sure if that matters or not. Error code is 0FL01. Appreciate any suggestions!
Hey @disqus_JFxXaQGkI1:disqus , try this https://www.techpowerup.com/forums/threads/atiflash-error-0fl01-fix.133935/ also take a look here https://forum.ethereum.org/discussion/10152/bricked-my-480-cards-with-atiflash-error-0fl01
Thanks, I’ll give this a try. On a separate thought, do you think it’s possibly due to using a Non reference 480 card? I’ve read that flashing bios on a card that is overclocked can cause issues and I’ve got essentially the identical one listed in this guide that is factory overclocked.
Hmm.. not sure if i understand.. do you have the card with VBIOS switch ?
Yes, I do.
Ok, great.. and when you flashed the v4 ROM, before that have you switched the jumper to non OC bios ?
Yes, i tried it in both directions. With the switch towards the HDMI cable was the one I was expecting to work but I received the same error message with the switch in either positions. Tried it on two identical cards.
That’s really strange.. fresh windows?
Yes, installed over this past weekend.
Tinkering with things a little more, i’m getting a new error message. First, I tried running through cmd prompt and typed the -unlockrom command which seems to at least allow things to go to the next step. Now i get the same error message but it states “can not flash a 0x0 length image into a 0x40000 lengthrom!ROM not erased” Any idea what that means? My online searches are coming up empty.
I think i see the issue. When i backup the bios on my card, both roms are 256kb in memory size, but the rom linked above is 512kb. I guess I will need to find another ROM with the correct file size.
Didn’t you used ATIflash to backup the ROM?
I did and that backup has a file size of 256kb on my hard drive. The ROM listed above is 512kb.
Got it up and running. My original guess on file size for the BIOS was indeed the issue. My fix was to look at the original silent BIOS settings and copy paste the v4.rom listed in this tutorial line for line in polaris bios editor. Worked like a charm and up and running at 180 mh/s on my 6 GPU setup! Thanks for your help!
WoW! That’s one damn fix 🙂 good thinking @disqus_JFxXaQGkI1:disqus, you got now the max speed 🙂 congratz! Happy mining !
same cards (100406NT+8GOCL) – but A1701 -> Samsung w. romsize 40000 (256kb); A1712 -> Samsung w. romsize 80000 (512kb)
thanks Andrew:) your solution saved my day. i appreciate, indeed!
Hey, do I understand correct that you opened the SilentBackup and copied values from v4.rom and as a result you got an edited 256kb file?
I did this for all values, but my computer wouldn’t boot after that. Could you maybe share you ROM file?
Here you go, use at your own risk!
https://mega.nz/#!M3Q2iACD!JPcLEM9mBinLOh3vLQnOJ5nrTzapD1Ni_1wThnWeVqM
hi I don’t have bios switch on my sapphire rx480 8gb.
Looks like you don’t have the OC version..
Hi, every time after restart the voltage automatic restore to “0”. Please help.
Save the settings to a profile, do you use sapphire trixx ?
It saves the settings with the voltage only for the first GPU, for the rest it’s 0 after restart. Any idea how to do it for all of the GPUs?
You can save on profiles or try to do the same settings via claymore directly..
https://uploads.disquscdn.com/images/eb545cfcac409fa3cda5b958bf90bf243a9d4046deeeb8cdf9020d7d3275945c.jpg https://uploads.disquscdn.com/images/7309c2dbecfecf5b568c6b05f795ecbfc929c60122232687032fff58fbcf789d.jpg Hi Ciprian
I am currently working with 6 Sapphire NITRO (without +) OC 8GB graphics cards.
when I try to edit the original BIOS, I do not get an option of 1750 or 2000 but random numbers in Timing column. Could you help me with custom bios with these Graphic cards?
Please find the BIOS in below link:
https://drive.google.com/open?id=0B1It-2tfRiaMeXhDNk5YMnpZdms
Can you confirm that you have Elpida bios ? send a screenshot from GPU-z.
it does not look like Elpida bios.
Please find attached the GPU-Z Screenshot. https://uploads.disquscdn.com/images/b9e3e8a3436cd68e6a919baeb08696660c066afc02bcb6fe1fa1a30363840a69.jpg
Hmm.. can you backup de bios with atiwinflash and send it to me? thanks!
https://drive.google.com/file/d/0B1It-2tfRiaMeXhDNk5YMnpZdms/view
thanks! can you also make a photo of box and also a photo of white label where is the SKU number?
Hi Ciprian
thanx for the prompt replies,
please find attached the SKU number and photo of the box https://uploads.disquscdn.com/images/3cddab11055cc9851c79dd56b74c15c99481cba76977bc270a75249dc41c216a.jpg https://uploads.disquscdn.com/images/e87c546b4e250267a1111f43d5203af23fba0e3b7172fe1915d4c18c2247173a.jpg https://uploads.disquscdn.com/images/2af97ab891d303201d9c9af929bb6f61a2943bfc7de75b3647fc99582e21ad53.jpg
hmm.. not sure why you have that on samsung memory..
that’s the problem, any ideas to customize the rom?
I’m getting 156 MH/s by overclocking and I want it to work better.
maybe it can be done something with watttool or to edit the bios with hex editor.. not really sure..
Hi Apoorv, were you able to fix it?
Do you have rom for 480 8gb chipset micron?
@bdkminang:disqus, try this and let me know if that worked for you https://mega.nz/#!42Qx1awA!ZeAhW-Q_y4lEizHG2Fx0omFqz4oVP-8X_9je9JZBPJg
bios ok. but when i apply save setting sepphire trixx it load to default again. FYI my rig 3 samsung chipset and 3 micron shipset
Hi,
I have tried to install v4.rom to my sapphire rx4808gb-oc ver.01-20G card and xfx triple X rx4808gb-oc ver. but after succesfull flashing the windows does not recognize the card and flash again with the orginal firmware.Any help be appreciated.
What is the driver version?
Hi Ciprian,
Thanks for the reply, i have downgraded from 17.xx to 16.5 ati driver and now gettting 29.6MH.It is stable now.
Is there any rom for xfx rx480 oc series?
I have expected to get 31 for sapphire 01-20g series but unable to get ?
Not sure about the 31 mh/s , don’t have any :/ , 29.6 is a good hashrate 🙂
Hi coinextr and Ciprian,
I had the same issue. I have Sapphire RX480 Nitro with 8GB. I followed your procedure initially and then Windows did not recognized my card.
Here is what I did, but still not working –
– I programmed the Flash again with originalsilent.rom
– I used AMD Clean utility to clean the drivers.
– Then I ran DDU to clean all the entries etc.
– I verified that the current driver 17.4 was not there.
– Then I restarted the system.
– I installed version 16.5 (well I did not see the display driver option there). May be if you can help me with the download page where I can download this file.
– I programmed the rom with v4.rom
– Restarted the system, and the problem is same.
I have tried other combinations as well but of no use.
Any help will be highly appreciated.
Thanks
Rajesh
Hi,
Have you also tried with 16.9.1 driver version?
If that doesn’t work then make a copy of the silent BIOS, then open v4.rom and original silent bios, then manually copy the differences between those tow bioses, save the rom and program it.
Let me know if that worked.
Hi Ciprian,
Many thanks for that tip to load 16.9.1 driver. It worked!
I am using Minergate and getting a 25.82 MH/s. I think I need to try with Claymore.
Am I missing anything here? I aim to reach 29.2 MH/s
Thanks,
Rajesh
To achieve that hashrate you will have to modify the bios 🙂
install driver ver 16.9.2 and it work perfect. i have this same gpus
hey buddy worked for me 😀
awesome! 🙂
https://uploads.disquscdn.com/images/37d589ac6a476a402b9eff1f84b76dfa23704bc46bb9add2d5ba4e416a672027.jpg Hey. I got the following problem ‘Cannot erase ROM’, Can anyone help me to fix this?
Try to manual copy and paste v4 modification to your original bios, maybe that will help.. also try to flash with cmd!
great. worked for me. getting 28-29 mh/s. should i Switch VBIOS to previous position now???
Bios should stay where it is now, if you switch bios it will work on a different version, not the modded one!
Could you please write here what exactly are the steps?
thanks
Hi, doesn’t work on my 11260-10-20G, any advice? Regards
Try copying 1750 to 2000 and go with mem clock to 2150, le tme know if that worked!
i have the same gpu, with vdrop+ bios try to configure in saphire trixx 1125/2080, -100mv, +10% power, i get 29mhs eth/929mhs dcr, 58C,90w, work only with 16.9.2 driver version
Why do i need to use OC version of VGA? Is there any true difference between normal and OC versions? Where i live there are 40 euro difference between normal and OC versions.
It should support better overclock, better hashrate..
heloo..For the Cyprian V. Believe that we could have a private discussion .. what nationality are you ? … SKYPE ID: costis70..whatsapp: + 40723329868..mail: [email protected]
Thx for all the help! One thing… I have a Nitro+ RX 480 8Gb Samsung… no matter what .rom I load or if I change one setting in Polaris and then successfully load the .rom into my card… my display reverts to the lowest setting and inside TechPowerUP GPU clock and memory are both 0. If I reinstall the orig silent.rom it works fine.
Any other way to mod the bios? p.s I used you genesis mining code, I hope the company isnt a scam haha
Maybe try to manually modify the rom, compare this rom with your original roma and copy the differences..
Ha, thanks! GN is not a scam 🙂
ok, I copied my bios .rom using TechPowerUp and then made changes inside Polariseditor and it worked. But one other thing was my bios .rom size was 256k and a lot of the example .rom were 512k.
Always use ATIflash to backup bios!!
Hi, I have Asus Strix rx470 4gb OC gaming, have any bios mod for this GPU???
Nope, but if you send it to me i can come up with something..
Hello Cipian,
can be a good GPU the 4GB version?
– “Sapphire NITRO Radeon RX 480 4GB D5 OC GDDR5” (11260-13-20G),
or also the “NOT OC”:
– “11260-02-20G” ?
Is the “limit” only the memory as the other versions?
Regards
Ps: have you a feedback about the “full series” for example:
-Rx460 2GB
-Rx460 4GB
-Rx470 4GB
-Rx470 8GB
-Rx470 OC 4GB
-Rx470 OC 8GB
-Rx480 4GB
-Etc…
Thanks again for your big support!
Sim
Hi, remove the 460s and all cards can achive 28.5 – 30mhs on ethereum/ethash
Thanks!
Hello @ciprianpt:disqus . I need some help regarding Undervolt . When my pc starts only 1 GPU restore the Undervolt setting, rest of the GPU Undervolt setting not restoring. How can i fix this???
You can fix that using MSI Afterbuner!, go to settings and check “unlock undervolt” and that;s it
Finally, I reached a stable 31 Mh/s for Ethereum on my rig with Saphhire Nitro RX 480. I event hit 32 at times.
Awesome 🙂 is that one card only on the rig ?
I have 5 cards rig.
Hello from Bucharest!
Can somebody please help me to find a modded bios for my Sapphire 380X 4GB Elpida Nitro cards? And…for XFX RX480 4GB Elpida and Hynix (I have 2 Hynix and 4 Elpida)
thanks
Salut Claudiu,
The best way is to modify the original bios and re-program it 🙂
salut Ciprian…Poti sa ma ajuti cu ceva hintur, te rogi..eventual si in privat …
Salut @claudiugafton:disqus , cu ce anume ai nevoie? 🙂
Hey there, thanks for the awesome article. I was wondering, i have 6x Powercolour RX 480 8GB cards. Will this overclocking method be successful with those cards? I know powercolour isnt the greatest card and dont want to burn them out. Thanks again!
Hi, yes it should work, the best way is to make a copy of the original bios of your cards and manually modify it then flash it.
works in Sapphire RX 480 4gb nitro+ with Elpida Vram? https://uploads.disquscdn.com/images/27208ca5b8731ff7286c10ba889048ff8e068f3c0847a9b51928aac0637fe92d.png
For elpida/micron you will have to use another version of polaris bios editor, check here https://1stminingrig.com/best-bios-rom-sapphire-nitro-rx-480-8gb-oc-micron-memory-30-mhs/
Hello, Ciprian V.! Thanks for this awesome article.
Do you have any idea why some of my GPUs has hashrate lower then others?
I have 6 GPUs SAPPHIRE NITRO+ Radeon™ RX 480 8G D5 OC http://www.sapphiretech.com/productdetial.asp?pid=251A3BDE-2CC1-4C49-B661-165D72DEA40A&lang=eng, but specification is 11260-07. I updated their BIOSes using your ROM v4.rom. My config:
MB: Biostar TB85
OS: Windows 10 x64
GPU Driver: 21.19.137.514 (Crimson 16.6) WHQL / Win10 64, Date: 11/21/2016
Miner app: Claymore_v9.3, mode ETH+DCR
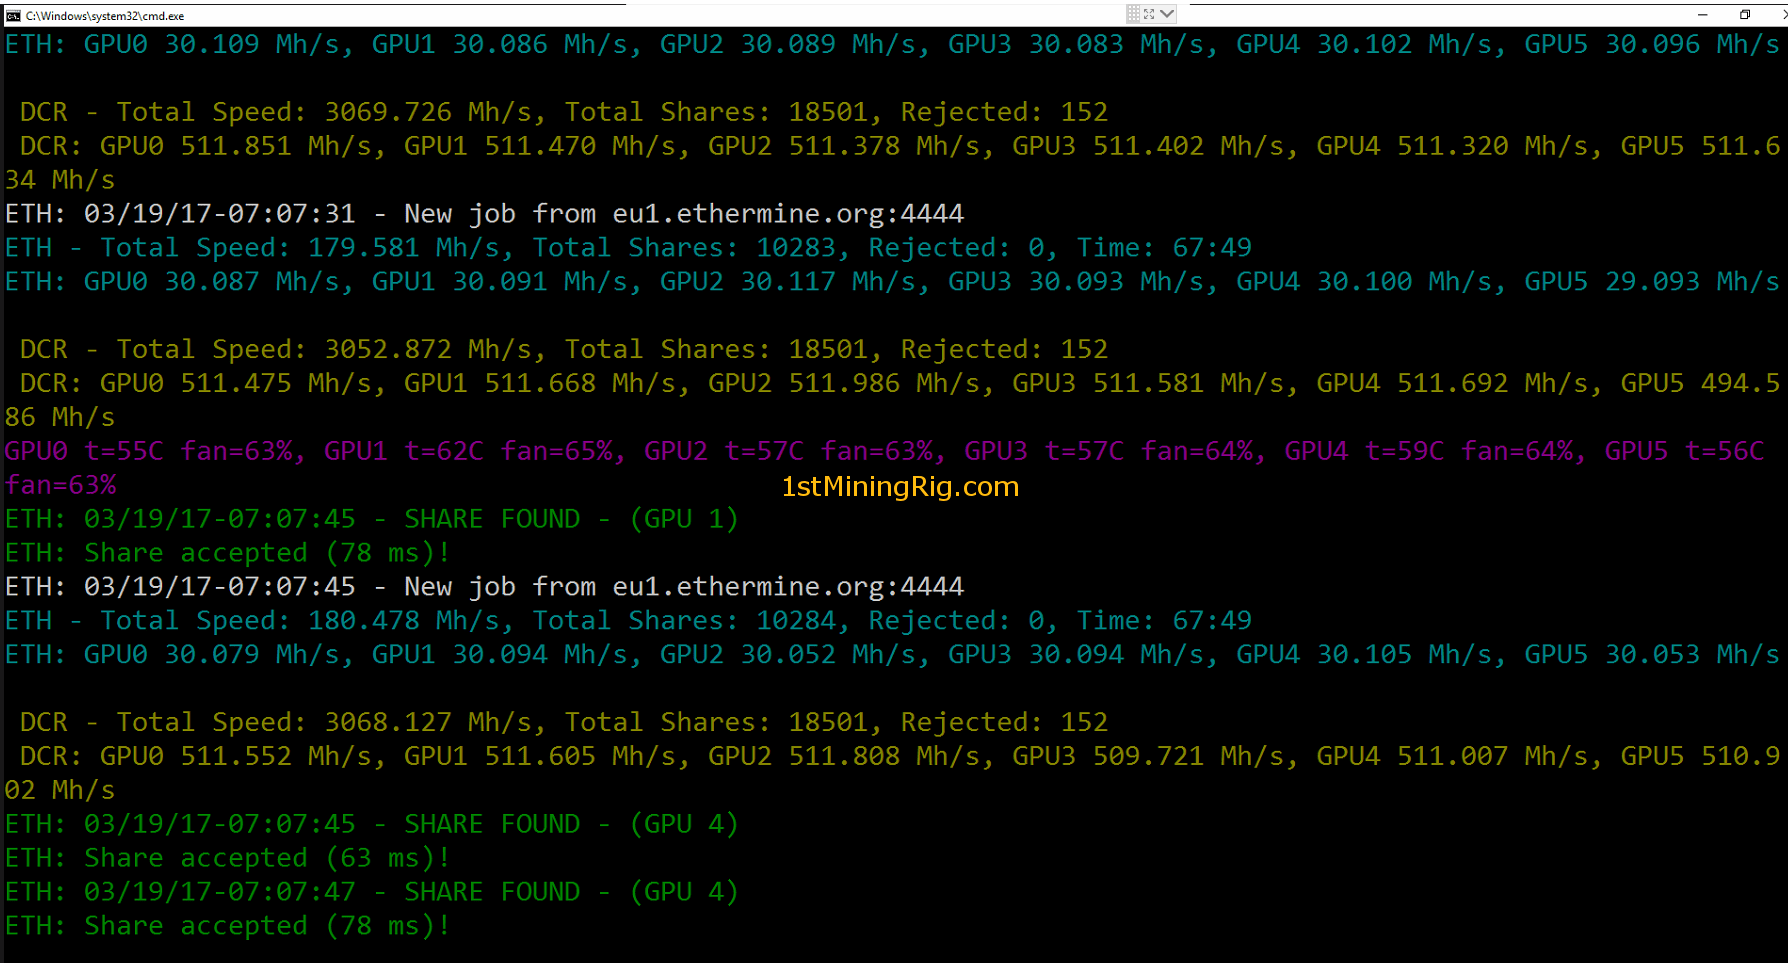
Here is the screen of Claymore_v9.3:
https://uploads.disquscdn.com/images/ebcb502dab3325af9010b51882d70d45d2a2cba646a42a750906e2528fc11d69.png
GPU0 29.637 Mh/s
GPU1 26.410 Mh/s
GPU2 29.768 Mh/s
GPU3 26.776 Mh/s
GPU4 24.610 Mh/s
GPU5 29.705 Mh/s
As you can see, only 3 GPUs have hashrate > 29 MH/s. You can skip GPU4, I reverted back original bios because it had weird behavior – GPU temperature was much higher that others GPUs.
Any idea why GPU1 and GPU3 have lower hashrate? Thanks!
It’s because not every card can handle the same settings, once flashed the rom try to modify a bit the memory, lower it a bit or try to increase if it works and not freez, if you still have problem try with the vdrop.rom alternative. Have you set any -dcri ?
When I mine only ETH, the speed for each of GPU > 29 MH/s. But in dual mode, as you can see, two of them work with lower hashrate. No, I didn’t set -dcri option. The funnies thing is these GPUs were bought from the same place at the same time, have the same spec, but works a little bit differ 🙂
All GPUs use the same rom ?
5 GPUs are updated with v4.rom, only GPU4 has original bios.
try lowering dcri, and check hashrate then,,
Will try it, thanks!
Hello,
Maybe someone can help me. After flashing the BIOS I’m having a black screen, code 43 and all sorts of issues. I’m using 16.9.1 drivers. I was able to flash one card, restart and I could see the screen. But when I connect all 7 flashed cards there is always a problem with display, black screen. Only solution is to switch gpu BIOS to the original one. My solution for now is that one card connected to the display has original bios (24,5MH/s) and the other 6 cards are flashed and achieve 29.1 MH/s.
If anyone can suggest solution I’d be very grateful, I suspect it’s something to do with code 43 and windows not accepting modified BIOS.
I have a 7GPU motherboard, all cards are being detected. Before bios I had 24.5MH/s on all of them.
Thanks
Bart
Finally managed to fix it somehow, I would not be able to repeat what I have done but in case anyone is in the same position – I’ve been playing with motherboard bios, unplugging various cards, but the key was something to do with motherboard bios and win 10 WQHL settings disabled, then I needed non WQHL drivers for RX 480. Hardest part finished I think, now just a bit of tweaking as even vdrop+.rom can crash it sometimes, low 29.xx/mhs at the moment and probably can only go down but I’m still happy 🙂 Big thanks to Ciprian!
Glad you made it Bart 🙂
Tried several own bios, others, then yours on my 5 RX 480 RIG. You v4 was the best, 4/5 running at 29,5 without OC. The 5th gives head, but its an old one. Will see later. Thanks Mate. Sent you a pint from poloniex, Paris Prices, 1 min ago, Cheers mate.
1CzXwSjiSXsAmA9QwG1uuzrLW1F6481wbS
Hi @antoineschaud:disqus, that’s great, some of my cards gets 30, have you lowered a bit dcri ? thanks for the tip 😉
29,3 on all 4 the other finally works on another RIG at 29,8
dcri 34 then tried each step from 1 to 40. best is dcri 5 with 30,05.
what about decred?
I have stopped dual mining. a month ago to reduce temp. i will try this week end, good idea
eth 29,0 dcr 145
Yep, because dcri is 5 🙂 if you increase dcri then hashrate for decred will increase too. i get 4-5k hashrate on decred per rig.
Hi guys had anyone a nitro+ oc 8gb rom with 256kb that worked well for dualmining =? v4 rom i cant flash, and when i modded timings on polaris editor power consume are at 130watt and the memoryheat go high and system crash.
(i got from 6 cards 5 and 2 are in a redbox they had 256kb bios and 3 in blackbox with 512kb and v4 works only at 512kb)
Will this work with the non + models?
No, check my last post, that is for non plus versions with micron memory…
Got my nitro (non-plus) 480 8GB with Hynix memory. any suggestions?
Some timings modifications can do the trick 🙂 try 1750 to higher.
I’ll do that, thanks
What difference between plus and non plus versions? I have 480 non plus 4gb with samsung memory. May I use it?
If it has samsung memory then yes, is good to be used.
Hi, is this modded bios supported by 11260-07-20g or it’s only for 11260-01-20g? Thanks in advance for the reply
If your card is rx 480 8gb nitro+ oc then it will work.
Hi guys. I had every time issue with miner crashes i try different roms from bios nitro+ oc 480 8gb different miners .after any times miner crash or freeze wit error gpu hangs in opencl can u help me pls
Atm:
mining on claymore v9.3
i reinstall the driver 16.9.1
set pcie to gen1
vdrop+.rom
have you uninstalled the drivers using DDU ?
y i did now system runs over 8 h without a crash maybe driver bugged at install or i failed after i plugged graficcards one by one and not all 5 at same time ill hope at monday i dont had any more issues after i got my 6th card , hmm is this possible that i run different bios at same cards at rig ill try v4 at the new card and if that works without crashes ill try all others too, next question was i see a screenshot from you you had 30mhs at eth and 800 dec is dec same mhs like pasc ? and when how you get so mutch =? and how mutch pwr at a card ?
ty 4 reply man
If a card is not working good with v4 then go with vdrop, it will work for sure. but before using it try to lower down a bit the memory and give it a bit more power.
i had vdrop active at all 5 cards
but ill try to give them more voltage
can u tell me pls how i can fixed undervolt on start up ?
By using MSI afterburner
crash after 6 hour with more voltage and lower mem clock
now ill try crimson 16.12.1 with bypass signature check and now using msi afterburner
Hi, any more news about your situation? I have same problem, had to drop memory clock to 2000mhz to keep it stable for longer than 2 hours. 28mh/s so I’m not gully happy.
Thanks
Are you getting that with v4 and vdrop ?
V4 was giving me white screens so i had to switch to vdrop+. It could be that maybe just oneor two cards crashing the whole rig but didn’t have time to experiment individually yet
Ah ah ahahha i got my 6th card an same prolem gpu hangs in opencl call and exit
I try install driver new and bypass works for 9 hours ans same than i clean all other drivers from my hdd and ddu and it works for 30 hours and same now i dont know what i should try next XD
Hi yes it fix my problem with bypass driver 16.12.1
this the link 4 bypass signature
—————————————————————————
https://www.techpowerup.com/228536/amd-bios-signature-check-re-enabled-with-relive-locks-out-polaris-bios-modders
—————————————————————————
and vdrop+ rom only i had -90 mvolt
i got with 5 card 140-145 mhs eth and 1400-1600 mhs pasc with decr -11 arround 850 watt per card ~29 mhs eth and ~320 mhs pasc if i had finish my burst coin project i will try v4 rom and switch to sia coin when the price not drop 😉
Thanks a lot, I’ll try that soon. What are yours gpu and memory clocks now?
1125 gpu 2080 memoryclock from vdrop+rom
As soon as I set 2150 for memory, computer freezes with blue screen. It is fine with 2140, though. vdrop+
Any ideas?
Yep , this is what i did for some cards too 🙂
with vdrop+ bios try 1125/2080, -100mv, +10% power, i get 29mhs eth/929mhs dcr, 58C,90w, work only with 16.9.2 driver version
hey hi man, how are you?
How can I patch the drivers to use crimson 17.xx with mod bios? My idea is to use 5rx 480 and 3 rx580 on the same motherboard. Thank you and I feel my English is bad.
try
https://www.techpowerup.com/228536/amd-bios-signature-check-re-enabled-with-relive-locks-out-polaris-bios-modders
I have tested with different mods and all give the same error (error 43) after flashing without the mod working perfectly.
I got error 43 after flashing
What is your driver version ?
Have any of you tested the power consumption of the Nitro+ 8gb? Is it really 225w as opposed to 150w while mining?
i get 29-30mh/s after flashing my card with bios, but the problem is that i get millions of gpu memory errors in HWinfo, anyway, i dont get incorrect shares, only when i dual mining eth+dcr i get them..i try to reduce memory clock but anyway i get errors, each second hundres of thousands of errors..its that ok? thank you
Hi, i personally do not test the cards with HWinfo at all.. i use the same bios and it works great for me, not crashes or anything like that.. sometimes i get a decred rejected share but that’s ok 🙂
Hello Ciprian and thanks for tutorial!
At the first i tried to use vdrop+.rom bios version with 1150/2150 clock, -100Mv as recomended. Because just wanted to make sure that is gonna be stable but however i got blue screen after a bit, so i tried now v4 version with the same clock speeds 1150/2150 clock, -100Mv. Unfortunetly it freezed after a bit. So tried now dont touch The mv which is now on 0 Mv and seems like its working now fine for few hours. Any other suggestions? To make sure it will stay stable?
I get now 29.500Mh/s
The bios is already undervolted, you can try max up to -50..
I’m getting a watchdog CL hang error after using the v4 mod as well as the vdrop mod. Also, does anyone know if the vdrop/v4 mod will work with XFX cards?
Lower a bit memory clock or incrase with 10% 15% power limit. no will not work with xfx only if you manually copy the differences.
@ciprianpt:disqus i am trying to mod a single XFX rx480 8GB GTR (Samsung), i tried every rom i can find on the web, crashed twice, no matter what i stil cant get past 24Mh, edited BIOS copied 1750 to 2000 tried that didnt affected the speed at all, this is the fifth type of card im modifiying bios and it just doesnt work! lol. I hate XFX. Do yo
u have any advice for rom or modifying?
Hi @kratkonak:disqus , clocks locked ? have you tried different softwares to change them? like watttool, msi afterburner or directly from miner?
@ciprianpt:disqus i didnt use wattool, tried msi, trixx, miner, i see the clocks changing from hwinfo, but they have no affect on hashrate, i lowered to 900/1800 got 24 , did 1300/2200 got 24 still, undervolted the hell out of it on another try, got nothing again. really annoying mate. On the other hand, i have it together with an Asus String Rx480 8 GB, Asus overlocked to 31mh at first try @ 80w from gpuz lol.
strange.. for me works with all of them..
It was my mistake mate, it seems i have a problem with Asus Strix RX480 8GB one not XFX. Somehow Claymore changed their ‘order’ GPU0 was Asus, GPU2 was XFX in the beginning somewhere between modding, GPU0 became XFX and GPU2 became Asus lol.
claymore always mix the gpus :/
Hello how are you? I have 6 gpu sapphire nitro rx 480 8gb samsumg memory, working with the MSI pro carbon 170A motherboard as indicated on this page. After I modify the Bios and Flash of the card, and start mining with claymor, 2-3 GPUs begin to lower the HM / S from 29 to 10-15 MH / s because this error occurs? I have version 8.1 Claymore. Any solution?
Driver version? Why not latest claymore release?
Hey,
I had 6 GPU’s running on stock Nitro+ Rx480 8GB. Off late 2 GPUs are showing 0Mhz Memory clock and core clock and when these two GPUs are connected, the miner crashes after detecting the cards (at Pool/Solo Version). The fans also run at constant 27%. They do detect, but don’t work. Are the cards bricked? Will flashing the ROM fix this issue?
Hi, have you tried chancing risers or to test the failing gpus one by one?
Yes I tried different risers too. I also tried connecting the gpu on the board directly. Same result. 🙁
Hello, my voltage its showing at +0 mv do i really have to put it into -100 or is that just for power savings? thanks for this guide by the way
drag it to -100 and apply changes.
it actually improves performance and stability in overclocking for some reason. Saves power and reduces temperatures as well.
Does anyone know if this bios will work with strix-rx480-o8g-gaming please? Thank you
Hi, no.. it wont work, that is a different brand :/
Hi there,
first of all, my english isnt well. sorry 🙂
I want report my exp on doing this modding: I bought exactly same rx480 and have
~20MH/s on untouched system (tested for win7 and win10)
the different between silent and oc bios is only 1MH/s..
dont remember what MH/s i had when flashing v4.rom but I got always a freeze and/or bluescreen while using..
I tried few bios and the max. i had was 24.5MH/s win7 and win10 no differences.
Im really unhappy about this! what is wrong for me that I never saw the results of the others? like 27 or 30 mh/s?
my system: ASRock Z68 Extreme3, Intel i5-2500k, 8GB Kingston, win7/10, same graphiccard like this thread, Crimson 16.9.2 and 16.9.1 tested. (when using 17.x i cant mining anything and get always blackscreens.
can someone help me and tell what could be wrong?
I also tested the mining tool from minergate… the strange on this is, I have no difference when I choose 1 or 4 for intensity while mining (eth). my cousin use a R9 290 tri oc (in gpuboss ~1.0 points slower than my card!) and he got 24.xMH/s on intensity 1 and ~36 (like he said) when he choose intensity 4 on minergatetool (eth). his card is not oc and not bios modded.
how can this be? why my system is so very different – and not same like the results from the thread here?
hope someone know more
Lakus
Hi.. looks like the chips cannot handle the v4 rom, have you tried vdrop ?
Hi, thank you for answering!
you mean “silent_nitro1625to2000strap+VDROP.rom” ?
if so, yes and while testing 10minutes, no crashes but mh/s ~22.
my “best” results i got when i take my original oc bios and use polaris and change the timing value (1750mhz value copy to 2000mhz value) only. then i get 23.5mh/s – and also could run stable with -50mV 1150 gpu and 2080 memory – decrease the Watt from ~110 to ~87 with same mh/s.
but from that 27 and 30 mh/s where i read everywhere, i’m far away :/
ps: do it makes any different when using the “silent-side” for modding and the “oc-side”?
It doesnt matter what side the switch is since you are using a modified version of silent bios. Are you testing on solo ethereum or dual mining ?
I’m selling a RX 480 Nitro+ OC 8GB on eBay currently.
http://www.ebay.co.uk/itm/122535956310?ssPageName=STRK:MESELX:IT&_trksid=p3984.m1555.l2649
¡HELP!
I am using this bios vdrop+.rom , with ETC + DCR in a few minutes it hangs or reboots the computer (-96mv) with ETH + DCR takes about 4 or 5 hours it does not get reset but the miner restarts in afterburner there are 2 gpu with 938mv and 4 with 880mv, in the window of events of windows I have some message that the diver of amd stopped working and recovered and others of kernel-power, maybe the gpu need more mv? Sorry my bad english
try lowering clocks..
solved edit my personal bios mod 🙂
I’ve posted a reply about 1 to 3 pcie slot splitter. I dint see the rely. Did you delete it ?
Have you tried such a splitter ? It turns 1 x16 or 1 x4 slot into multiple x1 slots.
Here is my original reply.
Hi. Have you tried any 1 to 3 pcie splitters ? I’ve seen some people on forums talk about using them. They’re like 25 bucks on amazon. Basically you stick this pcie 1x connector on a 4x or 16x pcie slot and then the cable has board with 3 pcie 1x slots. This 1 to 3 splitter tales 1x for itself so it turns 4x slot into 3X 1x pcie slots. Effectively if you’re using a motherboard with only 3/4/5 pcie slots into 7 or 8 slots.
https://forum.ethereum.org/discussion/5195/riser-1-to-3-pci-e-1x
https://www.amazon.co.uk/d/Adapters/Mini-PCIe-express-slots-Riser-external-Multiplier/B01L74AKBQ
Maybe even turn 3 4/16x slots slots into 9 slots plus a couple of 1x on board itself. A top cpu has 16 pcie lanes (20-4 reserved so 16 effective) and motherboard chipset 8 plus.
Hi Ciprian V. 1st of all, thanks for your tutorials 🙂
I tried both bios on my shapphire rx 480 nitro+ 8GB OC but claymore is not detecting the card and it closes. My card is getting 24 mhs with the original Bios. I also tried editing the Bios with polaris but I got the same error.
Can you please help me?
Thanks in advance
are you using latest drivers?
I have the same problem, yes, drivers are the last one.
Hi,
Not using the same configuration yet (W7 and latest Catalyst) but when I flash the Card, which is the exact same ref with samsung memory, it seems the cards is no longer recognized :/
Can’t reach data from Trixx, Windows avert of a problem and Claymore doesn’t detect any AMD card :/
Any idea ?
if using latest drivers you will have to patch the drivers..
What do you mean ?
i’m not sure I understand
https://www.monitortests.com/forum/Thread-AMD-ATI-Pixel-Clock-Patcher
download the patcher version 1.4.5
Reinstall AMD drivers, when it asks to reboot, cancel.
Run the patcher, and it should say successful when patched.
Once you reboot, should be working then.
Erm so i tried flashing both of the bios you’ve provided above(v4 and vdrop) but i always got this error “cannot erase ROM” on atiflash, then i noticed how my bios backup both silent and OC are 256 (yes those backups are from atiflash and its working when i flash them back) while the modded bios rom are 512.
any ideas on what to do ?
same problem
You must not use gpu-z or other editors to back up your bios, they save as half size images for some reason. ATIFLASH shouldn’t do this and it should be 512k.
Use ATIFLASH version 2.74 to flash.
(atiflash_274)
The thing is i never used anything beside ATIFLASH to backup my bios and when i do it still gave me 256k
and yes it is ATIFLASH 2.74
How would I do this if I only have ethOS and no Windows?
(Thank you so much in advance)
After uploading the bios the computer will not detect the card 🙁
Salut Ciprian , does this work with Eth/Sia or Eth/Pasc !? because on standart i get 24.5 on Eth and 605 on Sia. 5 x rx 480 nitro+ OC 8gb.
Salut, yes it works.. ill choose ETH/SIA, set -dcri to 19 or maybe 14, test it 🙂
mersi 🙂 if i get in trouble i know where to come for some answers 🙂 , have a nice day 🙂 and happy mining 🙂
with placere :))
Ai idee se aplica si la placile astea !? Sapphire 11260-01-20G … primele sunt nitro+ OC astea sunt versiunea normala cu frecventa asta Processor Speed 1208 MHz.
dacă sunt tot nitro+ 480 8gb mai mult ca sigur, tot.memorie samsung este si tot 512kb are biosul.. la asta te referi ?
Inca nu stiu ce sunt ca astazi le-am comandat ….. astept sa vina si revin cu specificatii concrete , doar aia stiam codul de producator . Asta e numele lor Sapphire Radeon Nitro RX 480 8GB GDDR5 PCI-E Dual nu vad nici un + 🙂 dar tot 2000/8000 au frecventa, Singura diferenta este frecventa la cpu-ul de la placa .
Cu codul 11260-01-20G sunt varianta Nitro+ http://amzn.to/2taTuh2
https://www.amazon.de/gp/product/B01IQS6NI0/ref=oh_aui_detailpage_o00_s00?ie=UTF8&psc=1
astea sunt 🙂 tot de la ei le-am comandat.
In poza cutia este cu Nitro+, dar in titlu nu.. dar 11260-01-20G, probabil ca da.. nitro+ , memorie samsung!
Deci , am facut cum ai scris in tutorial , am instalat win10/64 modat placile cu v4 si aici apare problema la -dcri 19 2 placi au 28.5 Mh/s si 3 placi au 25.5 Mh/s :-/ toate au memorii samsung deci nu imi dau seama unde ar fi problema :-/ , a da si nu reusesc sa il fac stabil :-/
din cauza dag-ului.. ai pus si -dcri 19 sau mai sus/jos ?
What about 4GB does it work too?
Hi have always some trouble when I flash a modify bios. If I try to flash your bios, or flash an modify one (with polaris editor), the pc never recognize the gpu, and show driver error. Then I put the original one, and return to work. Could u help me? Or give me some advise?
Have you tried patching the drivers ?
done. Yes, didn’t patched the driver, but now everythings works. 58.1 with 2 rx 480 😀
awesome!
Please could you explain where I can get a ‘patched’ driver, and which one should be used with the V4 ROM?
V4 ROM should work fine with Crimson 16.9.1 / 16.9.2 from the sapphire download page..?
Hi, yes it should work fine.. also with that driver version patching the drivers is not needed.
Long post warning, please bear with me, being a newbie on this scene. I do not have a rig, but rather a Nitro+ 8Gb in my son’s rig, with Samsung GDDR5 memory. System is running 17.4.4 drivers on Win 10 64-bit and claymore 9.7, ETH-only mining. ASM mode is disabled
1) First and foremost: I had an Asus Strix RX480 8gb for some days. On that card with afterburner I would lower the power target and I would see an immediate reduction in gpu speed and temp. This does not happen on Nitro+, regardless if I use Afterburner or Trixx. I could achieve easily 25.5Mh/s on the Strix, without any BIOS modding. Plus, that would happens with only 62-64 degrees C, whereas on Nitro+ the temps hit 72+ directly after running Claymore.Any idea why limiting the power does not affect the GPU timing and power used on Nitro+?
2) I do not know what these modded BIOSs do here for Nitro+. Do they render the card unusable for normal (ie games etc) operation? I would like to use it for normal apps as well.
3) Regardless of using Trixx or something anything over 2100 on memory proved to be unstable. Why is that? This is supposed a card that can be pushed a lot! Same issues with lowering the GPU clock.
All in all, I am hugely dissappointed in this card, compared to the Strix. I just hope that this is due to my incorrect handling. Any advice would be appreciated.
For mining I recommend flashing the bios on the Nitro+. I don’t think it will hurt gaming performance, the mod improves memory response time only. I happen to have a few of them and the Nitro+ tends to run hotter than the Nitro(non +). My Nitro+ had 21MH/s out of the box, with the bios mod reached 24MH/s, then I usually overclock the memory to 2000, the core at 1150 to reach 28 MH/s (this is after lowering the dcri to 8 by clicking on ( – ) with the miner running.
I have not changed the voltage, except for reducing the -mv in Sapphire Trixx. I can hit 29MH/s at -dcri 8, 1260/2100 but I’d like to increase voltage to push further.
If temperature is a concern, I noticed that it runs decently cooler at 1100 core clock, and reducing -mv to 100 or 75. Pushing the memory clock doesn’t increase heat. But lowering core clock below 1100 will drop your hashrate a lot.
I’m just getting started with mining, so I have a lot of testing to do to still.
Are yours 8 or 4G? My own 8G had 24+ Mh/s out of the box. Undervolting by -96mv, setting power to +20% and cpu/mem to 1250/2150 seemed to work, producing around 25-26 Mh/sec.
Mine are 4G but from what I’ve seen the 8G versions have good memory timings so the bios mod benefits the 4G versions the most to match their 8G counterpart.
I haven’t played with any voltage yet but I’ll try your settings later to see if I can get stable 2100 at least. Increasing power limit seems like a good idea on 470s since I just remembered they are very limited in voltage limit inside the bios.
I think with your numbers you should have a lot more Hashrate, closer to 30Mh/s so I would suggest modding the bios and increasing or lowering the -dcri in the miner to increase performance. -dcri alone gives me an extra 1 – 1.5Mh/s
Hi Ciprian V.,
I followed your guide but it’s not working for me so I used a bunch of other combinations but I keep on getting a black screen a few minutes after running claymore. I’m using a 11260-07-20G.
I’ve tried the following:
V4 – 1150/2150 -100mv
Vdrop – 1150/2150 -100mv
vdrop – 1125/2080 -100mv 10% power (16.9.2)
1500>2000 – 1100/2000 -100mv
So far the 1500 to 2000 lasted the longest (less than 5 min) but also ended up with a black screen.
Any ideas?
take stock bios and copy 1750 memory timings to 2000 so that they are the same.
has anyone issued hashrate drop for sapphire rx 480 nitro+ 8gb cards with samsung rom my all card’s shasrate are decreasing day to day i read some posts about this because of dag file size but these cards are 8gb current size is 2.4 gb isnt it? claymore has announced also this cant be fixed at software level nobody is issuing this only me?
I am experiencing the same thing. Each of my cards has lost about 2MH/s over the past month.
It’s better gtx 1070?
No, the gtx 1070 better then rx 480.
hashrate, power consumption gtx 1070 win,
but a Price, is make me crazy 😀
https://1stminingrig.com/ethereum-dag-hashrate-drop-fix-amd-official-mining-drivers-are-now-out/
Wow, now it’s fantastic about 28-29.5Mh/s 🙂 Thank you so much
Should I still use this V4 bios with the new driver?
Hi All-
My setup
6 x Sapphire rx480 8GB nito +
(all samsung).
win 10 64 bit
MSI z270 A pro board
I have updated the bios timings (all but one card!), installed Crimson 16.9.2 and using Nicehash. All cards are recognized
For some reason i am crashing – cards also runing at 74c ish which is not hot.
Just by increasing mem clock to 2050 and GPU clock to 1266, undervolt -24 they are crashing.
I am also struggling to go over 27mh/s on any of the cards.
I have also noticed that Sapphire trixx that the mem clock only goes to 2790 but
in the images on this post they go much higher. For some reason my thresholds
are so much lower.
Any help would be much appriciated.
Thanks
I had that problem that did not exceed 27Mh/s but I solved it by installing the following driver https://1stminingrig.com/unofficial-amd-driver-fix-for-ethereum-dag-epoch-released/
Now I get Eth:29.7 Mh/s-DCR:892Mh/s, -100mv, + 10% power, 61C, 94w with the rom V4 and Eth:29.1 Mh/s with the rom vdrop.
That situation was disappointing, but I’m already happy.
Do it and tell me if it works.
rx 480 Sapphire nitro+ 8gb
whats your Hashrate ?
25MH/S without mod
with mod only 26.5 MH/S
Crimson ReLive Edition 17.9.1 Optional driver ?
Thank you. I will back to the default silent bios. 🙁
guys, check this https://1stminingrig.com/ethereum-dag-hashrate-drop-fix-amd-official-mining-drivers-are-now-out/
Thanks Ciprian.
sal. ce este scimbat la bios mode-ul asta v4? pt ca nu recunoaste placa mea.
32.5, custom mod made in hex script. (33 but not stable)
Can i make this in the Asus rx480 4GB?
Getting some GPU Memory Errors on HWiNFO64 …
The Driver helps alot thx
Hello, bro. I’ve got latest Crimson driver for my rx480, 8G (samsung rom) but I can’t rise hushrate more then 27 mh. Could you advise me any idea? Thanks in advance)
Have you tried with the official mining drivers https://1stminingrig.com/ethereum-dag-hashrate-drop-fix-amd-official-mining-drivers-are-now-out/ ?
Now I’m using Crimson 17.9.2
Tengo una rx 480 de 8gb que no tiene dualbios, mi pregunta es si hago una copia de seguridad de mi bios original y despues le monto una modificada y no me va; ¿Puedo restaurar la bios original y la tarjeta funcionaria normalmente?
No tengo Espagniol Ramirez :))
Mine went from 20MH/s to 22 MH/s.
Yeah. The same for me. I wonder what is the cause. Maybe it’s because I use 6-pin power cable instead of 8-pin ( I have to buy a new PSU with 8-pin PCI-express power cable )
After installing the AMD blockchain drivers. I’m averaging 29.5.
Hi, I’ve an RX 480 4GB Nitro+ , can I use the same mod?
Hey, your guides are really good. I’m an IT tech who just got into mining, but flashing BIOS and the like is way outside my safe bubble. Unfortunately I don’t have any coins to donate (yet), but throw up a paypal and we can gift/donate there as well? Thank you for making this available to the public.
Hey @disqus_Q8ZMD3uWlU:disqus , thank you! here is the paypal: https://www.paypal.me/1stMiningRig
thank you again! 🙂
What’s the rest of the config.? Which motherboard and processor did you use? Thanks!
Hey guys, i have 3 rx’s 480 used for mining , my pc doesnt recognize them, i think it might be a custom bios on them, how can i revert to original bios so i can use any of them in my PC ? Please help me :((
Have you applied the pixel patch ?
i dont know what that is
search for ati pixel patch 1.4.6, get it and run it, then restart pc!
with the “dead” card inside or.. ?
yes.
I messed up and forgot to backup my original silent vbios for the Sapphire rx480 8gb. Does anyone know where I can download the original vbios or can someone please share? Thanks for the help!
Hey @matthewvaneps:disqus , you can find it here: https://www.techpowerup.com/vgabios/?architecture=AMD&manufacturer=Sapphire&model=RX+480&interface=PCI-E&memType=GDDR5&memSize=8192&since= , check for the exact model of your gpu, bios version etc
Hello to the community, I’m trying to push my GPU’s but with no luck.
right now I’m with 17-18 Mh/s stock.
I’m still waitting for my rig parts, so I tried this on a normal computer with no rizer installed. The card is strigiht to the PCI-e 16x. I think this week I will have all the parts of my rig, so I would like to know how to set all the GPU’s.
well done for your blog and all these details you give to your readers. keep it up
Did you flashed the bios ? if yes which one ?
What is your driver and did you patched it ?
Which version of Claymore ?
I have finally managed to connect the 5 of my 6 cards.
I tired the 6th on 3 different PCs, and I’m not getting any screen at all.
As for the other 5.
I have optimized my mobo to the suggested settings. and I’ve installed the latest Crimson AMD driver.
Right now , I’m getting 5 cards with 22.5 Mh/s per card. I haven’t made any other changes till now.
You have to install the official beta blockchain driver:
https://www2.ati.com/drivers/beta/Win10-64Bit-Crimson-ReLive-Beta-Blockchain-Workloads-Aug23.exe
Uninstall the current driver with DDU and then install the blockchain driver. After that you have to patch the driver with atikmdag-patcher-1.4.5
Did you flashed the cards bioses ?
Hello zerofook,
yeah, I have the latest blockchain driver (23 Aug). No, I haven’t installed the atikmdag and no falsh bios yet.
If you want to achieve the speed 29.5-30 you have to flash your bioses. First try with v4.bios and then vdrop bios if your card is hanging.
There are instructions in the tutorial… just make it step by step …
Hello miners!
First of all – regards for this tutorial, it’s the best for amd rx480!
I have a rig with 6x AMD Sapphire rx480 Nitro + 8GB. Some of the cards are using the v4 bios from this tutorial and the others are with the vdrop because It looks like the v4 bios is too powerful for its. I’m using the beta blockchain Driver.
I have a problem with the stability of one of my cards. If I run it with the v4 bios the hash is between 29 and 30 mostly, but I see drops to 20 when I’m pressing S button in Claymore. However the total average speed is 29.8, which is perfect. The problem is that after working some minutes (from 2 minutes to 12 hours) I’m getting blue/black screen.
So I changed the bios with the vdrop version. The result is that the card is starting mining on 29.400-500 and it’s stable for a short time. After some time of working (about 5 min) the hash starting a smoothly drop until it reach 27 – 26,2 and become stable on this speed. The rig is working for 2-3 days and then Claymore watchdog reporting a GPU hang for this card. After Claymore restart all is good and the process is repeating 29.5 -> 26.2 -> Watchdog GPU hand for this card…
This is happening every time when I run claymore no matter if I’m running this card alone or together with the all 6 cards.
I tried to play with the power and the clocks in Wattman, but it looks like the initial configuration from the bios are the best values for this card. Or… I just can’t pick the right values…
Do you have any suggestions how to fix that problem?
P.S. I tested the card with brand new raiser, but It’s not the problem.
P.S. The rig is working excellent if I’m running it without the problematic card.
Just to summarize:
v4.bios – the hash speed is more stable and higher, but the card is hanging after some minutes or hours (5 minutes – 12-13 hours ). => Watchdog hang or blue/blak screen. (mostly blue/black screen)
vdrop.bios – the hash speed is starting on 29.5, it’s stable for 2 minutes and then starts a smoothly drop to 26.2. The drop is happening for a 3-5 minutes. => Watchdog hang after 2-3 days of working. (NOT blue/black screen happening)
Sorry for my broken English 😉
Hi, thank you 🙂 i am pretty sure lowering the clock for that gpu will fix the problem 🙂