
How to Host a Storj Node – Setup, Earnings & Reports
- Like
- Digg
- Del
- Tumblr
- VKontakte
- Buffer
- Love This
- Odnoklassniki
- Meneame
- Blogger
- Amazon
- Yahoo Mail
- Gmail
- AOL
- Newsvine
- HackerNews
- Evernote
- MySpace
- Mail.ru
- Viadeo
- Line
- Comments
- Yummly
- SMS
- Viber
- Telegram
- Subscribe
- Skype
- Facebook Messenger
- Kakao
- LiveJournal
- Yammer
- Edgar
- Fintel
- Mix
- Instapaper
- Copy Link

Almost three years ago, I have posted my first guide on how to host your own Storj node. Today, I’d like to make a follow up article and share my experience with Storj so far.
Why Did I Choose Storj?
There are many decentralized storage platforms available on the interwebs. Back in 2017, Storj was one of the most promising projects. Right from its beginning, it had a clear goal, a well-defined roadmap, and a team that was doing work. One of the selling points for me was that Storj was nailing their milestones and delivering exactly what they promised.
Storj’s bigger competitor is SIA, a platform I happen to host for, too. If you’re curious to know my results with SIA, check my report here. I’ve been running my SIA rig right next to my Storj one for over one year now.
One of the key differences between both platforms is that Storj has a fixed storage price, whereas SIA is a free market. Storj has also more strict hosting requirements, one of which is to have a downtime lower than 5h per month the 5 hour downtime requirement is being recently updated to a new online auditing scheme described here: https://documentation.storj.io/resources/faq/how-the-online-score-is-calculated, opposed to the 13h downtime for SIA. Storj is partnered with FileZilla and other services, which makes it one of the most popular decentralized storage services.

My Results so Far
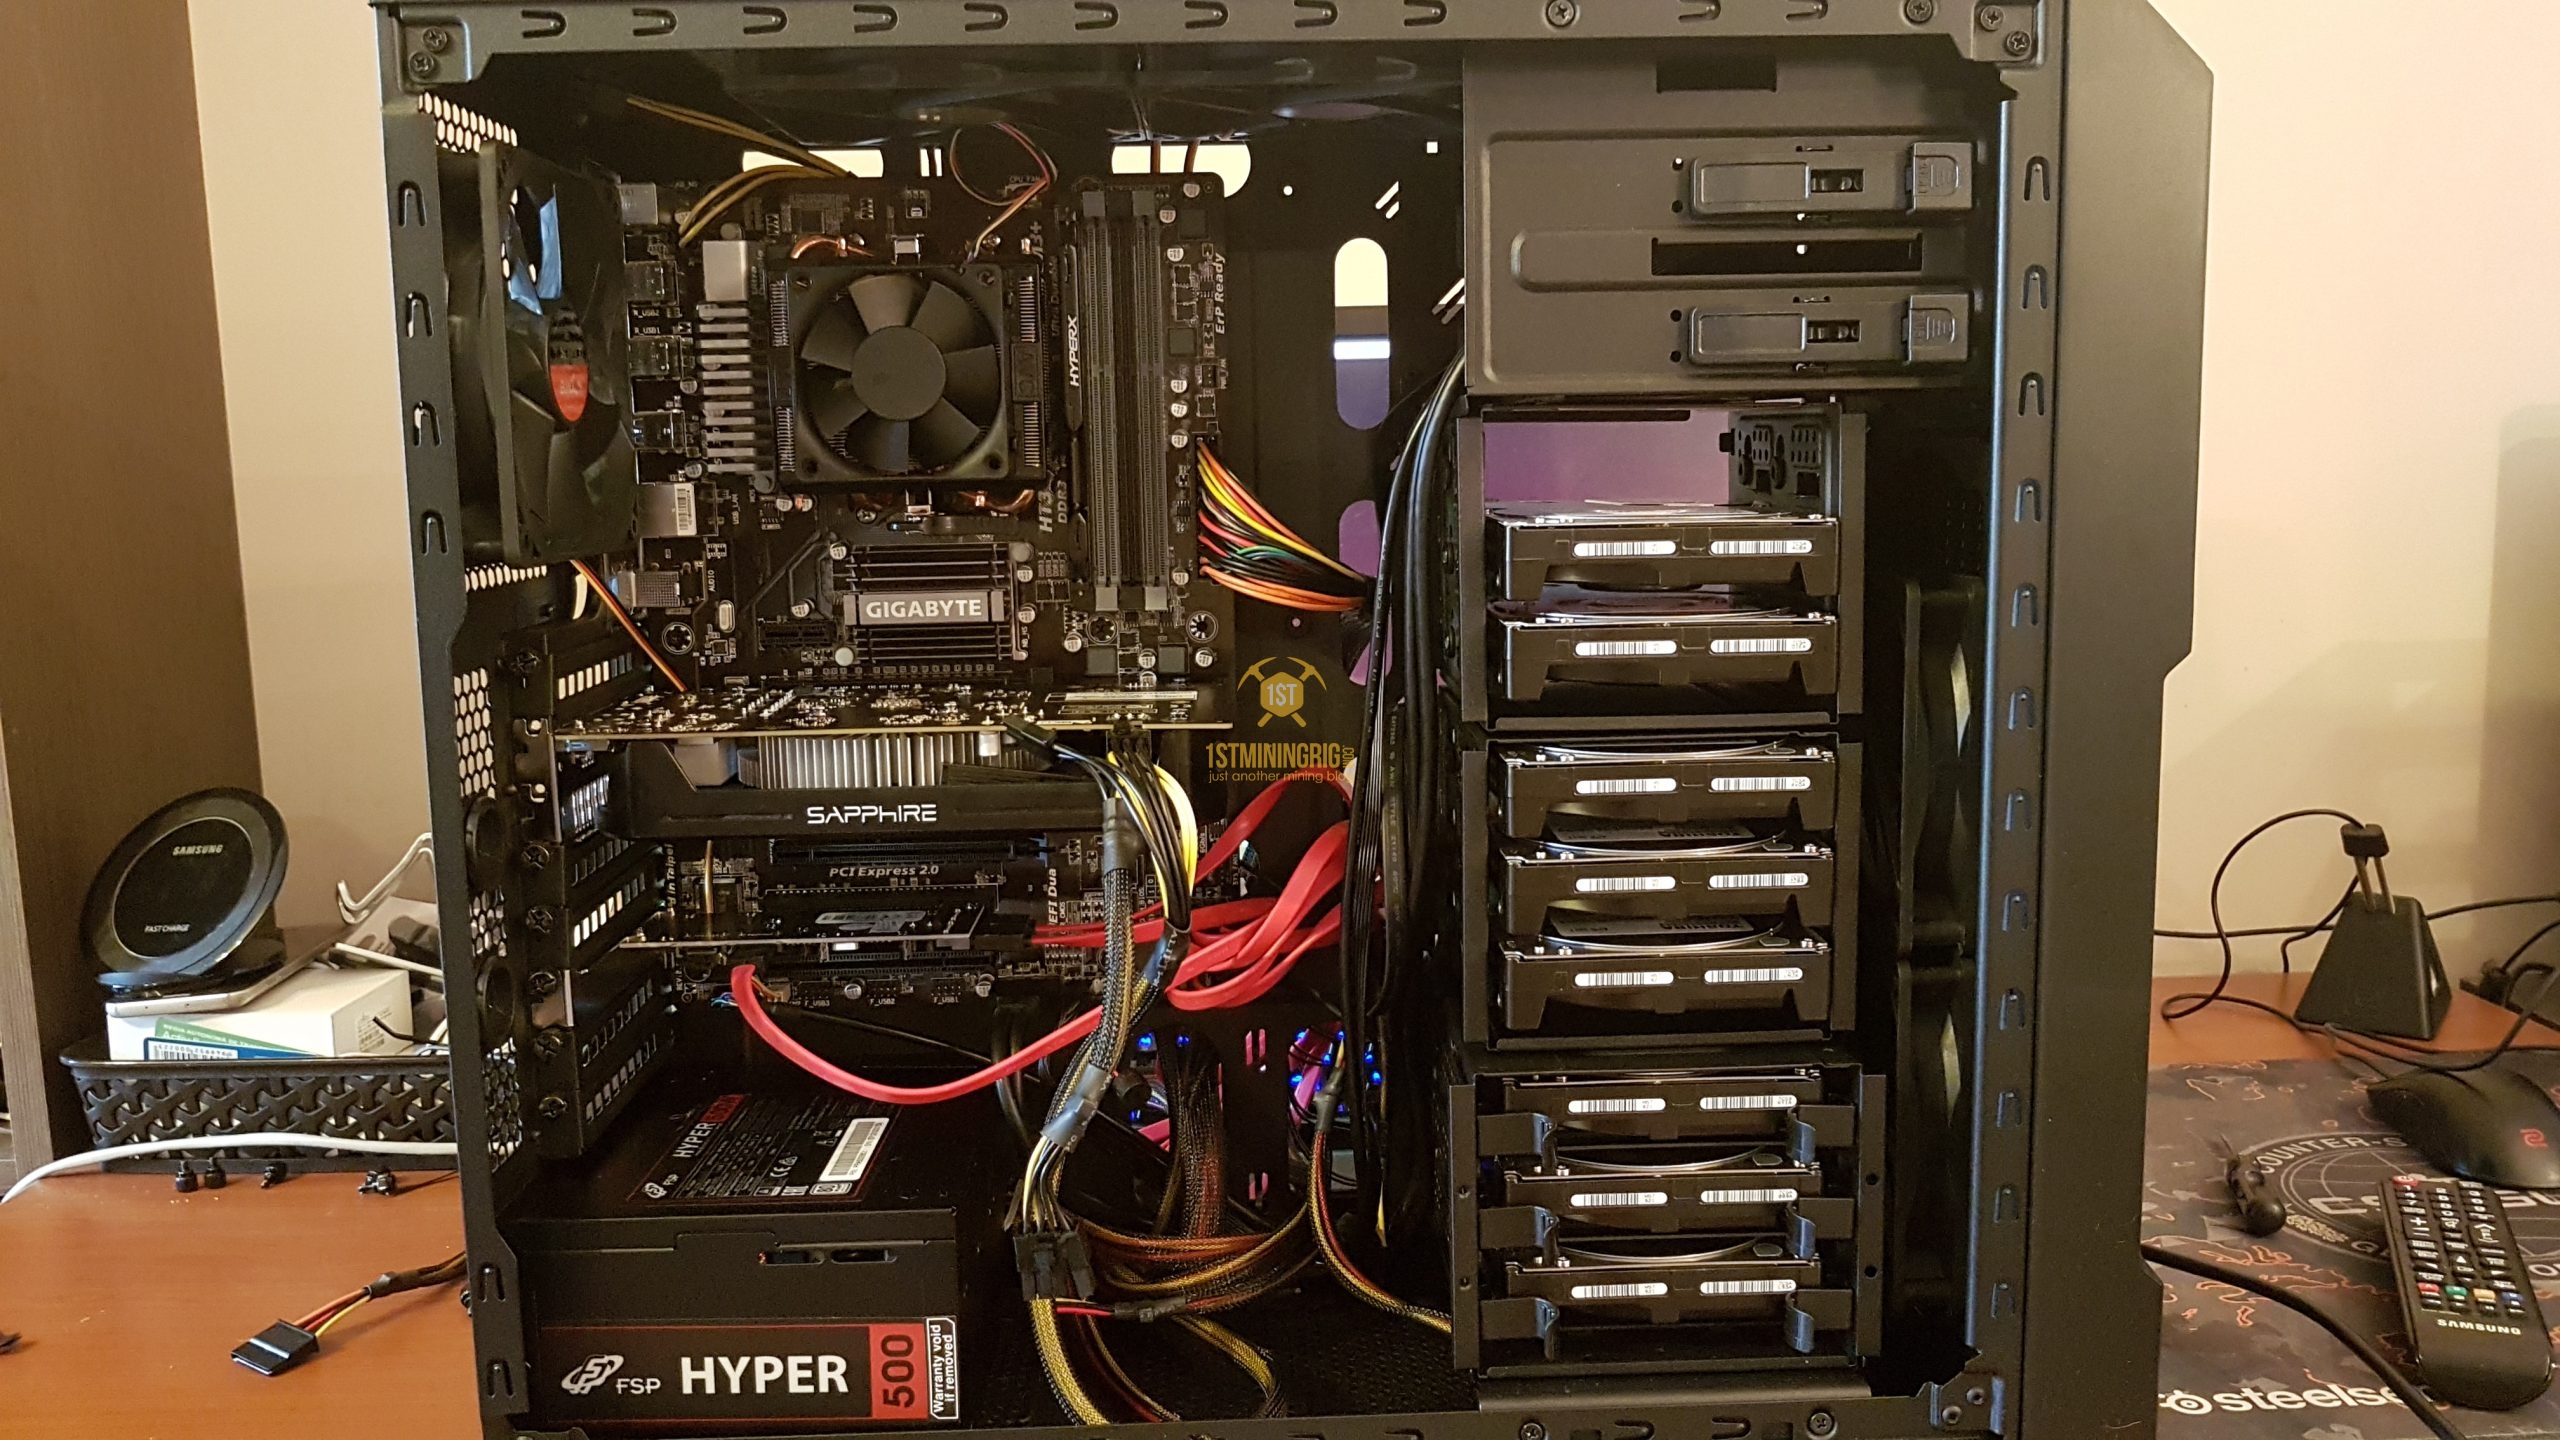
It was 2017 and I started by connecting eight 3TB hard disk drives to my rig. It took me time to realize that it’s way better to connect only one, and add more storage as demand increases also there are other alternatives to build a Storj node such as QNAP NAS Device or RaspberryPi (coming soon on Synology & Western Digital).
Talking about demand, my hard drives remained mostly empty. This was obviously reflected in my income, which wasn’t all that fancy till late 2019. The release of Tardigrade in March 2019 allowed for enterprises to connect to the networks, and hugely increased the demand in Storj services as petabytes of information have to be stored in the network.
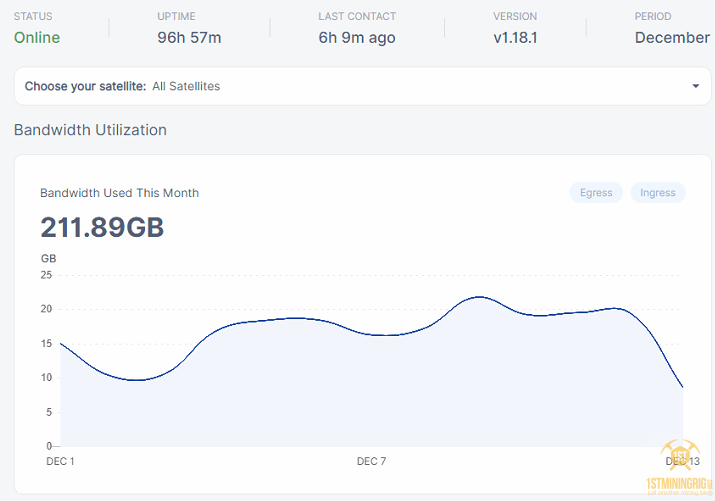
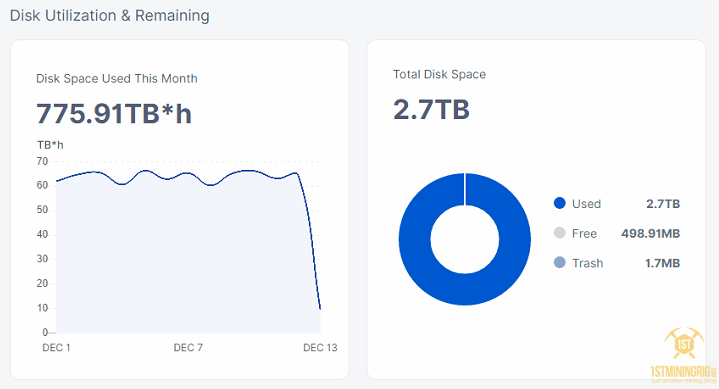
As for today, I am renting 2.7 TB of HDD space (currently one HDD, below you can find out how to add more nodes to the same windows machine using Toolbox), and have earned a total of 465 STORJ that roughly equals 200 USD. That’s not too fancy, considering that I spent that money on electricity to keep the rig running.
Best Hardware to Host a Storj Node
- Buy nothing, use what you already have or.. go “pro” 😀 (check below)
- WD 18TB Elements Desktop Hard Drive, USB 3.0
- QNAP 8-bay NAS/iSCSI IP-SAN, Quad-core 2.1GHz, 4GB RAM, 10G-ready
- HPE ProLiant MicroServer Gen10 Plus Ultra Micro Tower Server
- HPE ProLiant ML110 Gen10 Performance Tower Server
- CanaKit Raspberry Pi 4 4GB Starter PRO Kit + Western Digital 1TB-6TB
Or custom PC build:
To be honest i prefer custom rig for windows storj node hosting, here are the best and cheapest components i found with a total of $486:
- Mobo: MSI B460M-A PRO
- CPU: Intel Core i3-10100
- RAM: Crucial 8GB DDR4 2666 MHz
- SSD: Kingston 120G SSD M.2
- HDD: WD Blue 3TB
- PSU: Corsair CV450
- CASE: Cooler Master N400
- UPS: CyberPower CP350SLG UPS System
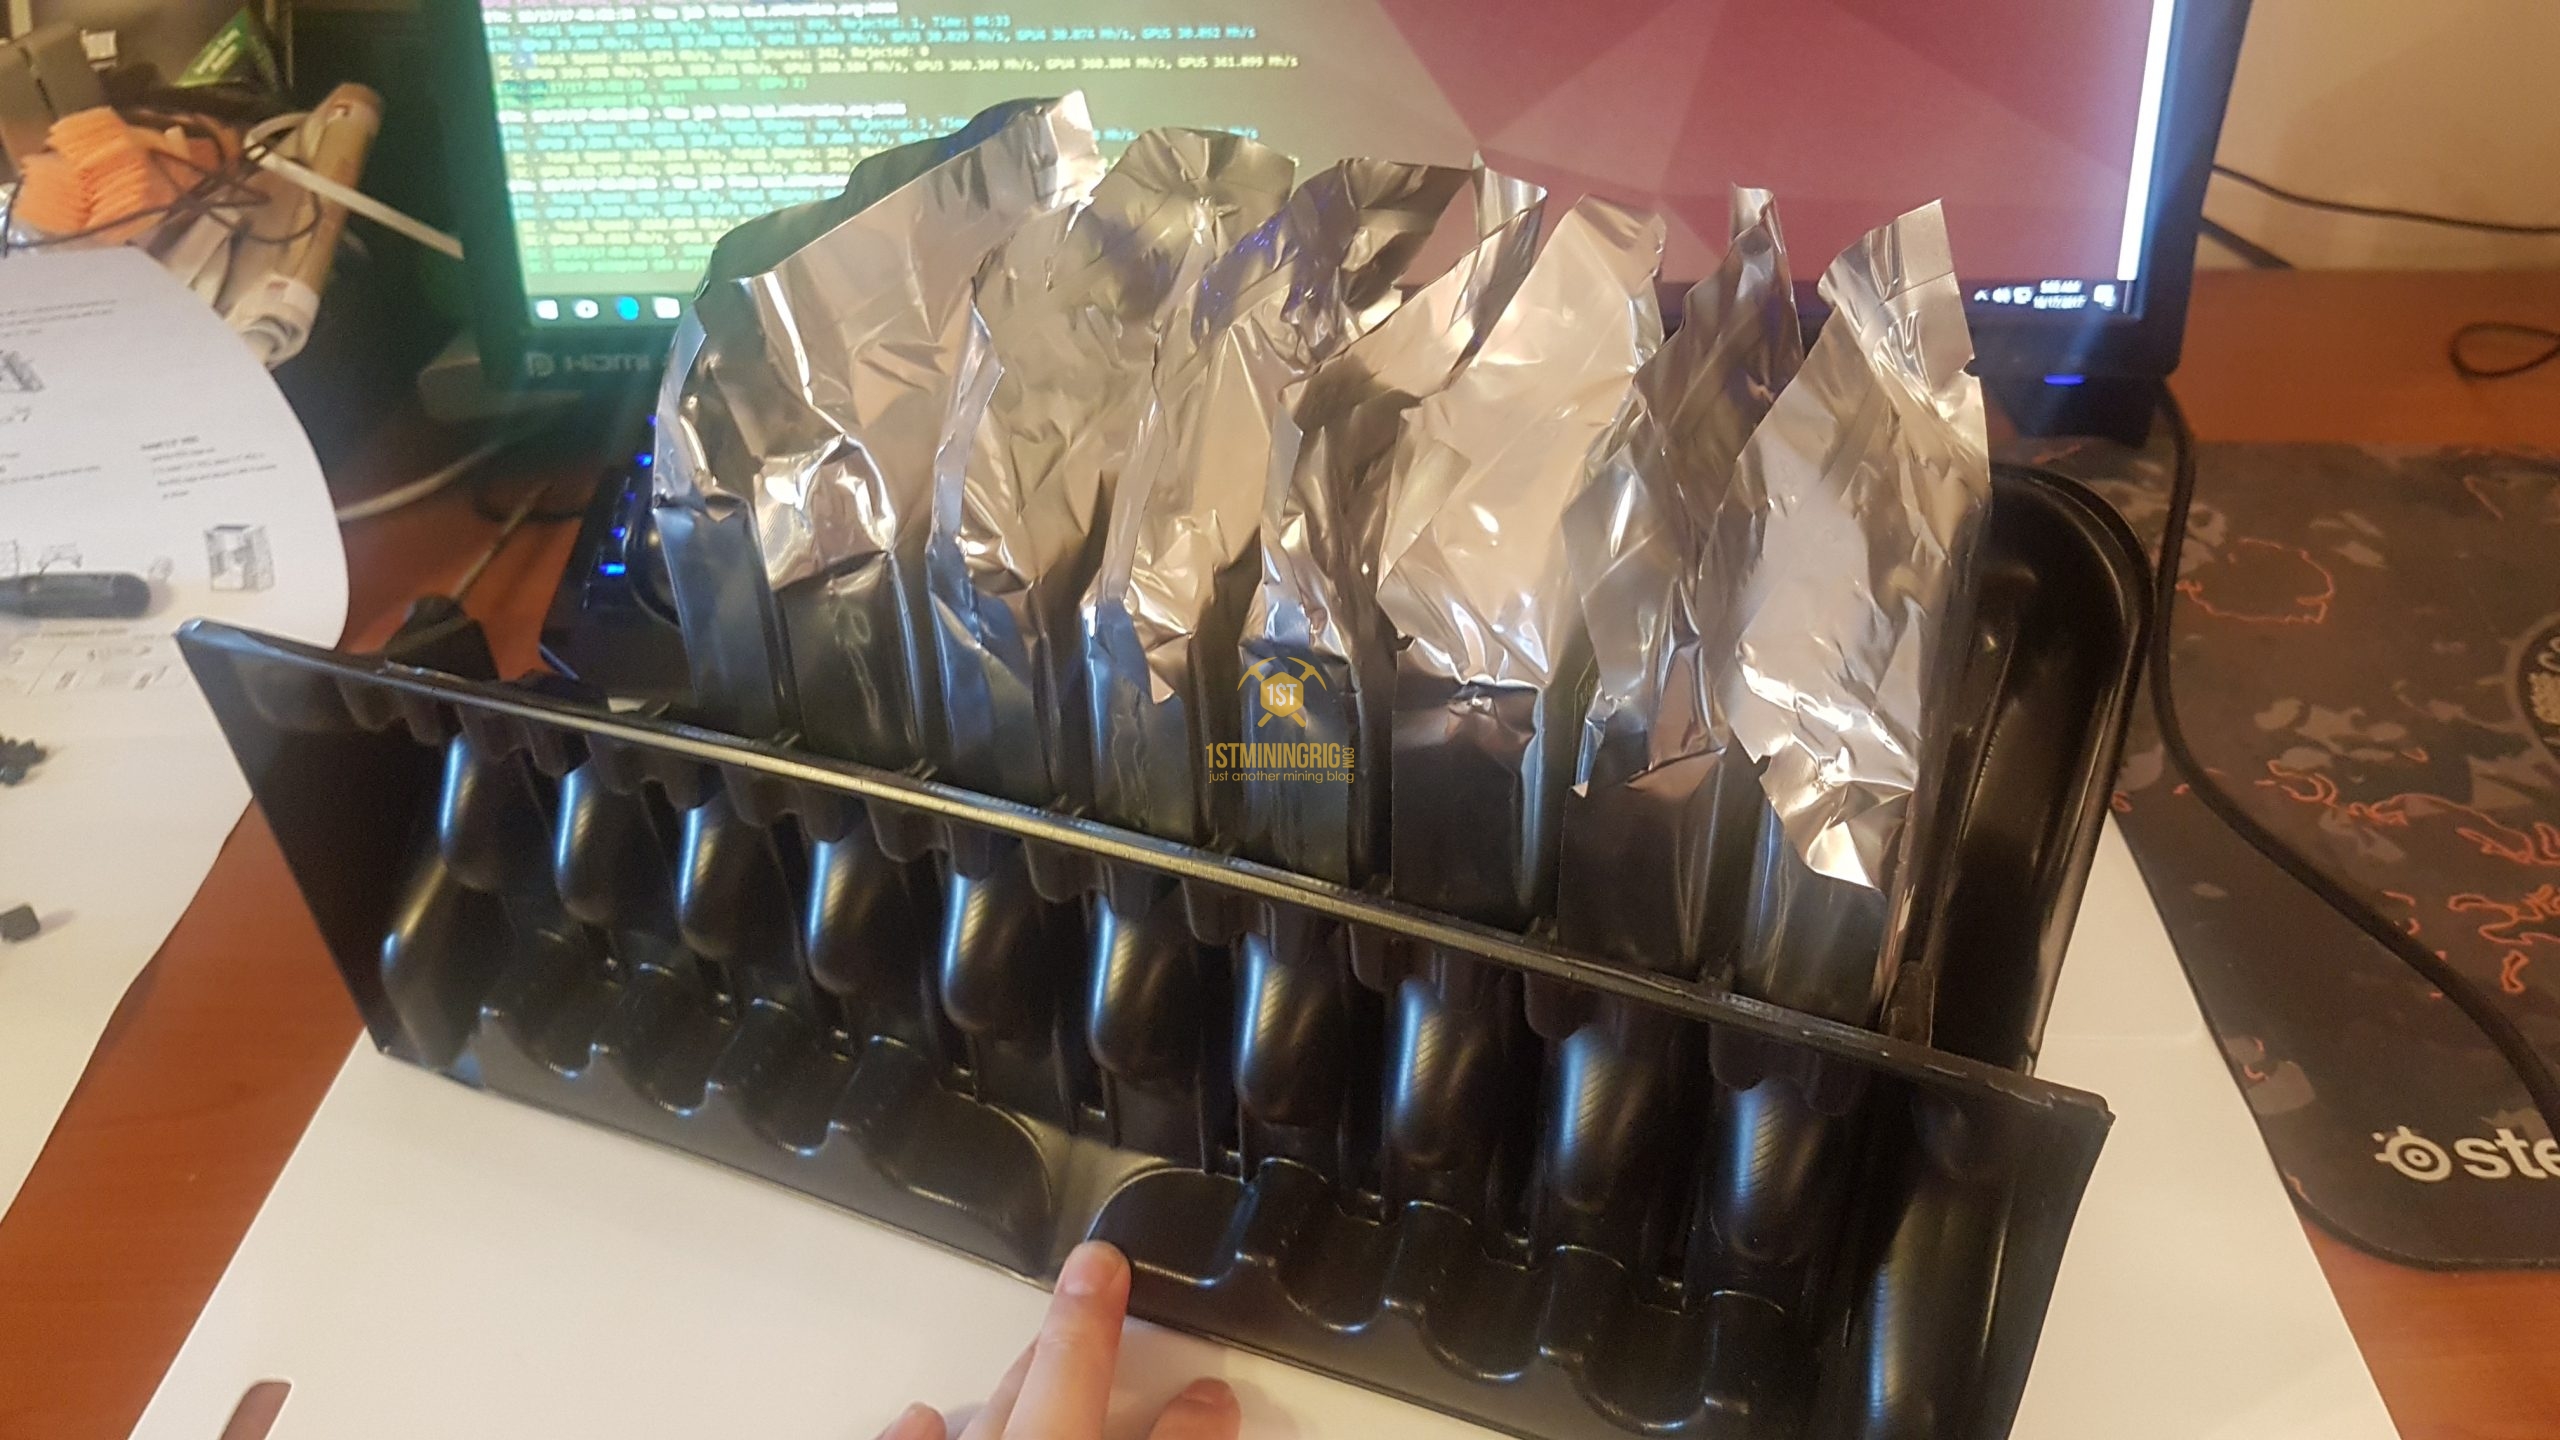
Here are some users Storj Nodes


Pictures from storj forum: https://forum.storj.io/t/post-pictures-of-your-storagenode-rig-s/1422
What to Expect in the Future
We know why hosting Storj wasn’t profitable until Tardigrade was released in 2019 and even then, it’s still barely bringing any money in. Despite that, I still believe that we are approaching a time where hosting Storj is becoming profitable.
Since the release of Tardigrade in mid 2019, the developers have been taking a lot of steps to popularize the project, and the results are clear as day.
If I get to find enough to fill all of the 24 TB I have available, the income from hosting might become quite interesting.
Regarding the Storj coin, it has experienced some price fluctuations just like other altcoins did. It was overpriced during the 2018 boom and then fell low during the infamous “crypto bloodbath”. Unlike most other altcoins though, Storj seems to be back on its feet, now priced 4x times higher than what it was exactly a year ago. This might be a good indicator that the product that is backing the coin has demand.

How to Set Up Your Storj Node
Here are the steps you need to take if you’d like to give Storj hosting a try:Get your unique auth token
- Get your auth token here (save it, we will use it later): https://registration.storj.io/


Forward 28967 port
- Forward 28967 port from your router. Here is a very useful article if this is new for you!

Add firewall rule for 28967 port
- And add firewall rule for the same port: open PowerShell with administrator rights and paste the following command: “New-NetFirewallRule -DisplayName “Storj v3” -Direction Inbound –Protocol TCP –LocalPort 28967 -Action allow“, this will automatically do it for you, make sure to open CMD or PowerShell as Administrator.


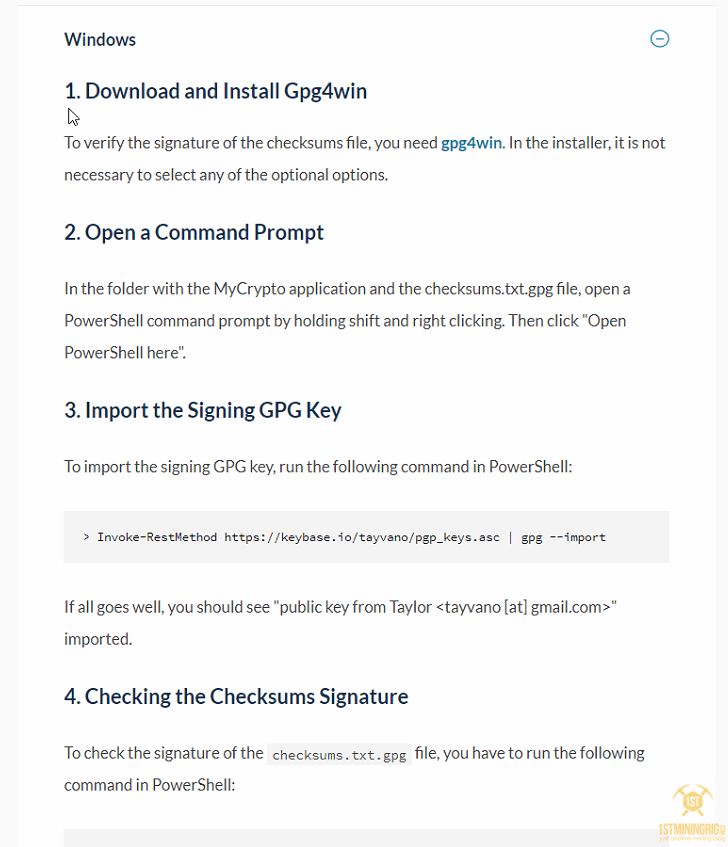
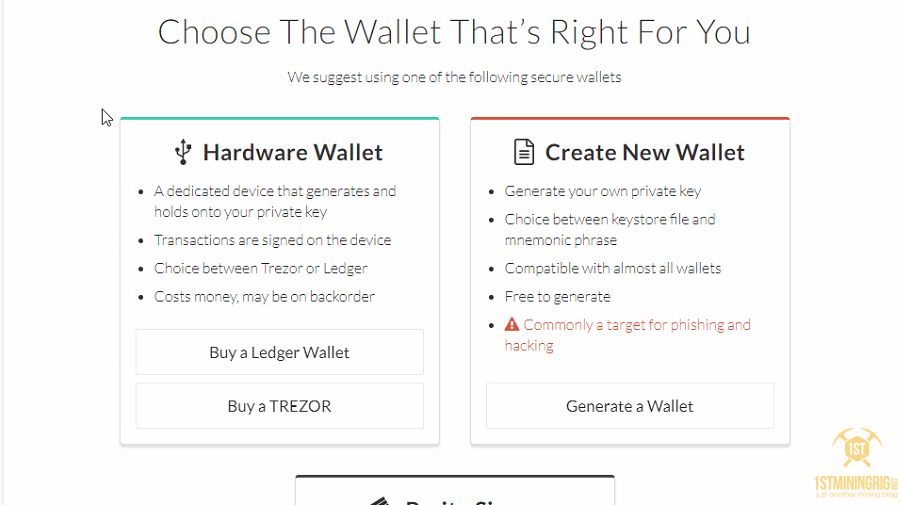
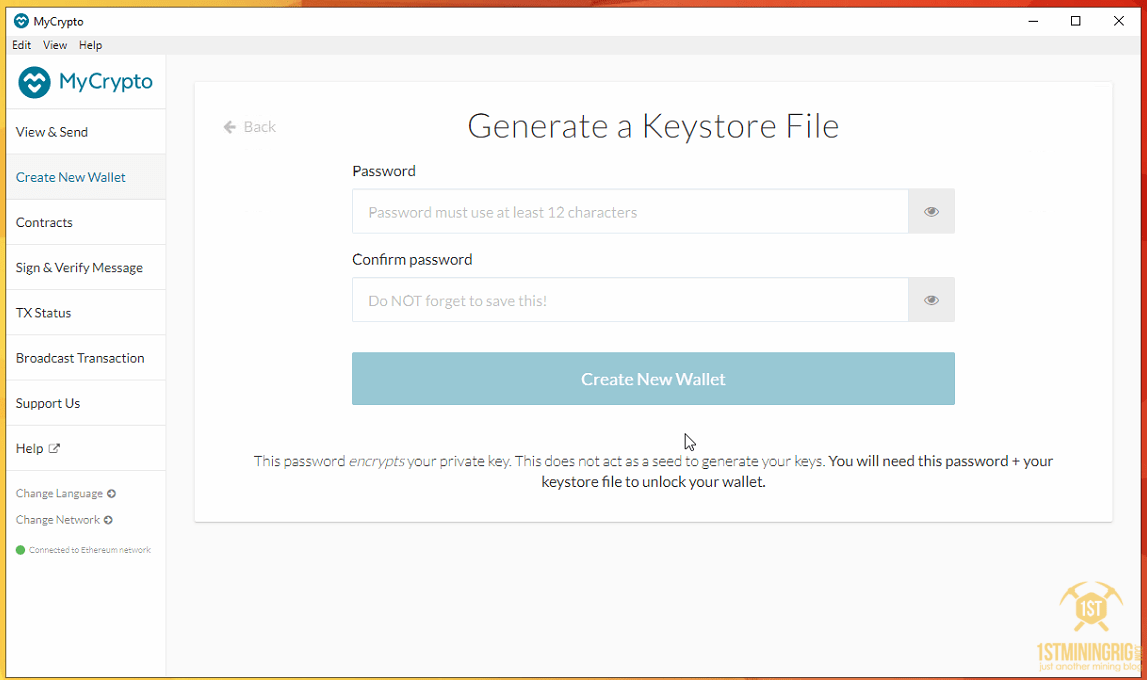
Install myCrypto Wallet
- Install MyCrypto wallet (great because can create more than one address, same as Ethereum’s Mist wallet). Make sure to Verify Authenticity before installation, check here for instructions: https://support.mycrypto.com/security/verifying-authenticity-of-desktop-app.html, also download “Signed Checksums” (here is a video with instructions)

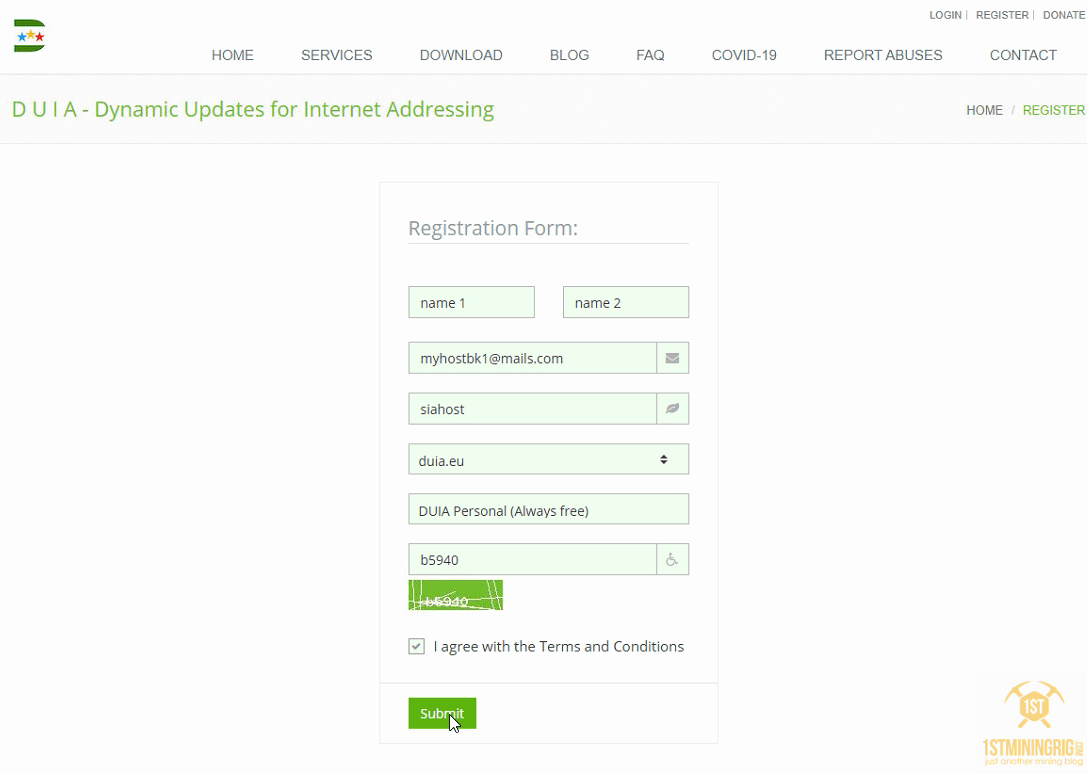
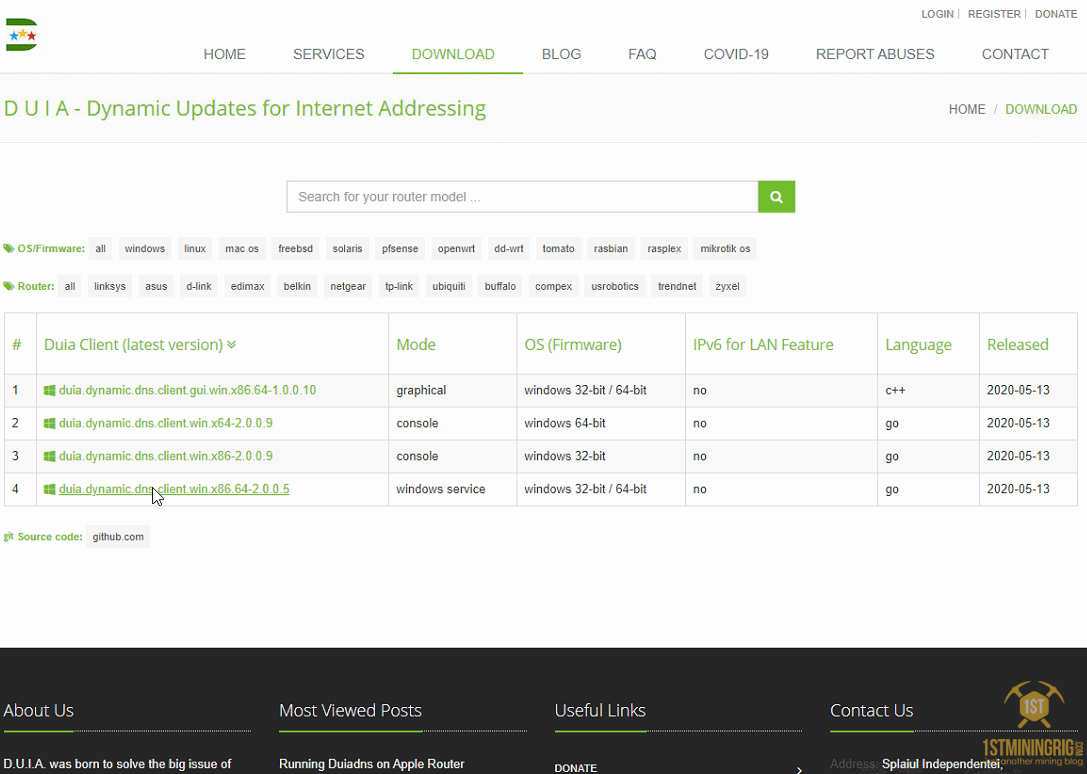
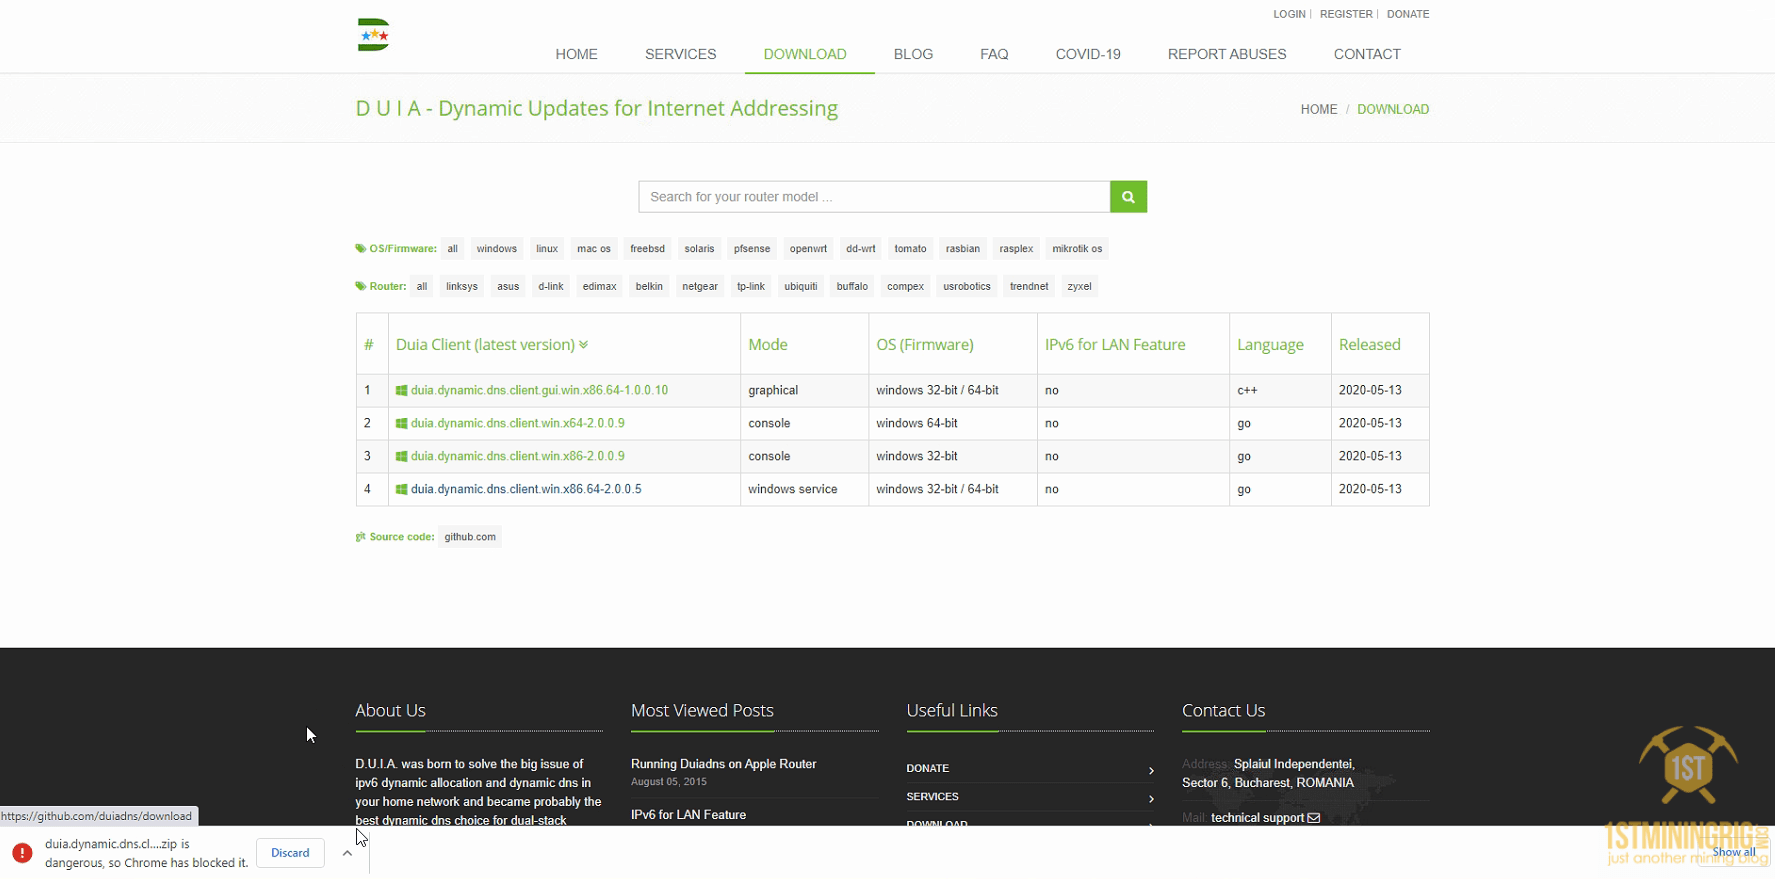
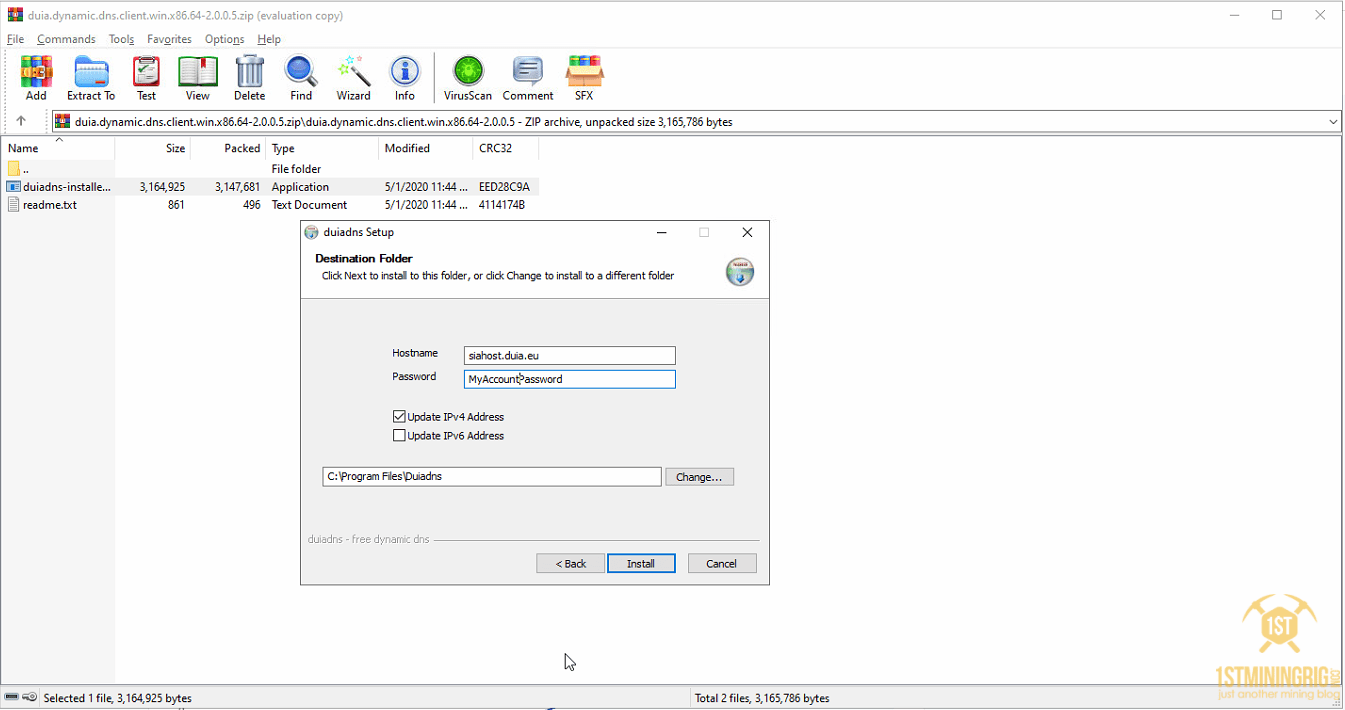
Create custom DNS
- Custom DNS: Go to duiadns.net (its completely free and very easy to use), signup (free), confirm account, create your hostname (eg: storjhost.duia.eu), download windows client install it, run it, enter your hostname (eg: storjhost.duia.eu) and account password. It will automatically start with windows, no other actions are required from here.

Storj Node Installation & Setup
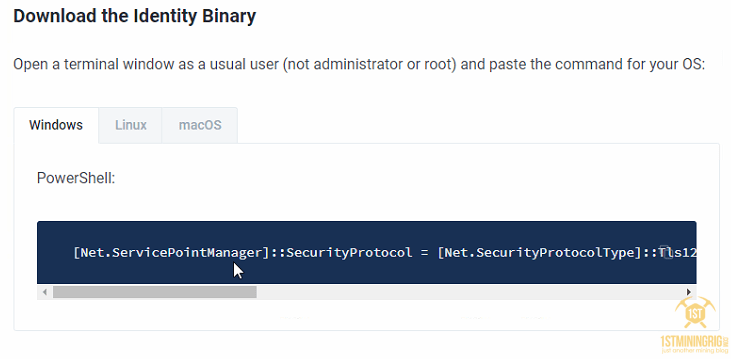
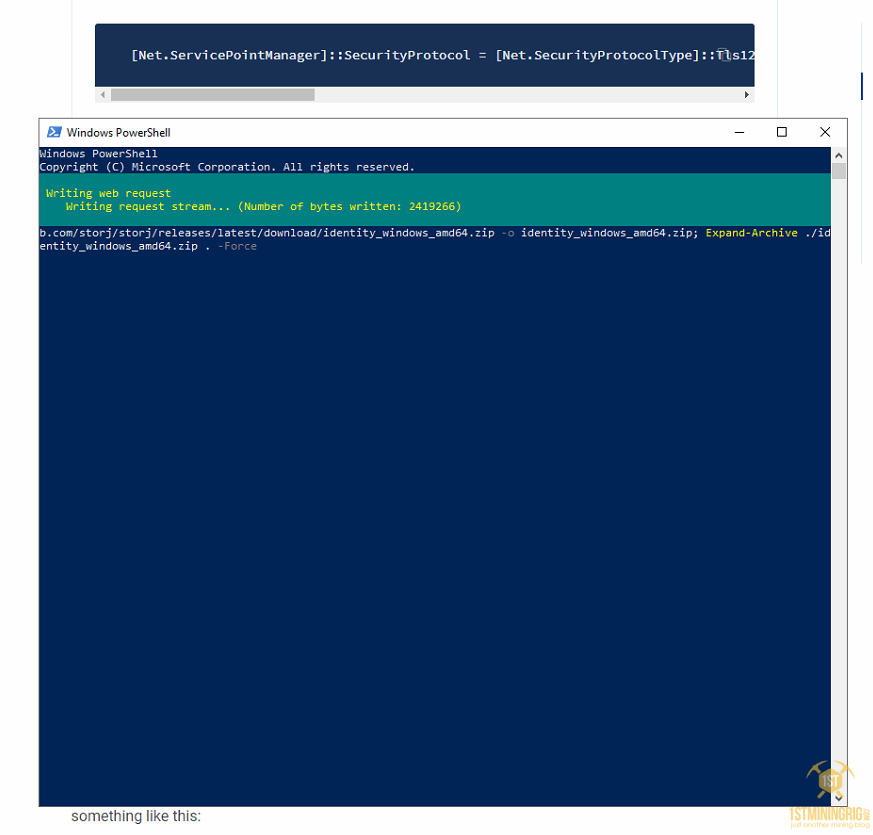
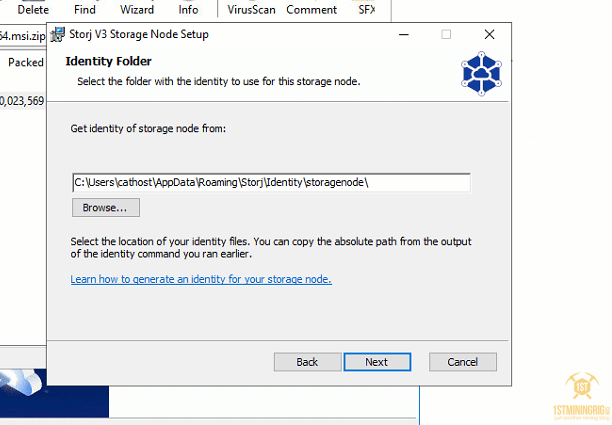
Download Identity
- Download the Identity Binary: open CMD or PowerShell and paste the following text “[Net.ServicePointManager]::SecurityProtocol = [Net.SecurityProtocolType]::Tls12; curl https://github.com/storj/storj/releases/latest/download/identity_windows_amd64.zip -o identity_windows_amd64.zip; Expand-Archive ./identity_windows_amd64.zip . -Force” (this will take a minute)
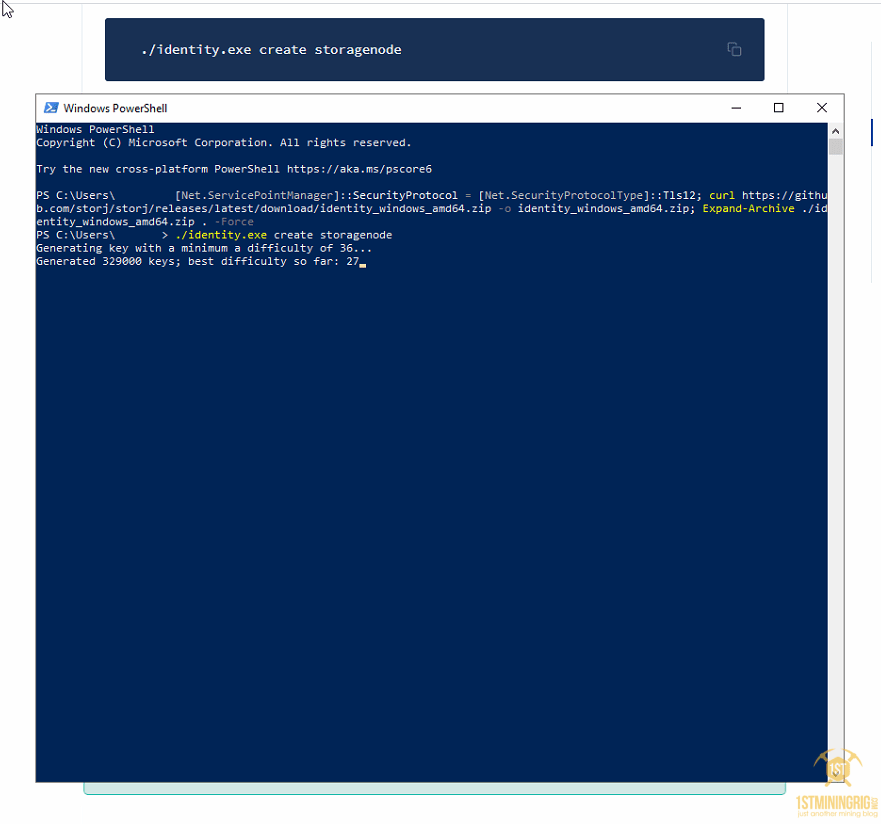
Create Identity
- Create Identity (this can take from one to several hours): in the same CMD or PowerShell terminal paste the text: “./identity.exe create storagenode“, once finished make backup of “ca.key ” file.

Authorize Identity
- Authorize the Identity: copy “./identity.exe authorize storagenode <email:characterstring>” and replace <email:characterstring> with your auth key that was generated in the first steps, so the final command should look similar to this “./identity.exe authorize storagenode [email protected]:1LT1geuT8AVz9BKqCDoBJYy33mv3moStYqf9AxZbAzJM14j2bYWSGo7cS4Eg8baxByaXjEXTc3zmEL2tfw6m3knBfonVYp“, paste it in the terminal.


Confirm Identity
- Confirm the identity: copy and paste the following commands to terminal, these should return the following numbers, 2 and 3
- (sls BEGIN “$env:AppData\Storj\Identity\storagenode\ca.cert”).count
- (sls BEGIN “$env:AppData\Storj\Identity\storagenode\identity.cert”).count

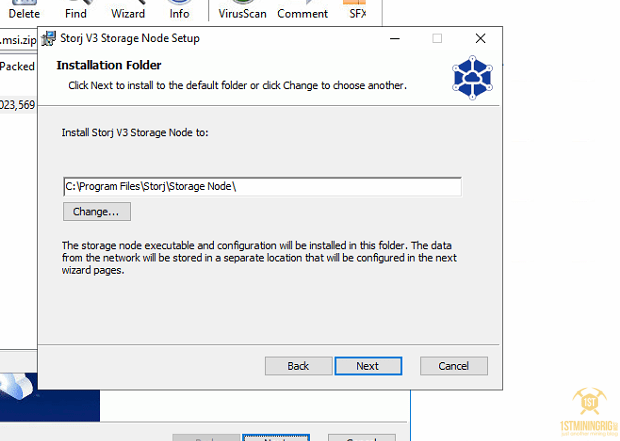
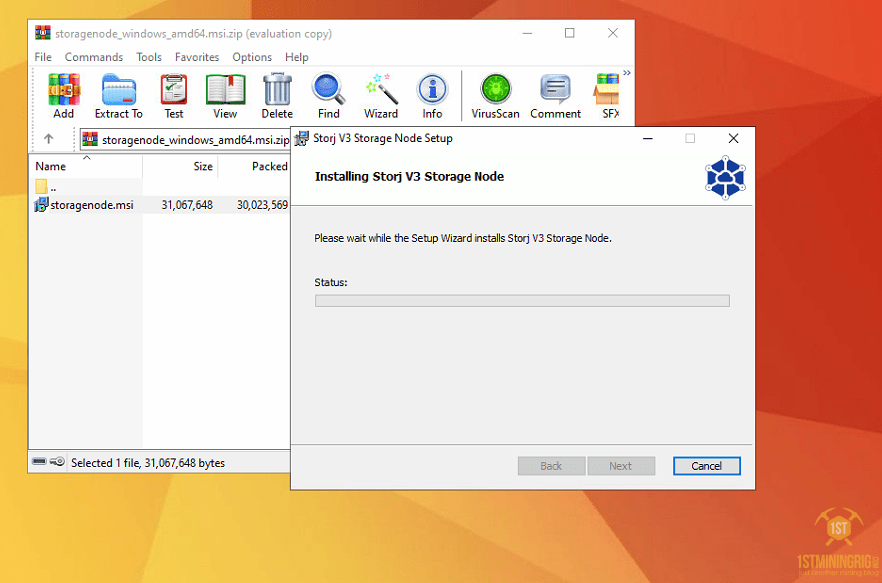
Storj GUI Installation & Setup
- GUI Install – download it here: https://github.com/storj/storj/releases/latest/download/storagenode_windows_amd64.msi.zip or here https://documentation.storj.io/setup/gui-windows/storage-node
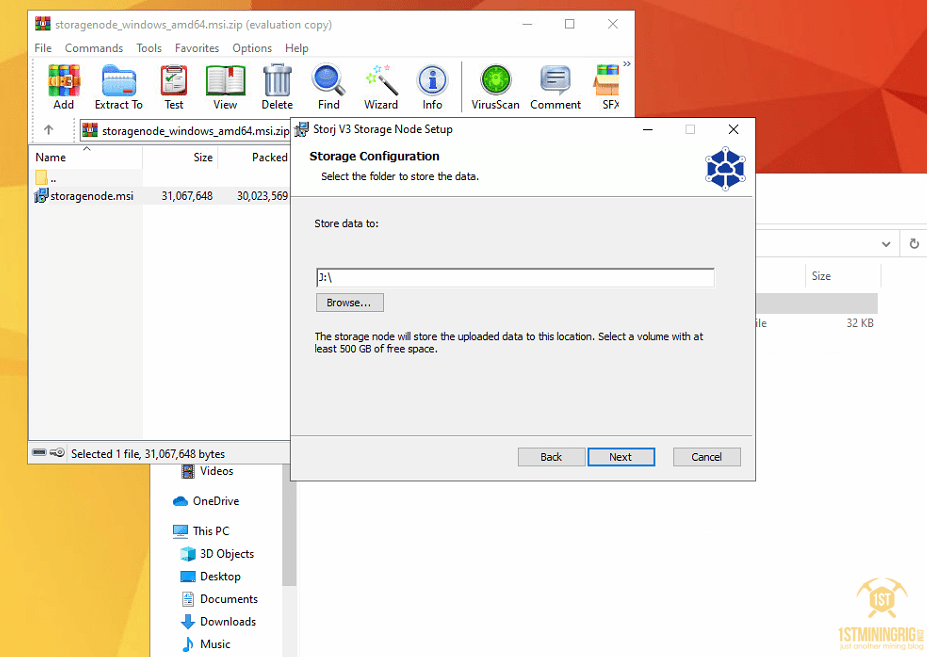
- Run the installer (i recommend to not change the default locations)
- Select storage location
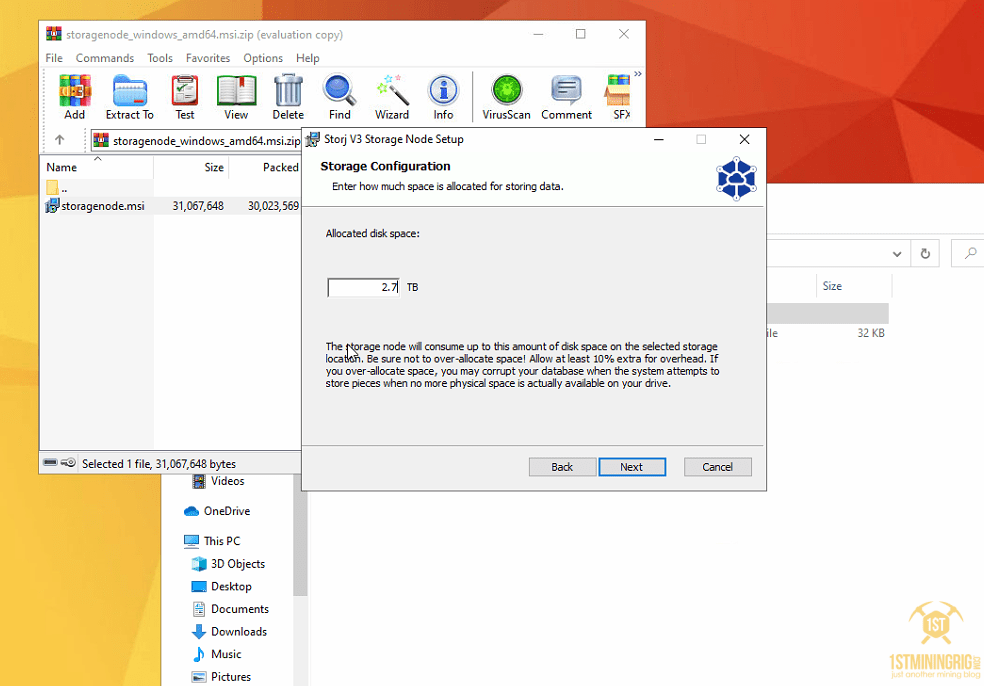
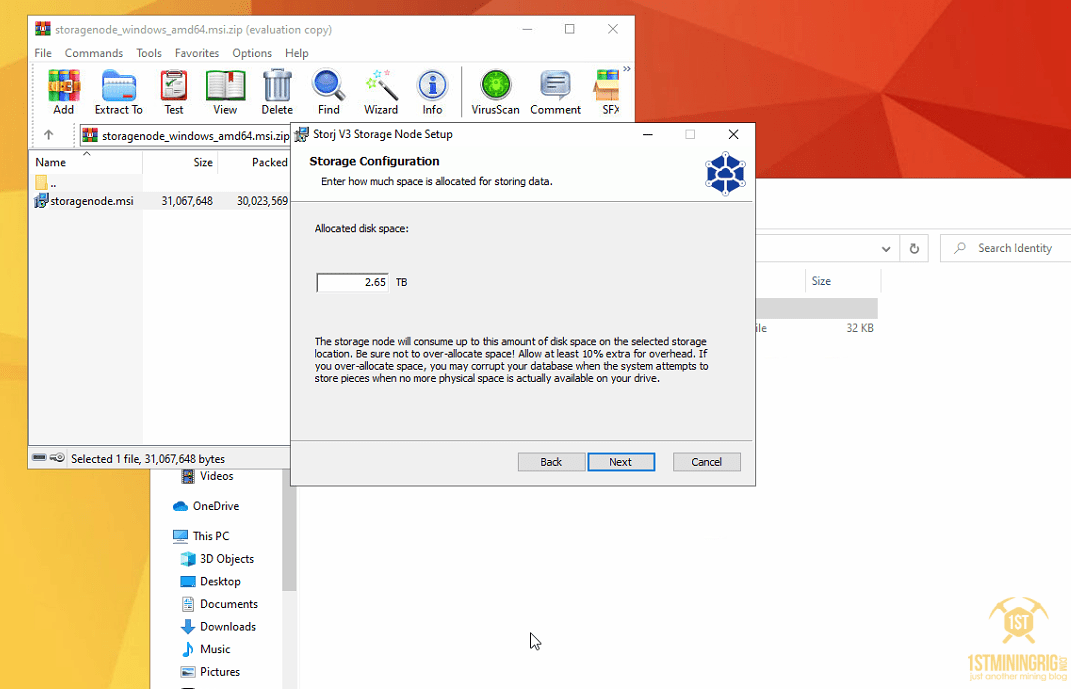
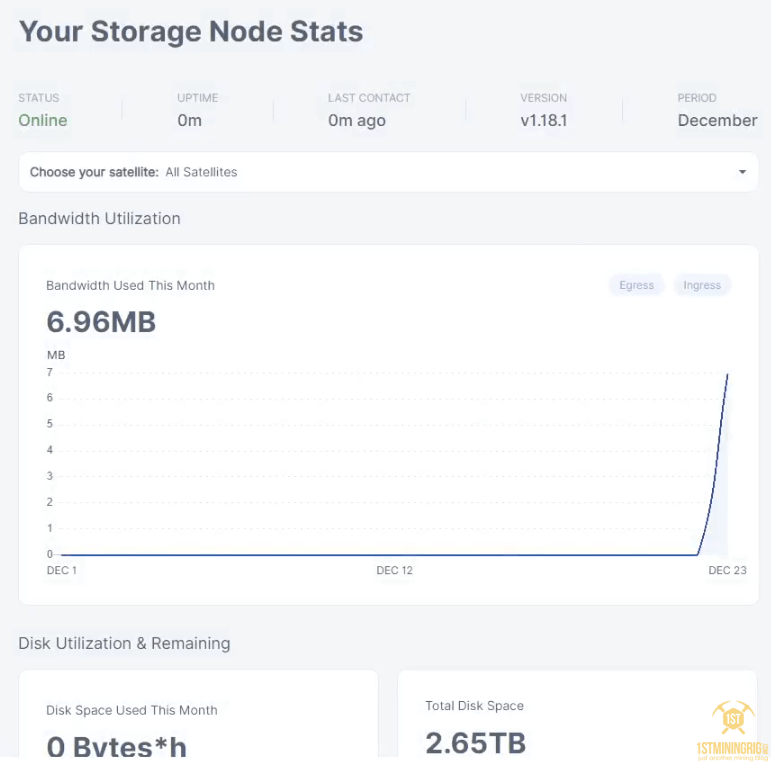
- Allocate how much disk space should be used (my hdd has 2.72 TB and i set 2.65 to be used)
- Click install and Finish
- Once clicked on Finish it will open Storj dashboard in your default browser


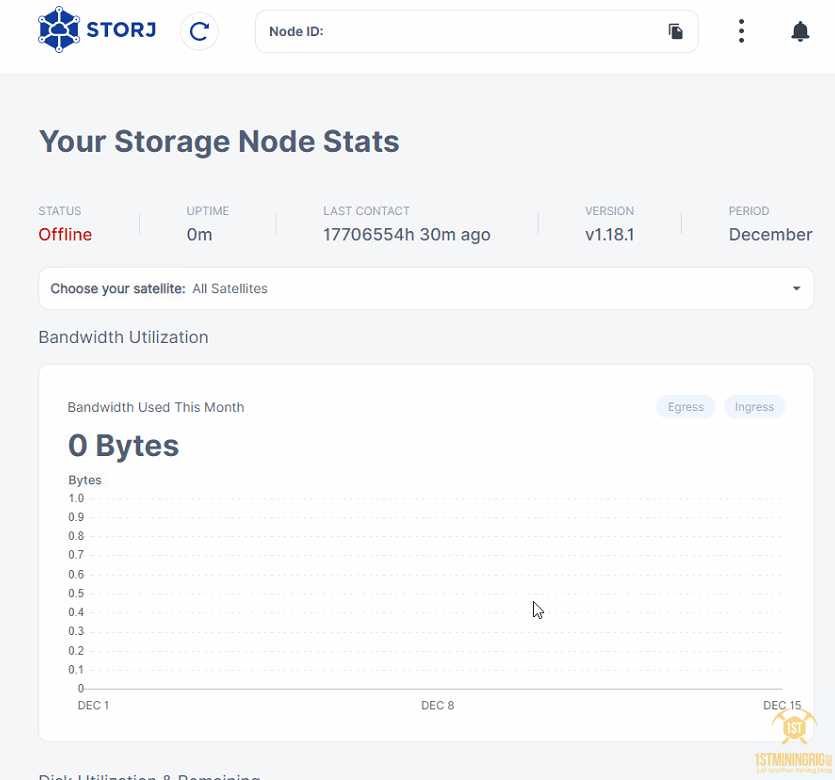
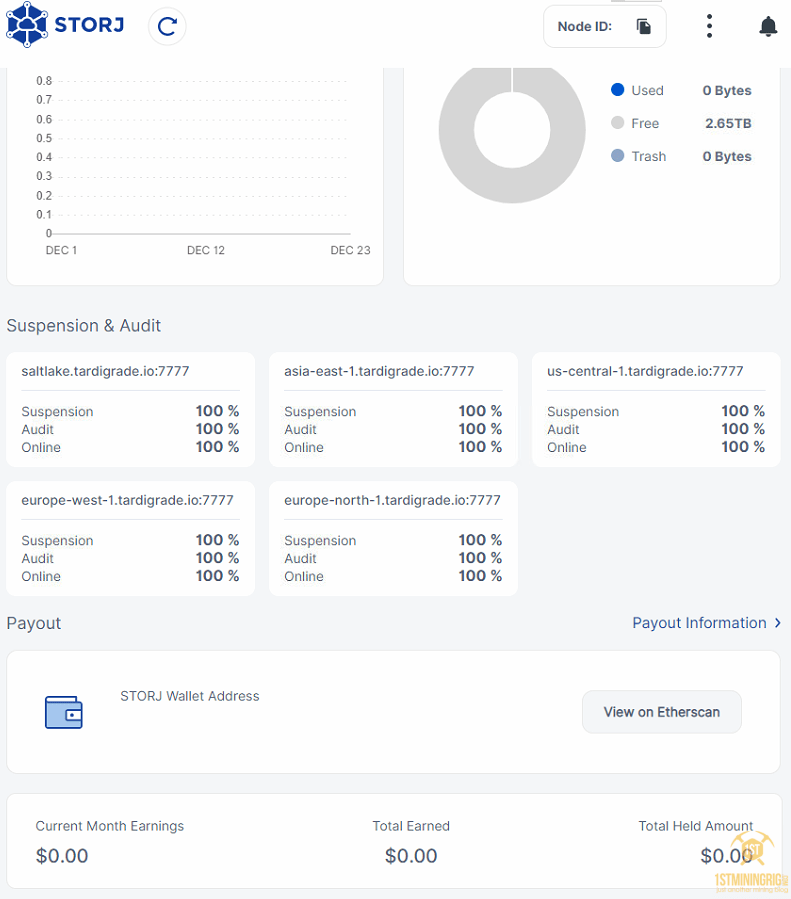
Storj Node Dashboard (finish)
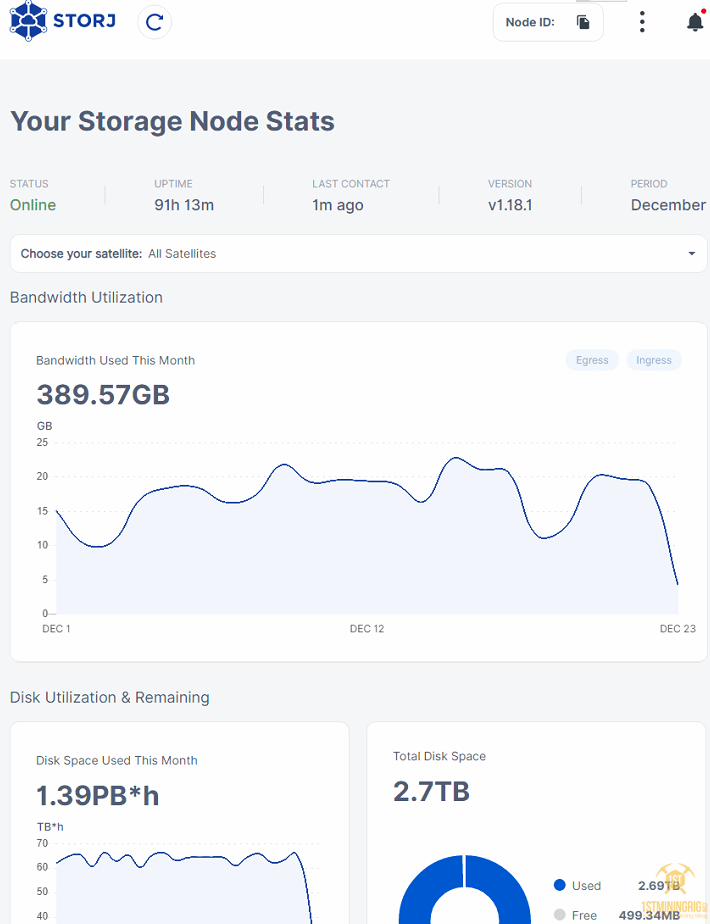
Storj Node dashboard right after setup
- To access it you will have to open your browser and go to the following address: http://localhost:14002/
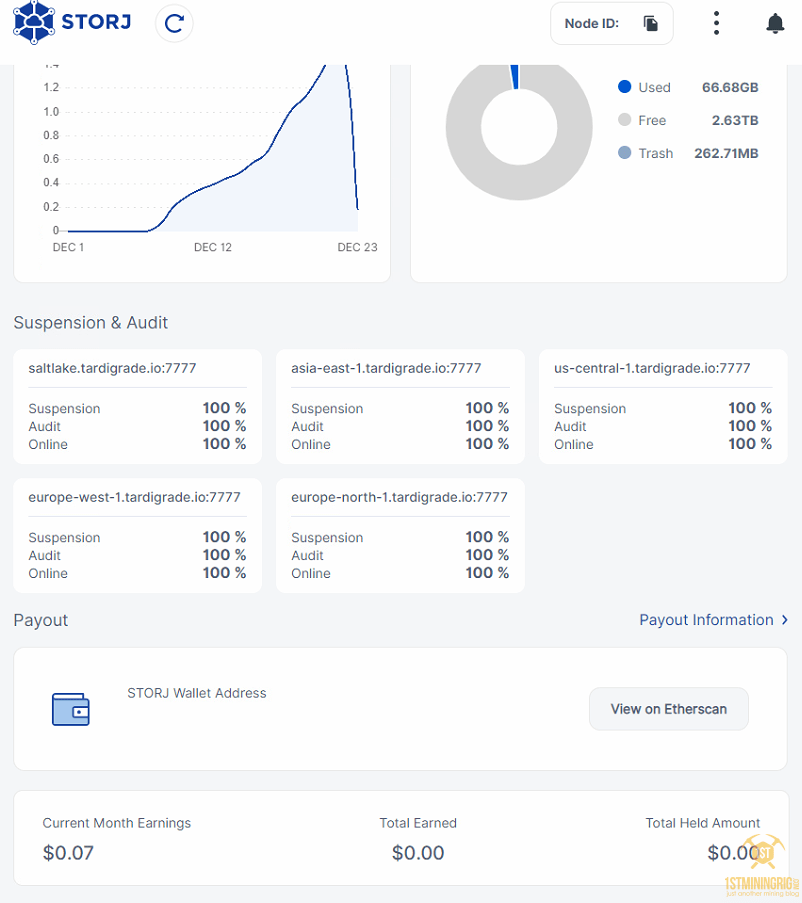
Storj Node dashboard after two weeks
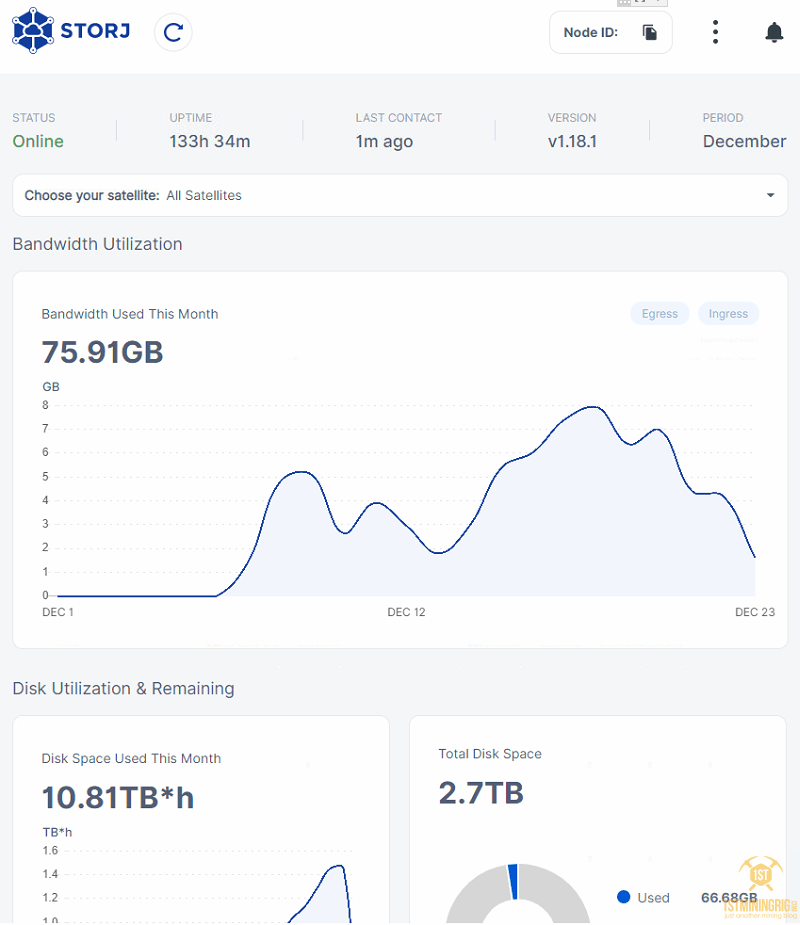
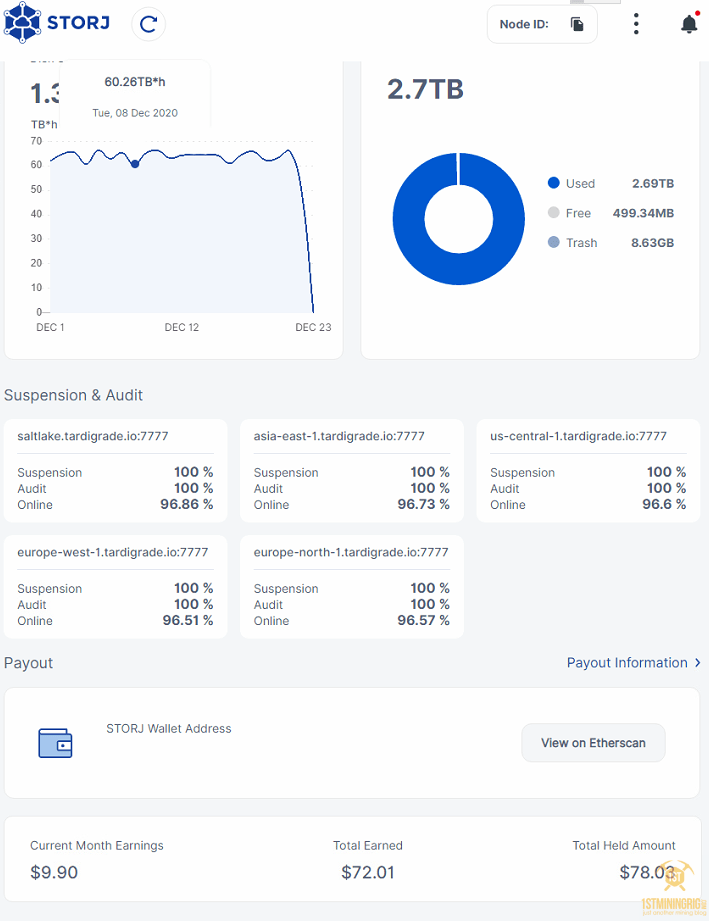
Storj Node dashboard after almost one year
- Total Storj received so far: 465 STORJ
How to add new HDD to Windows Storj Node Hosting Rig
Since I am getting close to the 3TB storage mark, it’s getting time for me to add a secondary HDD. I will use this opportunity to show you how to do that exactly. Feel free to follow along.
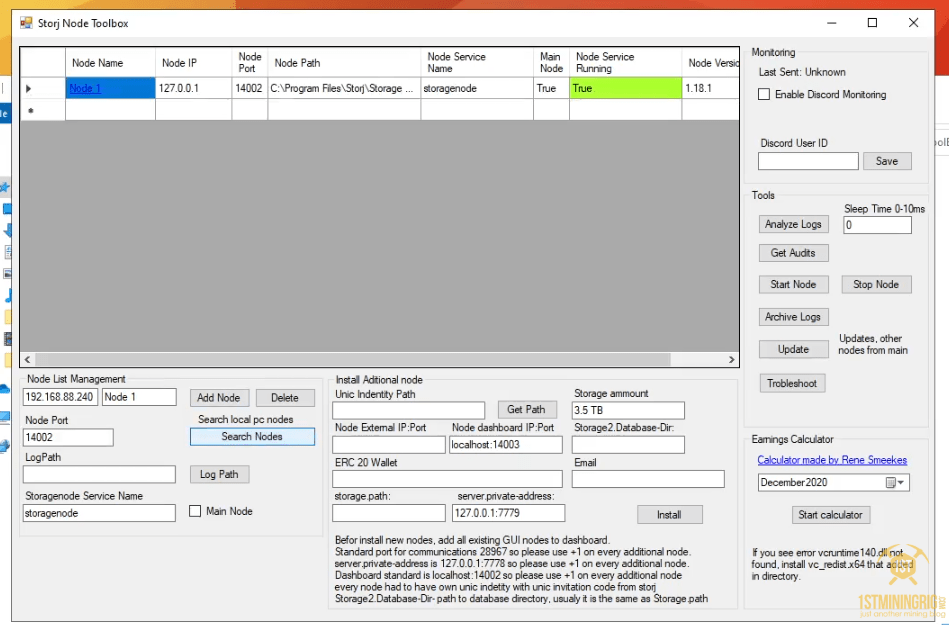
On Windows there is/was no option to create new Node/Add new HDD by reinstalling Storj Node GUI, you are stuck with your first node (manually you can edit your allocated space, unless we install CLI using Docker which is bit more complicated). But not anymore, Vadim created a nice tool for us called “Storjnode Toolbox” which can allow us to add as many hdds as we need with just few simple clicks.
Below you can find the steps to follow to add new Storj Node HDD using Toolbox:
New Storj Node Preparations
- Download Storjnode Toolbox: https://github.com/TonyTosol/Storj-Node-Toolbox/releases/
- Apply for a new Unique AUTH Token, note that you will have to use a different email address.
- Port forward 28968, the main/default port is 28967 but since we add a new Storj Node to the same machine we need to use a different port, so we will increase 28967 with +1.

- Firewall 28968 Port Rule, follow the steps and modify the port from 28967 to 28968 , command line “New-NetFirewallRule -DisplayName “Storj v3” -Direction Inbound –Protocol TCP –LocalPort 28968 -Action allow“

- Create new wallet address, new node, new address.
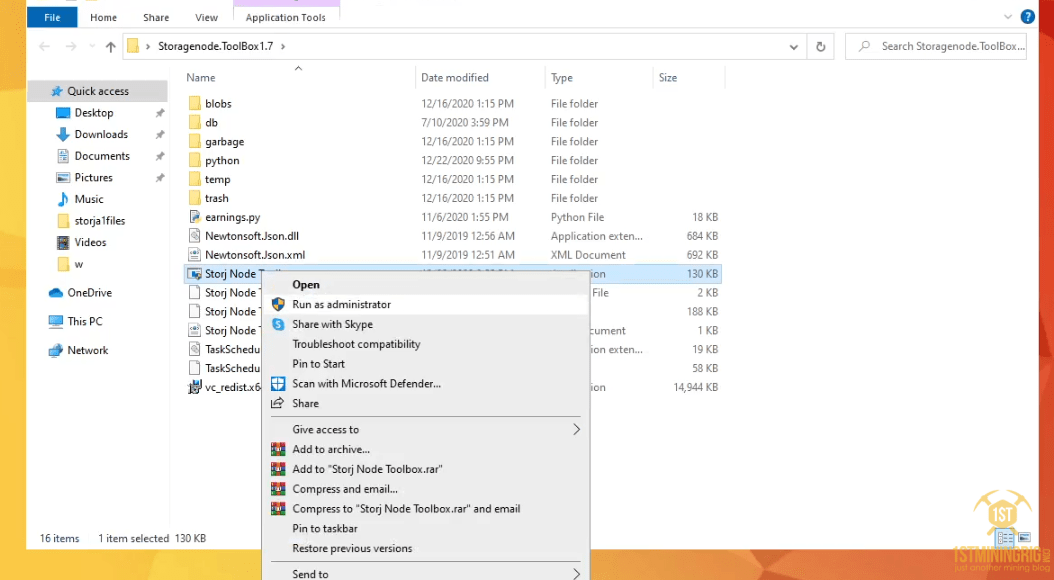
- Download Identity, you should have this already, but to be sure just download it once again.

- Create new Identity, (this will take a while) in our main Storj Node we used “./identity.exe create storagenode“, this time we will modify “storagenode“, so i renamed it to “storagenode1“, here is full command to copy “./identity.exe create storagenode1“

- Authorize Identity, once again we will have to rename “storagenode” to “storagenode1“, please double check everything before hiting enter: “./identity.exe authorize storagenode1 <email:characterstring>” replace “<email:characterstring>” with your new email and unique auth token from second step.
![]()
- Confirm the identity, storagenode1
- (sls BEGIN “$env:AppData\Storj\Identity\storagenode1\ca.cert”).count
- (sls BEGIN “$env:AppData\Storj\Identity\storagenode1\identity.cert”).count
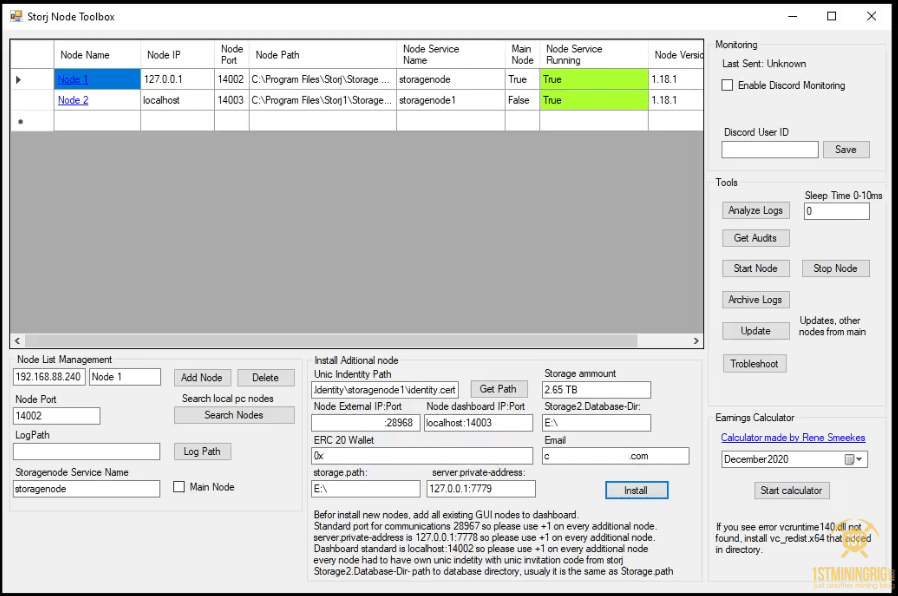
StorjNode Toolbox Adding Node
- Run Toolbox as administrator and click “Search Nodes“, this will display your main/first Storj Host Node
- Unique Identity Path: click “Geth Path” and default location is “C:\Users\UserName\AppData\Roaming\Storj\Identity\storagenode1” select “identity.key“
- Node External IP:Port: for “IP” use DNS created on duiadns.net, the “Port” should be “28968“
- Node Dashboard IP:Port: if this is the second node added the new port will be “14003“, the main port will always be 14002.
- ERC 20 Wallet: the new wallet address you created above with myCrypto.
- Storage Path: storage folder location where the files will be added for the new node
- Server Private Address: default port is “7778“, with the second we will use “7779“, with 3rd “7780” et..
- Storage Amount: choose how much space you want to allocate to this new Storj Node
- Storage2 Daabase-Dir: Usually same as “Storage Path” unless you use custom locations.
- Email: you can add the same email used for “Unique AUTH Key“
- Double check everything then click “Install“
- Done! 🙂 to access new Storj Node dashboard go to “http://localhost:14003/“
In Conclusion
I honestly do not regret taking part in this node hosting journey. I’ve learned a lot in the way and I have supported the network when it needed it the most. As for today, Storj node hosting is becoming quite interesting, and I am intrigued to see how profitable it can turn. I am obviously keeping my current rig hosting Storj, and I will keep you up to date with how it goes.
[cp_modal display="inline" id="cp_id_e9e92"][/cp_modal]


