
Monero Mining – How to Mine Monero on Windows with CPU & GPU
- Like
- Digg
- Del
- Tumblr
- VKontakte
- Buffer
- Love This
- Odnoklassniki
- Meneame
- Blogger
- Amazon
- Yahoo Mail
- Gmail
- AOL
- Newsvine
- HackerNews
- Evernote
- MySpace
- Mail.ru
- Viadeo
- Line
- Comments
- Yummly
- SMS
- Viber
- Telegram
- Subscribe
- Skype
- Facebook Messenger
- Kakao
- LiveJournal
- Yammer
- Edgar
- Fintel
- Mix
- Instapaper
- Copy Link
Hey, what sup ? I have seen in some places people asking about Monero and how to mine it, if you don’t know much about it, Monero is a secure, private, untraceable currency. It is open-source and freely available to all. You can read all about it right here, or watch video below.
Today i’m going to show you how to mine Monero coin on Windows / Linux with CPU and AMD / nVidia GPU.
AMD video cards are the perfect choice to mine Monero but i will show you examples for both AMD and nVidia cards.
UPDATED Thursday, September 21, 2017: How to mine Monero (XMR) with GPU has been updated, click here for tutorial, this time i sued Claymore’s CryptoNote GPU Miner v9.7
Recommended Hardware for Monero (XMR) Mining Rig
- GPUs:
- Motherboard: ASRock H81 PRO BTC, GIGABYTE GA-H110-D3A, Biostar TB250-BTC PRO
- CPU: Intel Celeron G1840 for ASRock H81 PRO BTC, Intel Celeron G3900 for Gigabyte H110-D3A & Biostar TB250-BTC PRO
- RAM: Kingston HyperX FURY 4GB 1333MHz DDR3 for ASRock H81 PRO BTC, Kingston Technology HyperX FURY 2400MHz DDR4 for Gigabyte H110-D3A & Biostar TB250-BTC PRO
- SSD: ADATA SU700 120GB
- PSU: 2x EVGA SuperNOVA 750 G2, 80+ GOLD 750W
- Dual PSU Adapter: Add2PSU Multiple Power Supply Adapter
- USB Risers: USB Riser VER 008 PCI-E 16x to 1x 60cm USB 3.0 Extension Cable
- Power Button: 2 Pin SW PC Power Cable on/off Push Button ATX Computer Switch Wire 45cm
- Energy Meter: TP-Link HS110 Smart Plug w/ Energy Monitoring
- Frame: https://1stminingrig.com/product/aluminum-mining-rig-open-air-frame/
Here we go! I will start mining Monero with CPU
Monero CPU Mining
1 First step is to download the miner, i will be using Claymore’s CryptoNote Windows CPU Miner v3.5, download it from here , read more about the miner here 2 Once downloaded extract the contents in a folder and access it. 3 Then open “pool 32bit.bat” or “pool 64bit.bat” (depends what windows version you have) with notepad and paste the following code: “NsCpuCNMiner64 -o stratum+tcp://monerohash.com:3333 -u YOUR_WALLET_KEY_HERE -p x -t 4” , don’t forget to replace your wallet key. If you don’t have one it can be generated from your kraken.com account. 4 Now open the “pool 32bit.bat” or “pool 64bit.bat”, in my case ill open “pool 64bit.bat” because i have 64bit windows version. If you notice a message like “CANNOT ALLOCATE MEMORY!” and “SLOW MODE WILL BE STARTED IN 15 SECONDS…” you must do the following steps: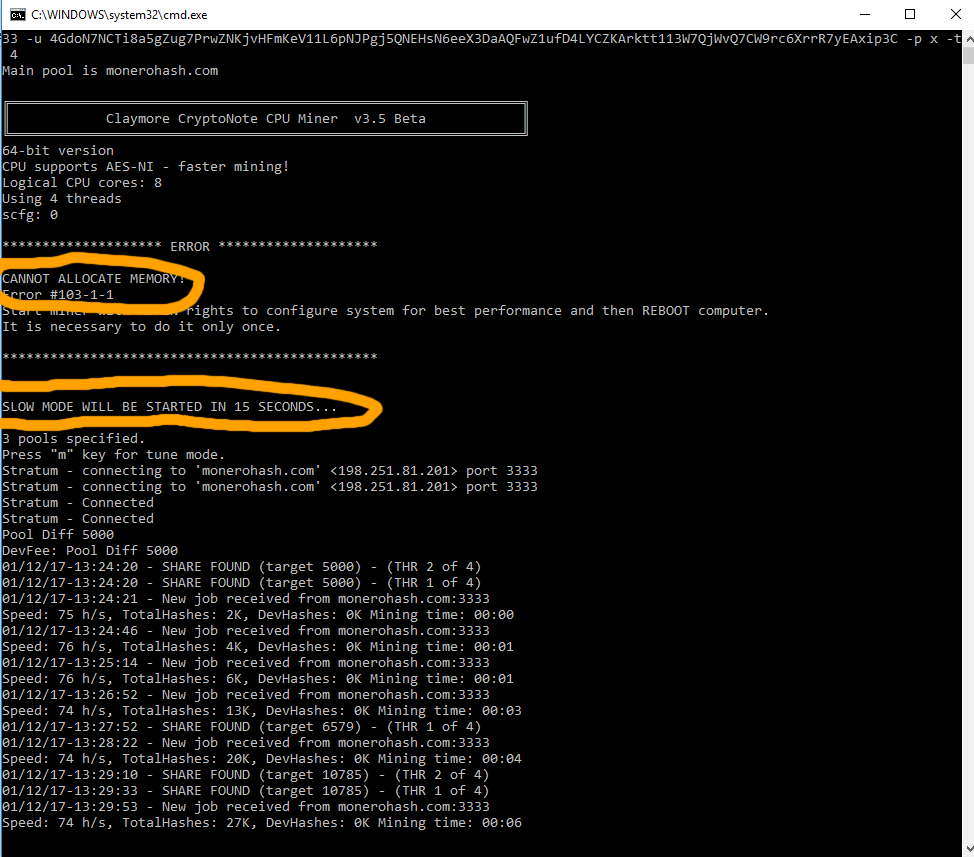
-
- Create shortcut for NsCpuCNMiner64.exe on desktop, you must be logged as admin aswel
- Open shortcut properties
- On “Target” location at the end of the line “C:\Users\USER\Desktop\Claymore CryptoNote CPU Miner v3.5 Beta – POOL\NsCpuCNMiner64.exe” add this “-o stratum+tcp://monerohash.com:3333 -u YOUR_WALLET_KEY -p x -t 4“, full code line should look like this “C:\Users\oneill\Desktop\Claymore CryptoNote CPU Miner v3.5 Beta – POOL\NsCpuCNMiner64.exe” -o stratum+tcp://monerohash.com:3333 -u YOUR_WALLET_KEY -p x -t 4
- Then Click on “Advanced” button, check “Run as Administrator” box, apply and save modifications.


- Now you will have to start the miner from desktop shortcut, you will still see the same error messages, just leave the miner to run for 2-3 minutes then close it and reboot your computer.
-t 4 stands for number of threads to use while mining. I have an i7-3610QM and i can go up to 8 threads, but as i understood -t 4 is the best option.
After the restart you will notice a new message saying “FAST MODE ENABLED”
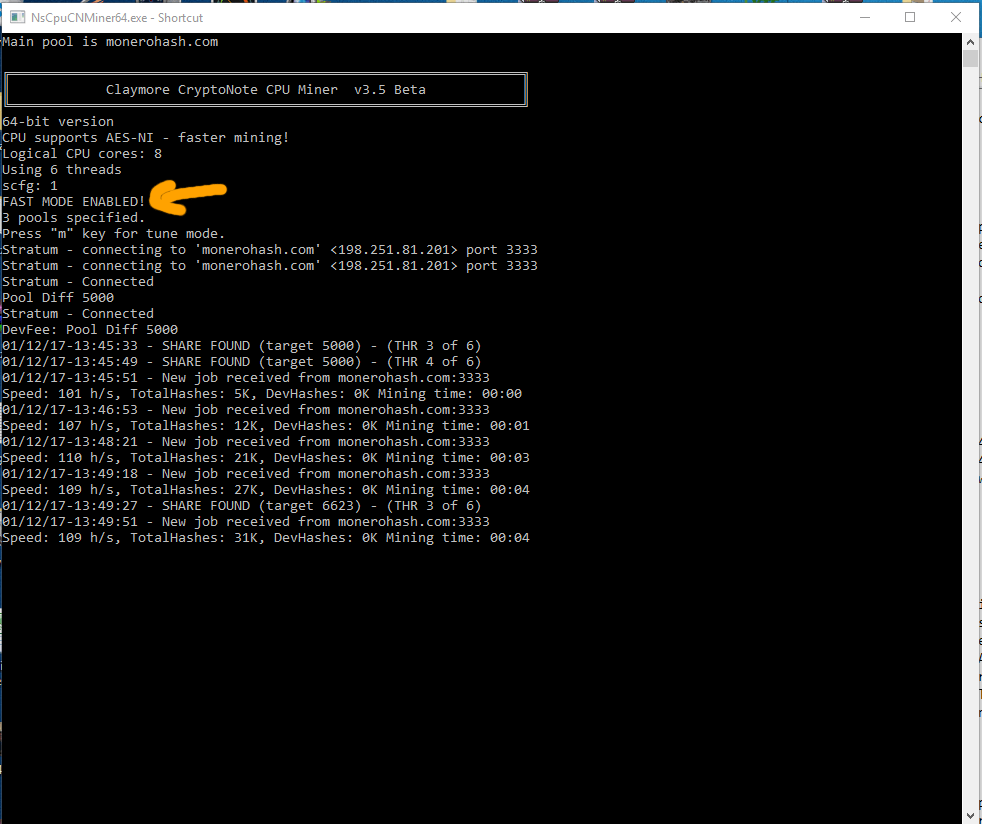
Here is mine:
Monero nVidia GPU Mining
For this test i will be using my laptop, the vide card is nVidia Geforce GTX 670M 3GB.
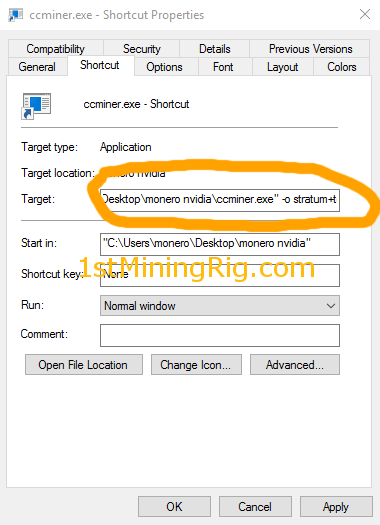
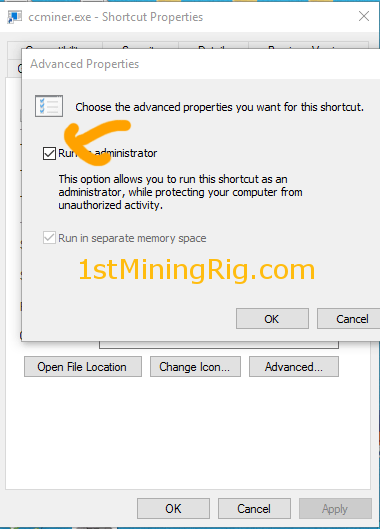
1 Will use ccminer-cryptonight (A modification of Christian Buchner’s & Christian H.’s ccminer project by tsiv for Cryptonight mining.). You can download it from https://github.com/tsiv/ccminer-cryptonight/releases 2 Once downloaded, extract its contents 3 Send a desktop shortcut of Right click of “ccminer.exe” by right clicking it and then choose “Send to” -> “Desktop” 4 On desktop shortcut that we have just created right click on it and go to properties 5 In target field paste the following code -o stratum+tcp://monerohash.com:3333 -u YOUR_WALLET_KEY -p x, paste it right after “C:\Users\monero\Desktop\monero nvidia\ccminer.exe”, so the full code will look exactly like this “C:\Users\monero\Desktop\monero nvidia\ccminer.exe” -o stratum+tcp://monerohash.com:3333 -u YOUR_WALLET_KEY -p x 6 Now click on “Advanced” and check the box that is saying “Run as Administrator” 7 Apply and save the modification and then you can close it. 8 Now double click the shortcut and watch the mining starting 🙂 , done!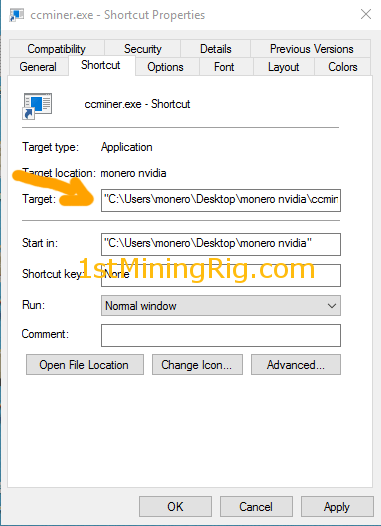


Monero AMD GPU Mining
UPDATED:
How to mine Monero (XMR) with Claymore’s CryptoNote GPU Miner v9.7
For me Claymore’s CryptoNote GPU Miner is the best miner for Monero, here is a quick tutorial how to use it.
- First download the miner from https://mega.co.nz/#F!e4JVEAIJ!l1iF4z10fMyJzY5-LnyC2A
- Once downloaded extract its contents and right click on start.bat file and then go to edit
- As Monero pool i recommend nanopool or dawrfpool, in this example ill use dawrfpool
- Inside the start.bat file paste the following code:
- GPU_FORCE_64BIT_PTR 0
GPU_MAX_HEAP_SIZE 100
GPU_USE_SYNC_OBJECTS 1
GPU_MAX_ALLOC_PERCENT 100
GPU_SINGLE_ALLOC_PERCENT 100
NsGpuCNMiner.exe -o stratum+tcp://xmr-eu.dwarfpool.com:8050 -u WALLET_ADDRESS.Rig1 -p x - Replace WALLET_ADDRESS with your personal Monero payment address
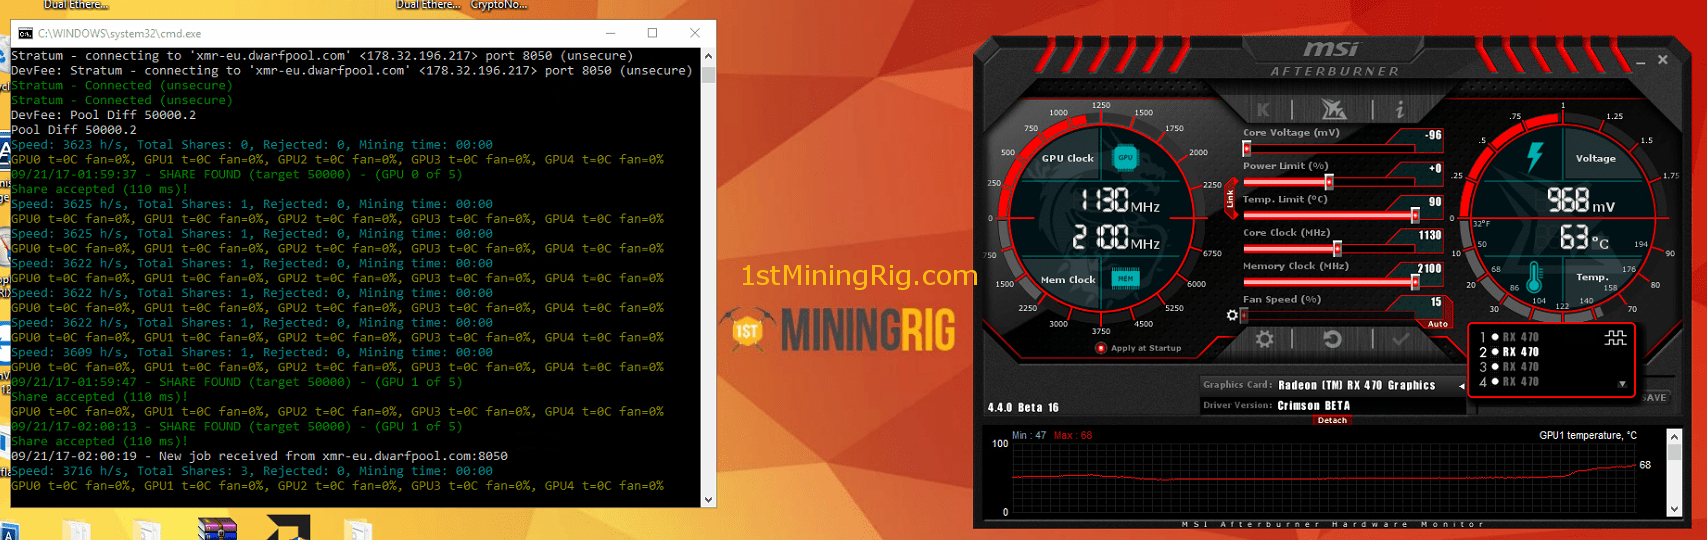
- If you want to control the fans directly from miner’s .bat file, you can add right after -p x the following -tstop 85 -tt 65 -fanmin 60 -fanmax 100, also you can control the clocks and voltage, all you have to do is to use the following commands: for setting up the clocks -clock (core clock) and -mclock (memory clock), as for undervolting -cvddc (core clock) and -mvddc (memory clock). This time i am using a rig of 5x Sapphire Nitro+ RX 470 4gb and the command line will look like this -cclock 1130 -mclock 2100 -cvddc 875 -mvddc 900 (note that you still have to find the best clocks and udnervolt for your rig, this is how mine works the best)’
- Finally the whole command line will look like this NsGpuCNMiner.exe -o stratum+tcp://xmr-eu.dwarfpool.com:8050 -u WALLET_ADDRESS.Rig1 -p x -tstop 85 -tt 65 -fanmin 60 -fanmax 100 -cclock 1130 -mclock 2100 -cvddc 875 -mvddc 900 (don’t miss the GPU allocations from above)
- That’s it, double click start.bat file to start mining

I will not be able to post my results because i don’t have a AMD GPU card to mine, i will only show you how to do it.
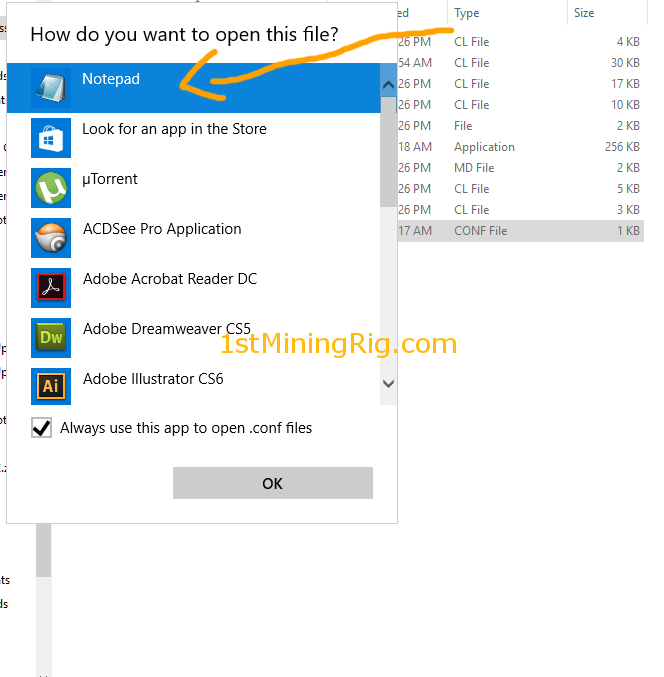
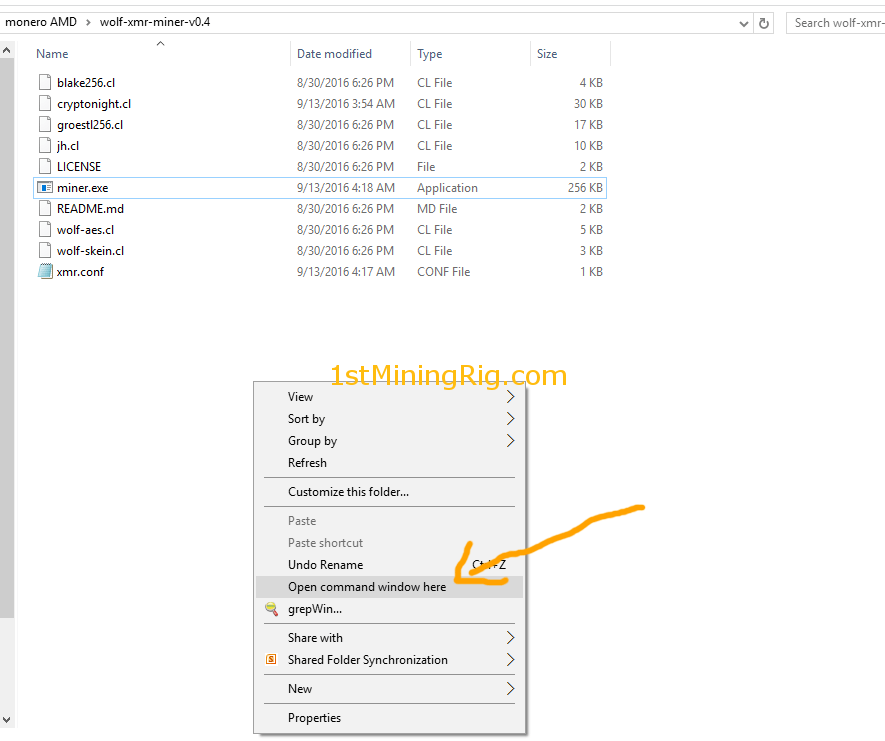
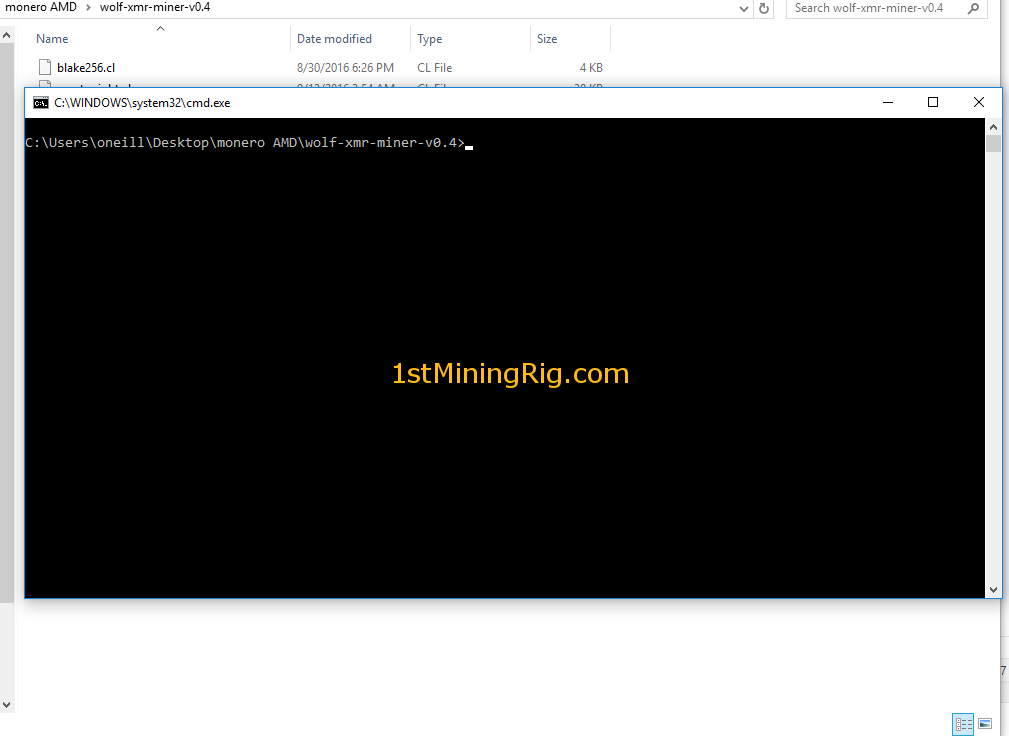
1 Download the mining software, this time we will be using Wolf’s OpenCL XMR Miner for AMD GPUs 2 Extract the contents from archive 3 Now open “xmr.conf” file with notepad. Hold “SHIFT” button then right click on “xmr.conf” and you will see at the top a new line “Open with“, click on that and then select “Notepad”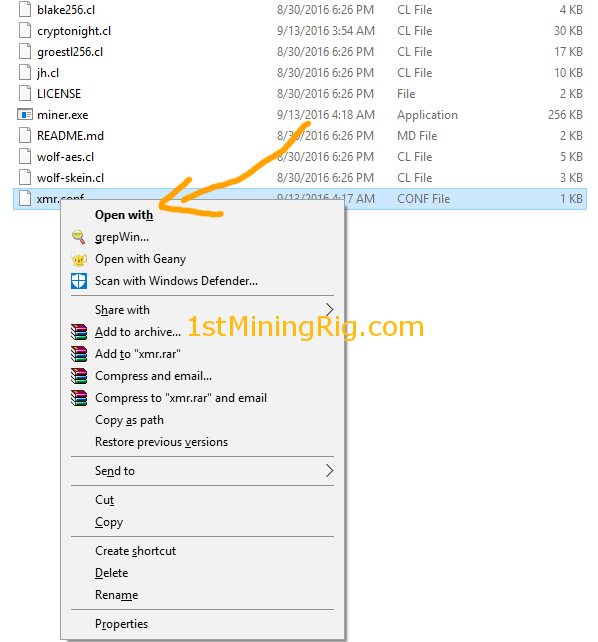

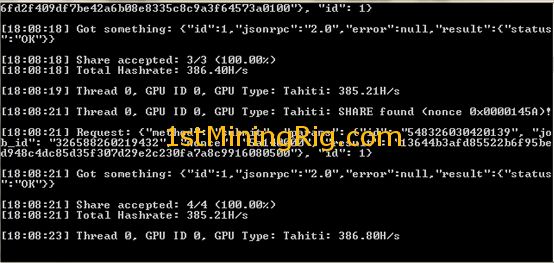
Make sure you adjust you proper settings to xmr.conf file and also read carefully readme file !
Have fun!
[cp_modal display="inline" id="cp_id_e9e92"][/cp_modal]


is this guide updated? is it normal to see no changes in monerohash for pending balance while mining? or should i see it live
Yes, the guide is still good, but if you will mine with GPU give it a try with Claymore’s CryptoNote GPU Miner https://bitcointalk.org/index.php?topic=638915.0 , compare hashrate speed.
im using Nvidia GT 730, is it better to use Claymore’s CPU miner or Cryptonight GPU miner. btw the stats showing in monerohash, is it live or delayed? i feel like im not getting anything. sorry noob here. that’s why im asking alot.
Use GPU miner, before to see stats you will have to send at least one share.. wait a few minutes.
Does the ‘MONERO NVIDIA GPU MINING’ instructions work with Claymore’s GPU miner?
I’m also trying mine monero with RX 480 with this guide! http://www.thecryptomining.info/2017/05/profitable-monero-mining-rig-producing.html
hii, when i enter my wallet adresse monerohash say “Not found”
Can you help me please ? Thank you
Its ok, after 5 hours i am add in the website list
hii, i have 5 computer they Hash to 260 /S and on the MoneroHash website i have only 8 H/S why ? thankk …
Claymore link in the article above alerts McAfee as a Trojan miner. Same with Wolf. Does anyone have a Monero miner that doesn’t get quarantined?
I cannot even get the mega to download. just open the site and sit there idle
My computer says miner is not a valid comand Am I missing a step?
PS C:UsersduckDesktopMinerswolf-xmr-miner-master> miner xmr.conf
miner : The term ‘miner’ is not recognized as the name of a
cmdlet, function, script file, or operable program. Check the
spelling of the name, or if a path was included, verify that the
path is correct and try again.
At line:1 char:1
+ miner xmr.conf
+ ~~~~~
+ CategoryInfo : ObjectNotFound: (miner:String) [], C
ommandNotFoundException
+ FullyQualifiedErrorId : CommandNotFoundException
just download the newer version of the wolf. in the extracted files should you find a miner.exe file
after i type miner xmr.conf it says; Share rejected (invalid address used for login): -1/0 (inf%)
what is this?
did i do something wrong when i was configuring the xmr.conf?
Thank you after looking through so many videos on how to mine XMR your guide is the only one that worked.
I am battling to mine Monero using an ATI Radeon HD 5770. I am new to this and I have only been using Minergate. Minergate however does not see my GPU. How can I accomplish mining with this card? Please could somebody send me exact details…even if it means I must use a console app.
Hello Ciprian,
I wanted to know if it’s possible for you to make a new article about monero mining now that it’s more profitable than ETH, like configuration and optimization for maximizing hashrate.
Thank you for everything.
Patrick
Yeah.. i am about to make a new one.. thanks!
Hi,
for CPU mining I receive this error message.
Any ideas?
“id”:1,”jsonrpc”:”2.0″,”error”:{“code”:-1,”message”:”invalidaddressusedforlogin”}
i use minegate other pool minemonero.pro but i am not withdraw i use too monero gui help me please
i have a saphire nitro+ rx580 8 gb what would be ideal rawintensity.. at moment using this guide cpu/gpu mining i get about 700/hs….could i get more if increase rawintensity….
i wanna check my balance and stats and on monerohash site it asks me to enter my address to lookup.. which address do i need to put in there and where can i find it?
Did claymore updated his miner? he said in 2 weeks time new version will be released. i keep on demanding to reduce the fee to 1% lol… im using SGMINER 0 fee. having RX580 @ 850Hs each.. if claymore can do a merge mine or dual mine option to his new version that 2% would be OK i guess?..
Hey Jason, I am trying to get my RX580s working with SGMINER as well. So far working fine and steady on claymore, but wanting to try sgminer for better results. Can you share which sgminer version you use, and what settings/commands you run in your batch file? I following all examples, but not seeing much happening after I run it, whether I run sgminer.exe directly and fill in the info, or use batch (with or without config both).
the nvidia ccminer says it is missing a file msvcr100.dll so it can’t initiate
just an update. Claymore’s Cryptonote 10.1 is now out.. w/ lower dev fee from 2% to 1%. thou it seems that the hashrate in SGMINER 5.5.5 is more reliable..
Yep, ill make a test and full tutorial about it.. also comparison between previous version and 10.1 one , thanks 🙂 , have you received the items ?
On its way dude thanks hehe.. and i have a bad news haha! SATAcable burnt.. lol.. got three cards on one cable.. i always keep in my mind to avoid this, but i missed this one… good thing the cards are safe.. lol.. https://uploads.disquscdn.com/images/2c4ae965067759f852e019c914ebbac4b6327189101b0662e7e278a3c00e5da8.jpg
Ooops.. what psu ?
CORSAIR 850w. im using old desktop which can support 3GPU’s. at first i have this error in Claymore
04:03:45:115 d98 GPU 0: got incorrect temperature 511, ignore
04:03:45:123 d98 GPU 1: got incorrect temperature 511, ignore
04:03:45:130 d98 GPU 2: got incorrect temperature 511, ignore
and then i noticed that the GPU temp in GPU-Z is Ok. so i checked each risers, yet risers are all Ok.. so i check all the cables from PSU to make sure all cards are safe as i was thinking that PSU is providing so much power.. then i saw one SATA cable that got burnt. well.. lesson learned.. dont plugged 3 GPU in 1 SATA cable at a time…
hi, i can’t mining with claymore cryptonote 10.2, i follow all the steps, but claymore wont start, only shows this “No pools specified! Specify at least one valid pool in -xpool parameter”, what should i do?
can you show me your bat file settings ?
Hi, can I mine Monero using a single Video Card? Will that still be profitable? If not, how many Video Card should I install to make mining XMR profitable? Thanks.
Yes, it can be profitable mining with only one GPU too!
Oh that’s great. I’m planning to buy a computer this month and going to use 1 video card at first, then, will buy 2 or 3 video cards depending on my earnings to gain more mining power.
Claymore’s CryptoNote Windows CPU Miner was deleted by my system calling it a virus. Probably won’t be using that. The virus is called Fuerboos.C!cl
it is not a virus 🙂